There is a certain freedom that comes with age, a liberation from the expectations and pressures of youth that allows you to embrace who you truly are. This freedom is often reflected in the choices women make about their appearance, including their hair. For women over 60, the messy pixie haircut has emerged as a powerful statement of confidence, style, and authenticity. It is a look that says you are comfortable in your own skin, unafraid to break the rules, and ready to embrace a modern, effortless aesthetic.
The messy pixie haircut for women over 60 is a perfect blend of edgy and feminine, offering a style that is both bold and soft. The messy texture adds volume and movement, which is especially flattering for hair that may have become finer with age. The cut is low-maintenance, allowing for a wash-and-go style that still looks polished and put-together. The choppy, piecey layers also soften facial features, creating a youthful, vibrant appearance. It is a cut that defies age and celebrates individuality.
In this guide, we will explore a variety of messy pixie haircuts that are perfect for women over 60. We will cover styles ranging from soft and subtle to bold and dramatic, ensuring there is a look for every personality and hair type. We will also provide styling tips, product recommendations, and maintenance advice to help you achieve and maintain a messy pixie that makes you feel confident and stylish. Get ready to embrace the freedom and beauty of a modern, messy pixie.
12 Messy Pixie Haircuts for Women Over 60
Here are fourteen messy pixie haircuts that exude confidence and style for women over 60.
1. Classic Messy Pixie
The classic messy pixie features choppy, textured layers that create volume and movement. The messy texture adds a youthful, relaxed feel while maintaining a stylish silhouette. This cut is low-maintenance and incredibly flattering for women over 60.
2. Textured Messy Pixie
A textured messy pixie uses soft, tousled layers to create dimension and movement. The added texture gives the hair a modern, relaxed appearance. This style is ideal for enhancing natural volume and body, making it perfect for thinner hair.
3. Choppy Messy Pixie
Choppy layers give the messy pixie an edgy, modern feel. The piecey texture adds movement and visual interest, making this a bold choice for women who want a statement look. A little pomade or texture spray is all you need to style this look.
4. Messy Pixie with Side-Swept Bangs
Side-swept bangs add softness and elegance to the messy pixie silhouette. The angled fringe gently frames the face and highlights cheekbones, creating a graceful and refined look. This style is versatile and flatters many face shapes.
5. Voluminous Messy Pixie
A voluminous messy pixie focuses on lift at the crown and fullness throughout the cut. Strategic layering creates depth and dimension, making this an excellent choice for fine or thinning hair. The result is a fuller, more youthful appearance.
6. Feathered Messy Pixie
Feathered layers create a light, airy feel that softens facial features. This messy pixie moves naturally and feels feminine and graceful. It works well for straight or slightly wavy hair and requires minimal styling.
7. Asymmetrical Messy Pixie
An asymmetrical messy pixie features uneven lengths for a stylish twist. One side slightly longer adds interest and drama, bringing attention to facial features and creating a modern edge. This cut is bold, confident, and fashion-forward.
8. Messy Pixie with Curtain Bangs
Curtain bangs add a soft, face-framing element to the messy pixie. The bangs part in the middle and sweep to the sides, creating a romantic and trendy look. This style is polished yet effortless, perfect for any occasion.
9. Messy Pixie with Highlights
Highlights add significant dimension to a messy pixie, making the layers pop and the style look more dynamic. The color variation creates depth and visual interest, giving the illusion of more volume and texture.
10. Short Stacked Messy Pixie
A short stacked messy pixie features a stacked back that adds volume and lift. The layers are concentrated at the crown, creating a rounded, full silhouette. This style is especially flattering for those with fine hair.
11. Messy Pixie with Wispy Ends
Wispy ends give the messy pixie a soft, romantic feel. The ends are light and delicate, blending seamlessly into the layers. This style is elegant and feminine, perfect for those who want a softer take on the pixie.
12. Messy Pixie with Long Bangs
A messy pixie with long bangs creates a dramatic and face-framing effect. The bangs are cut longer and can be swept to the side or worn forward for a more mysterious look. This style is elegant, versatile, and adds length to the face.
Section: Styling Tips for a Messy Pixie
Styling a messy pixie is all about embracing texture and effortlessness. The goal is to achieve a lived-in, tousled look that feels modern and cool. Start by applying a texturizing spray or mousse to damp hair, focusing on the roots and ends. Use your fingers to tousle and piece out the layers as your hair dries, or use a diffuser for added volume and texture.
A little pomade or styling cream can be rubbed between your palms and worked through the ends for piecey definition and shine. Dry shampoo is your friend for refreshing the style between washes and adding grip to the layers. To maintain the shape of your messy pixie, be prepared to visit your stylist every four to six weeks for a trim.
Frequently Asked Questions About Messy Pixie Haircuts for Women Over 60
Is a messy pixie suitable for women over 60?
Yes, a messy pixie is highly suitable and flattering for women over 60. The texture adds volume and movement, which can be especially beneficial for hair that may have become finer with age. The cut is modern, stylish, and exudes confidence.
Will a messy pixie make me look younger?
A messy pixie can create a youthful, vibrant appearance. The texture and layers soften facial features and add a modern edge that defies age. It is a fresh, confident look that can take years off your appearance.
How do I style a messy pixie?
Apply a texturizing spray or mousse to damp hair and use your fingers to tousle and piece out the layers as it dries. A little pomade can define the ends. Dry shampoo adds grip between washes.
How often should I trim a messy pixie?
To maintain the shape and layers of a messy pixie, it is recommended to get a trim every four to six weeks. This will keep the style looking fresh and prevent it from growing out awkwardly.
Can I have a messy pixie if I have curly hair?
Absolutely. A curly messy pixie embraces natural curls and adds volume and texture. The layers allow curls to spring up with bounce and movement, creating a playful, confident look.
Conclusion
The messy pixie haircut is a powerful and liberating choice for women over 60, offering a style that is both modern and timeless. It exudes confidence, celebrates individuality, and embraces the natural beauty of aging. Whether you choose a classic, textured, or silver variation, the messy pixie is a cut that will make you feel stylish, vibrant, and unapologetically yourself. Embrace the freedom and beauty of a messy pixie and discover the transformative power of a haircut that reflects your inner confidence.
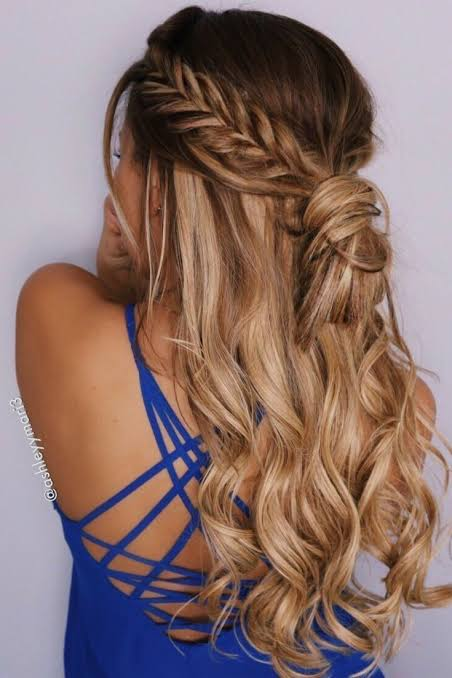
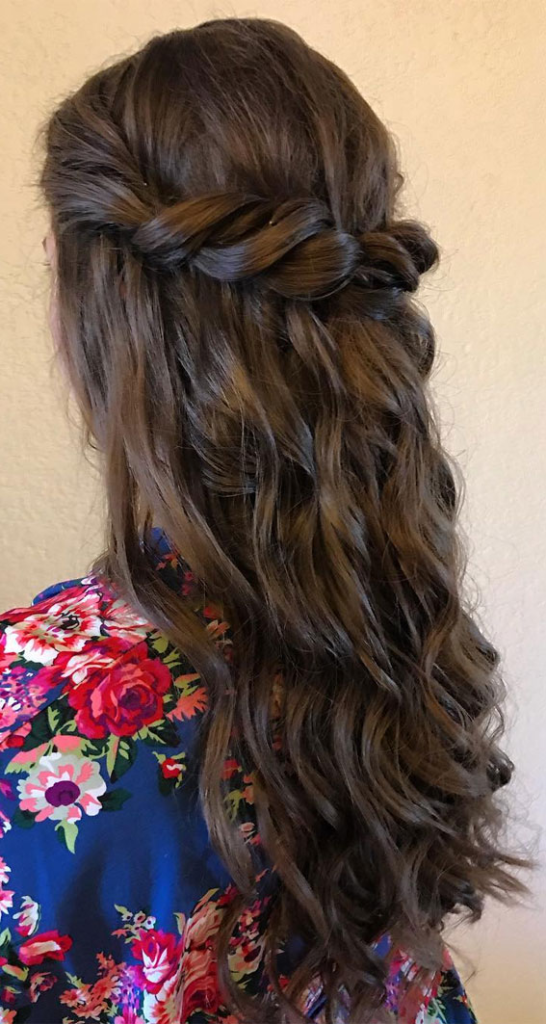
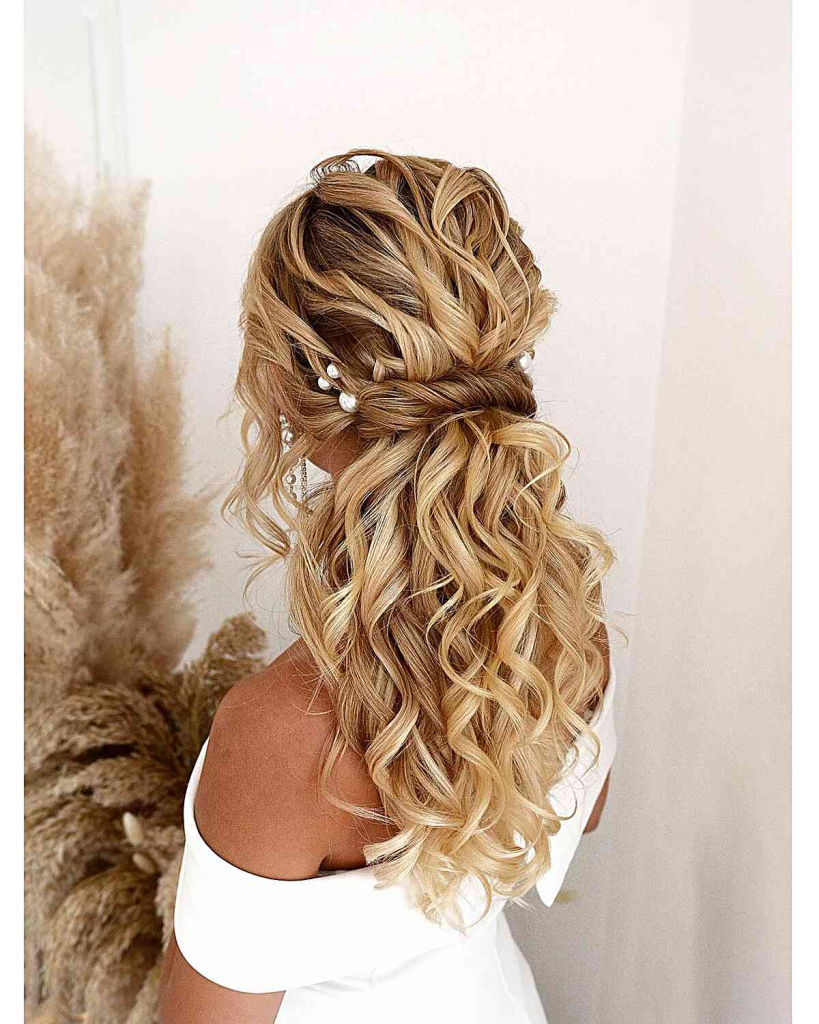
Thick hair is a beautiful blessing, but it can also be a styling challenge. The weight and volume that make it so luscious can also make it difficult to manage, especially when you want to create an elegant, stylish look. The half up half down braid is a stunning solution that works beautifully with medium length hair, allowing you to showcase your hair’s natural volume while keeping it off your face in a chic, practical style. This versatile look is perfect for everything from casual days to formal events.
The appeal of medium length hairstyles for thick hair half up half down braid styles lies in their ability to balance practicality with beauty. The half up half down style allows you to showcase the length and volume of your hair while keeping the front sections neatly styled. Adding a braid elevates the look, creating a sophisticated, romantic, or boho vibe depending on the braid style you choose. From simple three-strand braids to intricate Dutch braids and fishtails, there is a variation to suit every occasion and personal style.
In this guide, we will explore a variety of medium length hairstyles for thick hair that incorporate the half up half down braid. We will cover different braid styles, from classic to modern, and provide step-by-step instructions for creating each look. We will also share tips on how to manage thick hair for these styles, including product recommendations and techniques for keeping your braid secure and polished. Get ready to elevate your hairstyle game with these stunning braided looks.
12 Medium Length Hairstyles for Thick Hair Half Up Half Down Braid
Here are twelve stunning half up half down braid styles for medium length thick hair.
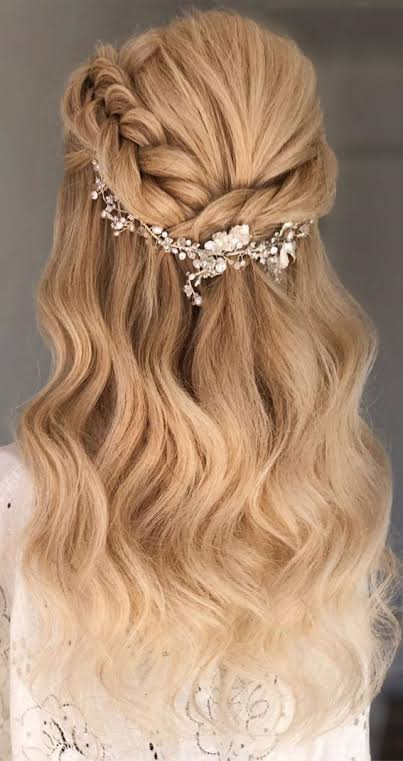
1. Classic Half Up Half Down Braid
The classic half up half down braid is a timeless and elegant style. Take the top section of your hair and divide it into three sections. Braid a simple three-strand braid, securing it with a clear elastic. The braid adds texture and interest to the top of the style, while the rest of your hair flows freely.
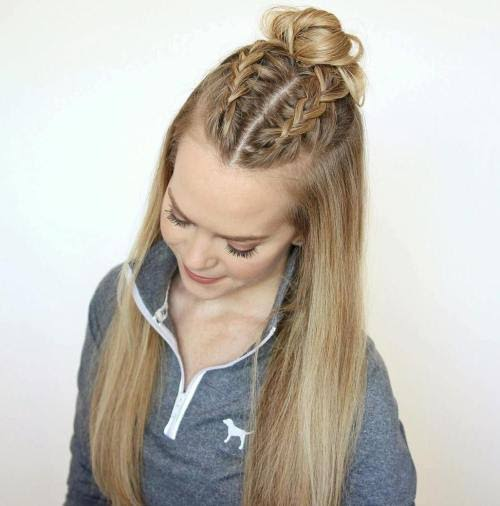
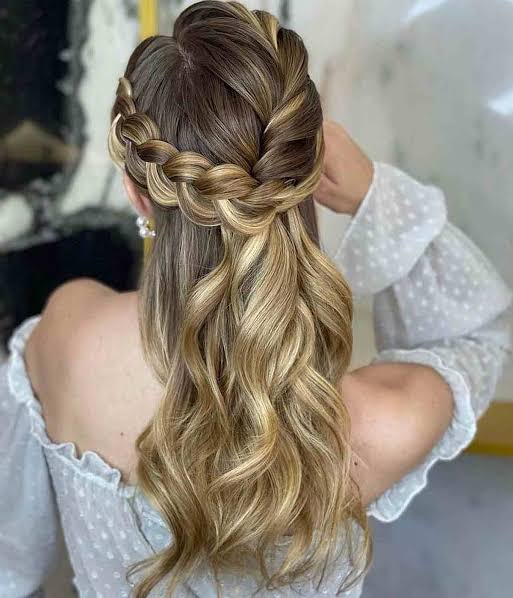
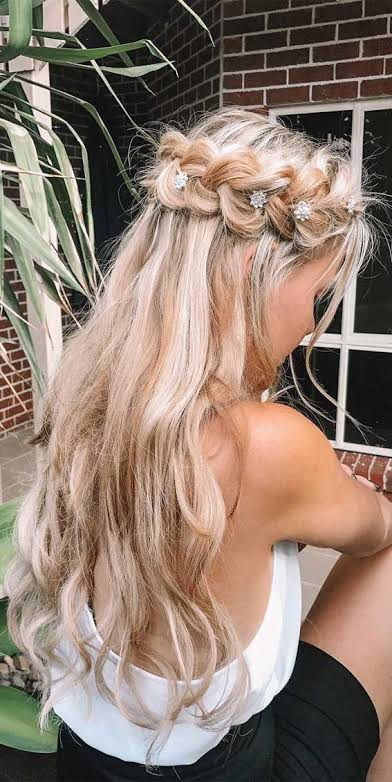
2. Dutch Braid Half Up Half Down
A Dutch braid is a beautiful variation that appears raised above the hair surface. Braid the top section of your hair in a Dutch braid, crossing the strands under instead of over. This creates a stunning, three-dimensional effect. Secure the braid at the back and let the rest of your hair fall naturally.
3. Fishtail Braid Half Up Half Down
A fishtail braid adds a romantic, bohemian feel to the half up half down style. Divide the top section of your hair into two sections. Take a small piece from the outside of the left section and cross it over to the right. Repeat on the other side, alternating until you reach the desired length. Secure with an elastic.
4. French Braid Half Up Half Down
A French braid is a classic and elegant choice. Start at the crown and begin braiding, adding in small sections of hair as you work your way down. Once you reach the nape of your neck, secure the braid and let the remaining hair flow free. This style is sophisticated and beautiful.
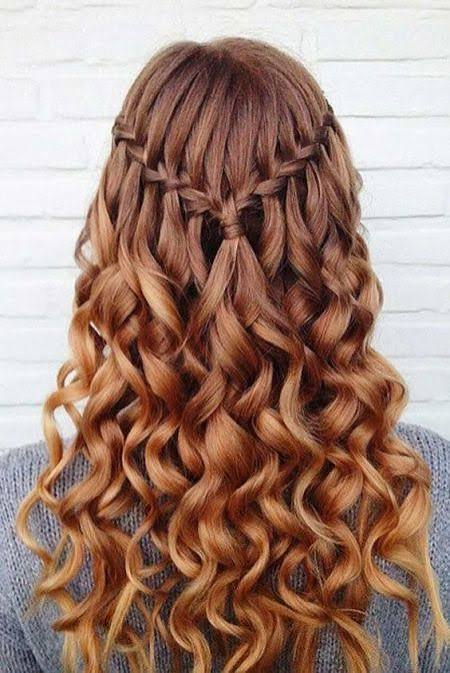
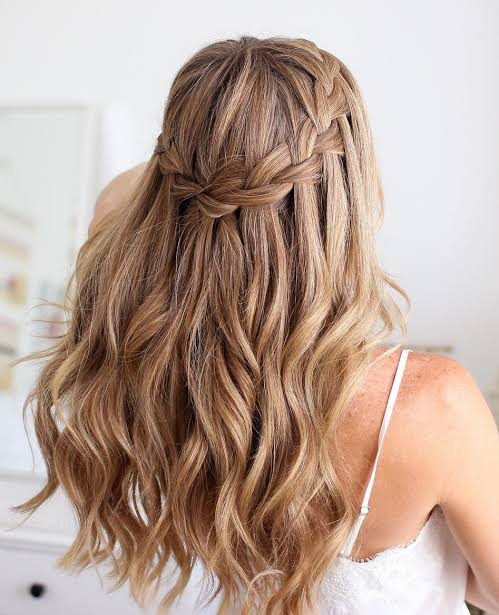
5. Waterfall Braid Half Up Half Down
The waterfall braid is a stunning and romantic style that creates the illusion of water cascading down your hair. Start a French braid at the side of your head, but instead of adding all the hair to the braid, drop the bottom section and let it fall into the rest of your hair. This creates a beautiful, cascading effect.
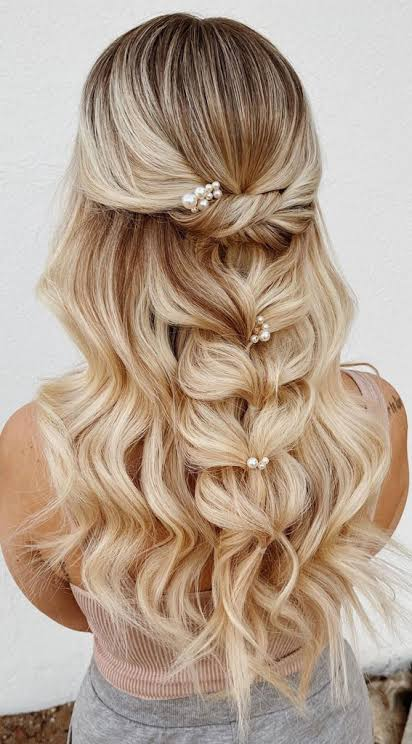
6. Pull-Through Braid Half Up Half Down
A pull-through braid is a modern and stylish variation. Divide the top section of your hair into two sections. Tie the bottom section over the top section with a small elastic, then pull the top section through the middle to create a loop. Repeat this process down the length of the hair to create a beautiful, textured braid.
7. Rope Braid Half Up Half Down
A rope braid is a simple yet stunning style that involves twisting two sections of hair around each other. Divide the top section of your hair into two sections and twist each section tightly. Wrap the twisted sections around each other and secure with an elastic. This creates a beautiful, rope-like effect.
8. Crown Braid Half Up Half Down
A crown braid is a regal and elegant style. Braid two sections of hair from the sides of your head, bringing them across the top and securing them at the back. This creates a crown-like effect that is perfect for special occasions.
9. Messy Braid Half Up Half Down
For a more relaxed, bohemian look, a messy braid is a perfect choice. Braid the top section of your hair loosely, pulling on the edges to create a undone, textured look. The messy braid adds a casual, effortless vibe to the half up half down style.
10. Zig-Zag Braid Half Up Half Down
A zig-zag braid adds a unique, playful element to the half up half down style. Braid the top section of your hair in a zig-zag pattern, using small sections of hair to create a dynamic, eye-catching braid. This style is fun and modern.
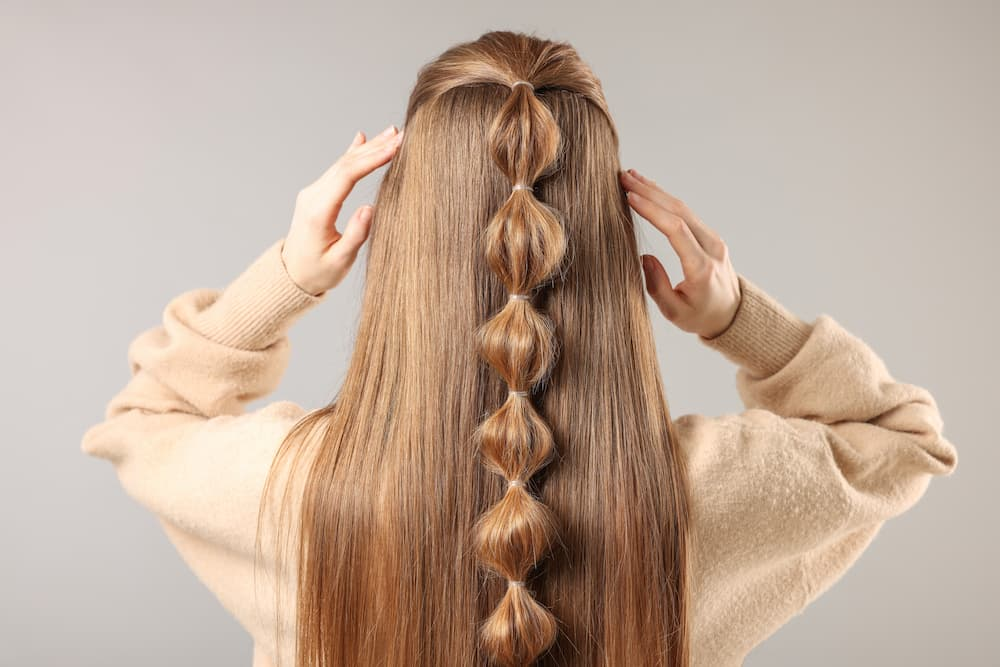
11. Bubble Braid Half Up Half Down
The bubble braid is a trendy and fun style that creates a series of bubbles along the braid. Secure the top section of your hair in a ponytail, then use small elastics to create sections along the length of the ponytail. Gently pull on each section to create a bubble effect.
12. Side Braid Half Up Half Down
A side braid adds asymmetry and interest to the half up half down style. Take the top section of your hair from one side and braid it down the side of your head, securing it at the back. This creates a beautiful, face-framing effect that is both elegant and modern.
Section: Styling Tips for Thick Hair Half Up Half Down Braids
Styling thick hair into a half up half down braid requires a few key techniques. Start by using a texturizing spray or dry shampoo to add grip to your hair, making it easier to braid and hold the style. Use a strong-hold hairspray to secure the braid and prevent flyaways. If your hair is very thick, consider using a small amount of styling cream to smooth the hair and reduce frizz.
When braiding thick hair, use small, even sections to create a clean, polished braid. Keep the braid taut to ensure it holds its shape. Secure the braid with a clear or coordinating elastic, and use bobby pins to secure any loose strands. Finish with a light-hold hairspray to keep the style in place without weighing it down.
Frequently Asked Questions About Half Up Half Down Braids for Thick Hair
Is a half up half down braid suitable for thick hair?
Yes, a half up half down braid is a beautiful and practical choice for thick hair. It allows you to showcase your volume while keeping hair off your face. The weight of thick hair can actually help the braid hold its shape beautifully.
How do I keep my braid secure in thick hair?
Use a texturizing spray or dry shampoo to add grip to your hair. Braid tightly and secure with a strong-hold elastic. Use bobby pins to secure any loose strands and finish with a light-hold hairspray.
What is the best braid for thick hair?
A Dutch braid, French braid, or fishtail braid are all excellent choices for thick hair. These braids hold their shape well and look full and beautiful with thick strands.
Can I do a half up half down braid on medium length hair?
Yes, medium length hair is ideal for half up half down braids. The length allows the braid to be visible and adds to the overall look. Braids work beautifully on hair that is at least shoulder-length.
How do I prevent my braid from frizzing?
Use a styling cream or serum to smooth the hair before braiding. Finish with a light-hold hairspray to control flyaways and keep the braid looking polished.
Conclusion
Medium length hairstyles with a half up half down braid are a stunning and versatile choice for women with thick hair. From classic three-strand braids to intricate Dutch braids and trendy bubble braids, there is a style to suit every occasion and personal preference. These looks allow you to showcase your hair’s natural volume while keeping it practical and stylish. With the right techniques and products, you can create a beautiful, polished braid that will turn heads wherever you go.
For too long, the world of men’s hairstyles has been dominated by straight, sleek looks that leave curly-haired men feeling like they have limited options. The truth is that curly hair is a gift, offering texture, volume, and a distinctive personality that straight hair simply cannot replicate. The right curly haircut can be a powerful statement of style and confidence, celebrating natural texture and creating a look that is both modern and masculine.
The best short curly haircuts for men are designed to work with your natural curl pattern, not against it. The key is to find a style that embraces your curls, whether they are tight coils, loose waves, or anything in between. From classic crew cuts with texture to modern fades and tapered styles, there is a curly haircut that will flatter your face shape and lifestyle. The right cut will also make your curls easier to manage, reducing frizz and enhancing definition.
In this guide, we will explore a variety of short curly haircuts for men that are modern, stylish, and masculine. We will cover everything from low-maintenance styles to more polished looks, ensuring there is a style for every man and every occasion. We will also provide styling tips, product recommendations, and maintenance advice to help you keep your curls looking their best. Get ready to embrace your natural texture and discover a haircut that makes you feel confident and handsome.
12 Short Curly Haircuts for Men
Here are fifteen short curly haircuts for men that are modern, stylish, and masculine.
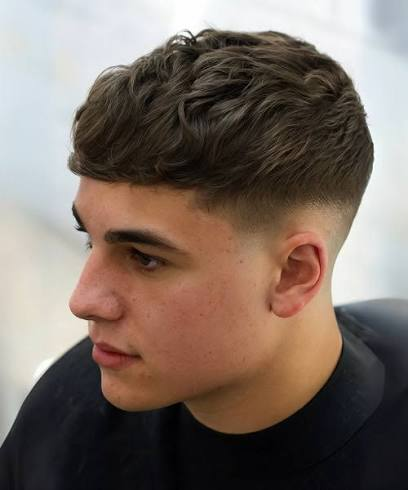
1. Textured Crew Cut
A textured crew cut is a classic, low-maintenance style that works beautifully with curly hair. The top is cut short but with enough length to showcase the natural curl pattern, while the sides and back are tapered. This style is clean, masculine, and incredibly versatile.
2. Curly Fade
A curly fade is a modern and stylish cut that features a gradual fade from short to long. The curls on top are left longer to showcase the texture, while the sides are faded for a clean, sharp look. This style is bold, contemporary, and very popular.
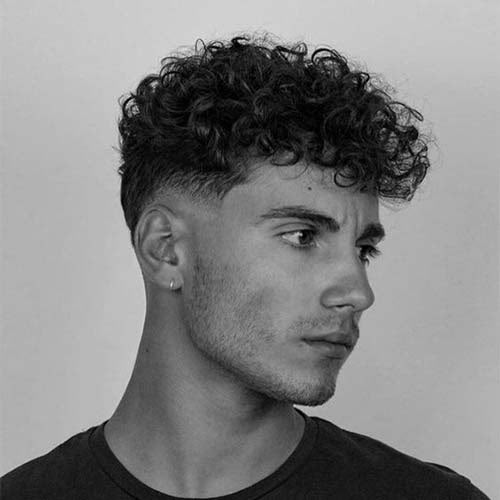
3. Tapered Curly Cut
A tapered curly cut features longer curls on top that gradually shorten towards the sides and back. This creates a clean, polished silhouette that is both professional and stylish. The taper allows the curls to shine while keeping the overall look neat.
4. Curly Quiff
A curly quiff adds height and volume to the front of the hair, creating a bold, confident look. The curls are styled up and back, adding structure and definition. This style is perfect for men who want a modern, eye-catching look.
5. Curly Pompadour
A curly pompadour is a classic, sophisticated style that features volume and height at the front. The curls are styled up and back, creating a dramatic, polished silhouette. This style is ideal for formal occasions or men who want a refined look.
6. Curly Caesar Cut
The Caesar cut is a timeless style that works beautifully with curly hair. The hair is cut short and uniform, with a fringe that falls forward. This style is low-maintenance, masculine, and perfect for men who want a classic, no-fuss look.
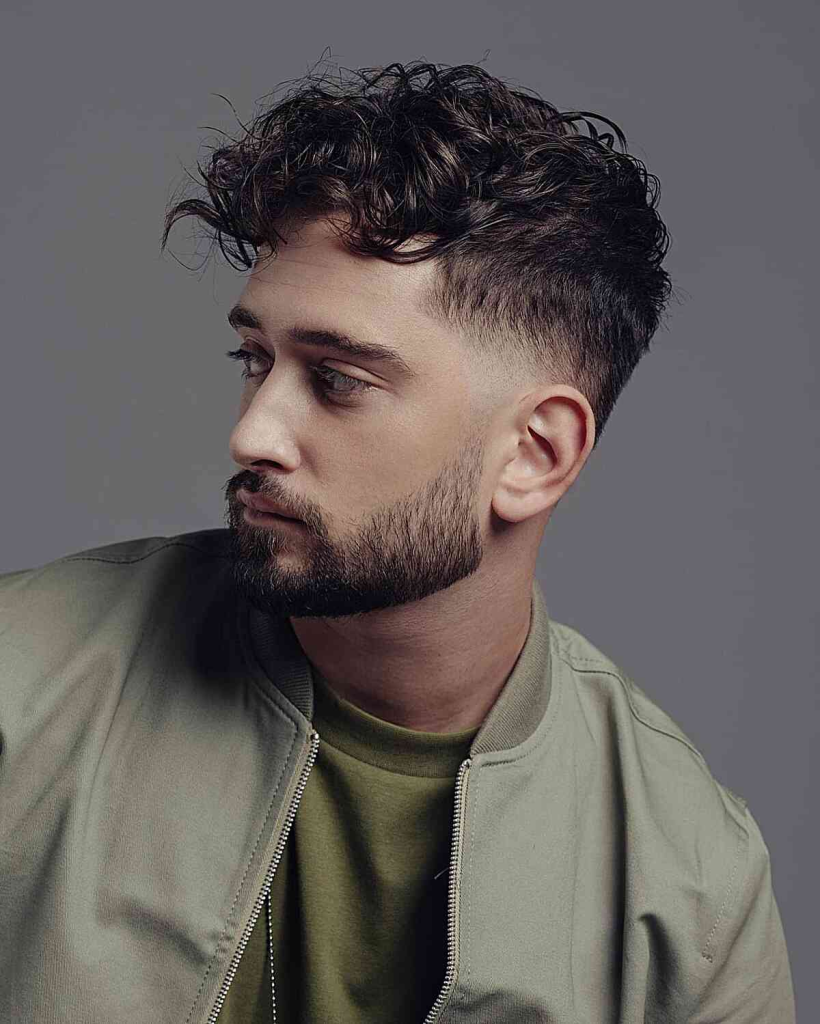
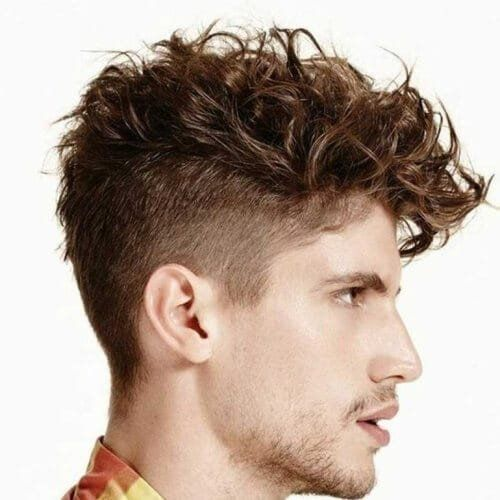
7. Curly Undercut
A curly undercut features short, faded sides and longer curls on top. The contrast between the short sides and the voluminous curls creates a bold, modern look. This style is edgy, stylish, and perfect for men who want to make a statement.
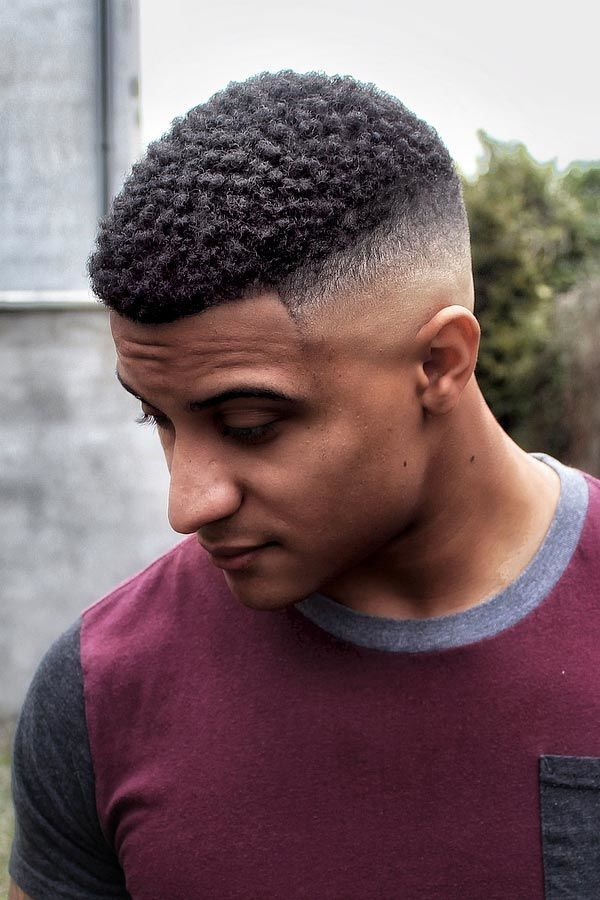
8. Curly Buzz Cut
A curly buzz cut is the ultimate low-maintenance style. The hair is cut very short all over, allowing the natural curl pattern to be visible without requiring styling. This style is clean, masculine, and perfect for men who prefer a minimalist look.
9. Curly Crop
A curly crop features short, textured curls that are cut evenly all over. The crop is simple, clean, and easy to maintain. This style is versatile and works well for men with any face shape.
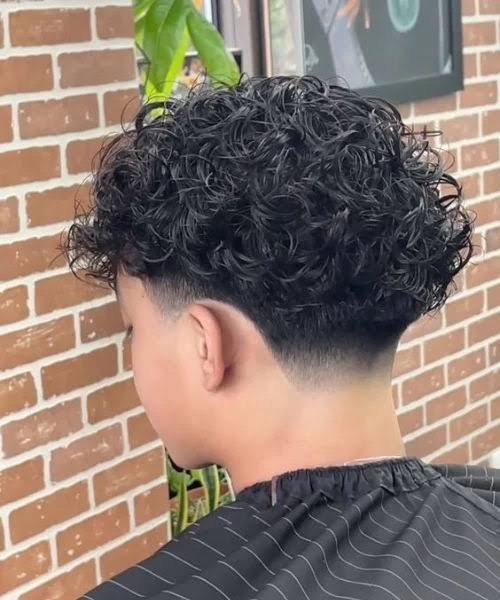
10. Curly Mohawk
A curly Mohawk is a bold, statement-making style. The curls on top are left longer and styled upward, while the sides are shaved or very closely cropped. This style is edgy, modern, and perfect for men who love to stand out.
11. Curly Side Part
A curly side part adds structure and sophistication to curly hair. The curls are styled with a defined side part, creating a polished, professional look. This style is perfect for men who want a refined, elegant haircut.
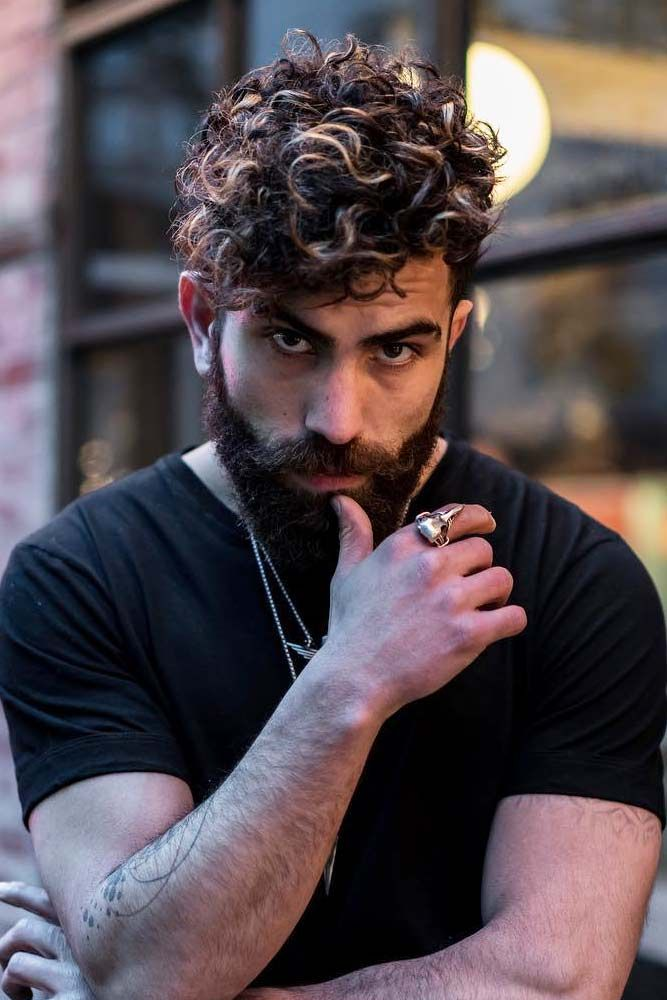
12. Messy Curly Cut
A messy curly cut is a relaxed, effortless style. The curls are left slightly longer and styled with a texturizing product to create a tousled, lived-in look. This style is perfect for men who want a casual, low-maintenance style.
Section: Styling Tips for Curly Hair
Styling curly hair starts with the right products and techniques. Use a moisturizing shampoo and conditioner designed for curly hair to keep your curls hydrated and healthy. After washing, apply a leave-in conditioner or curl cream to damp hair to define and enhance your curls.
For maximum definition, scrunch your hair as it dries, either with your hands or using a diffuser attachment on your blow dryer. Avoid brushing your curls when dry, as this can cause frizz and disrupt the curl pattern. Use a small amount of styling cream or pomade to tame flyaways and add shine. Regular trims are essential to maintain the shape of your haircut and prevent split ends.
Frequently Asked Questions About Short Curly Haircuts for Men
What is the best short haircut for curly hair?
The best short haircut for curly hair depends on your curl pattern and personal style. Textured crew cuts, fades, and tapered cuts are all excellent options. The key is to work with a stylist who understands how to cut curly hair.
Are fades good for curly hair?
Yes, fades are excellent for curly hair. The faded sides create a clean, sharp contrast with the curls on top, creating a modern and stylish look.
How do I style short curly hair?
Use moisturizing products and a curl cream or gel to define your curls. Scrunch your hair as it dries, and avoid brushing when dry. A small amount of styling cream can tame flyaways.
How often should I trim curly hair?
To maintain the shape of your haircut and prevent split ends, it is recommended to get a trim every four to six weeks.
Can I get a curly haircut if I have receding hairline?
Yes, many curly haircuts can be adapted for a receding hairline. A textured crew cut, buzz cut, or French crop can be flattering and minimize the appearance of a receding hairline.
Conclusion
Short curly haircuts for men offer a world of stylish, modern options that celebrate natural texture. Whether you prefer a classic crew cut, a bold fade, or a sophisticated pompadour, there is a curly haircut that will make you feel confident and handsome. Embrace your curls, work with a skilled stylist, and discover the transformative power of a haircut that works with your natural texture. With the right products and maintenance, your curls will be your greatest asset.
There comes a time in every woman’s life when she looks in the mirror and notices that her hair is not quite what it used to be. The volume that once seemed effortless has diminished, the strands feel finer, and the styles that worked for years no longer have the same impact. This is a natural part of aging, but it does not mean you have to settle for limp, lifeless hair. The right haircut can transform thin hair, adding volume, movement, and a youthful vitality that makes you feel confident and beautiful.
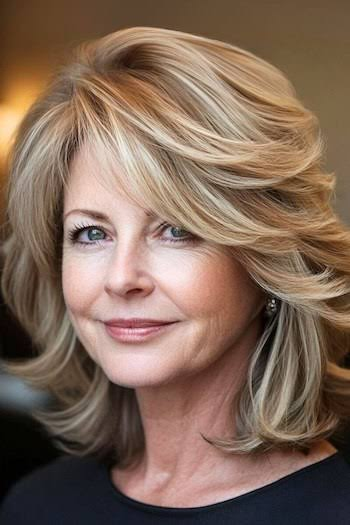
The beauty of layered hairstyles for women over 50 with thin hair lies in their ability to create the illusion of fullness and density. Strategic layering removes weight from the ends, allowing the hair to spring up with more volume at the roots. The layers also add movement and texture, making thin hair look thicker and more dynamic. Whether you prefer a short pixie, a sleek bob, or shoulder-length waves, there is a layered style that will work with your hair’s natural texture and enhance your features.
In this guide, we will explore a variety of layered hairstyles that are specifically designed to add volume and life to thin hair for women over 50. We will cover styles ranging from short and sassy to medium-length and flowing. We will also provide styling tips, product recommendations, and maintenance advice to help you achieve and maintain a voluminous look that flatters your face shape and personal style. Get ready to fall in love with your hair again.
14 Layered Hairstyles for Women Over 50 with Thin Hair
Here are fourteen layered hairstyles that add volume, movement, and life to thin hair.
1. Short Layered Pixie
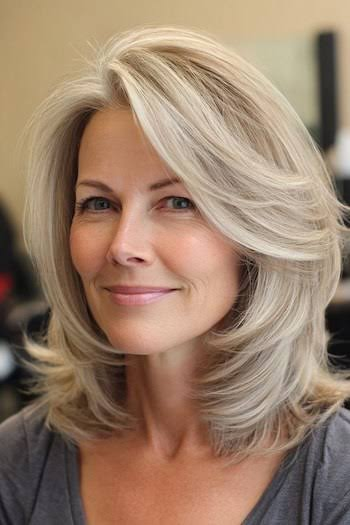
A short layered pixie is a classic and timeless choice for women with thin hair. The layers are concentrated at the crown, creating lift and volume where it is needed most. The short length reduces weight, allowing the hair to stand up with fullness. This style is low-maintenance and incredibly flattering.
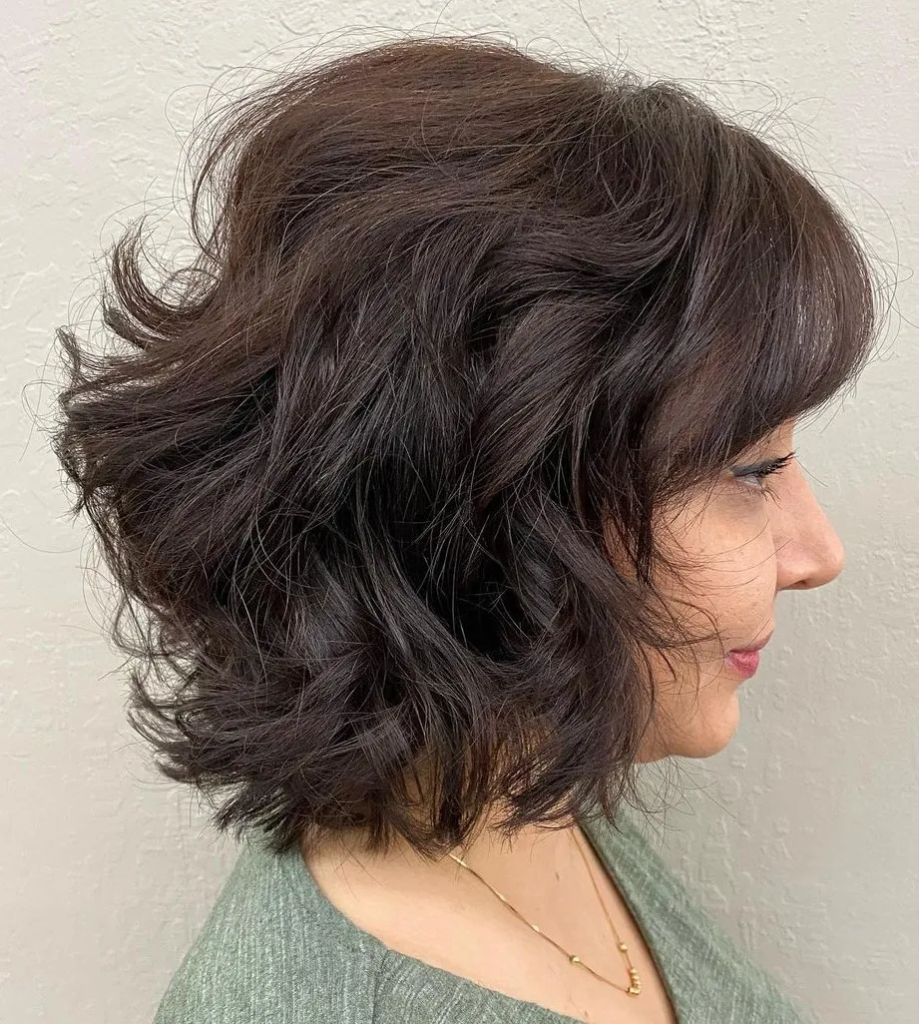
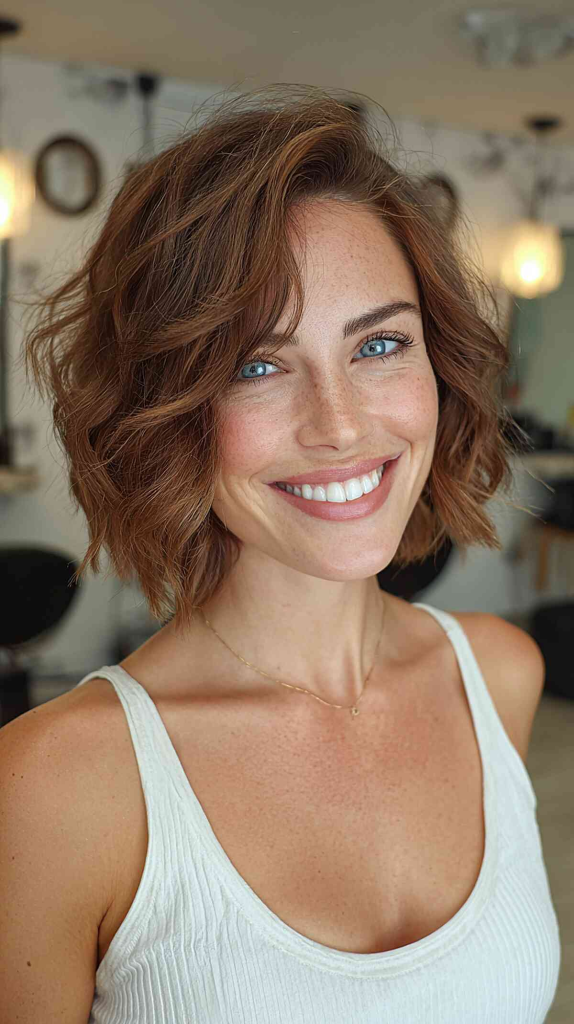
2. Textured Layered Bob
A textured layered bob uses soft, tousled layers to create movement and dimension. The layers add body to thin hair without weighing it down. This style is modern, versatile, and easy to style with a little texturizing spray and your fingers.
3. Feathered Layered Cut
Feathered layers create a light, airy feel that adds volume and softness to thin hair. The feathered ends blend seamlessly, creating the illusion of fullness. This style is feminine, graceful, and works well with straight or slightly wavy hair.
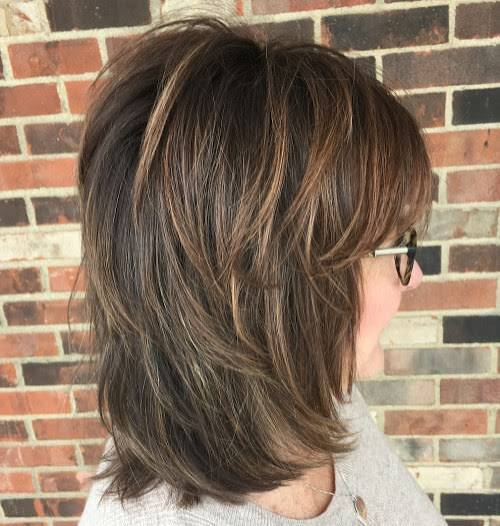
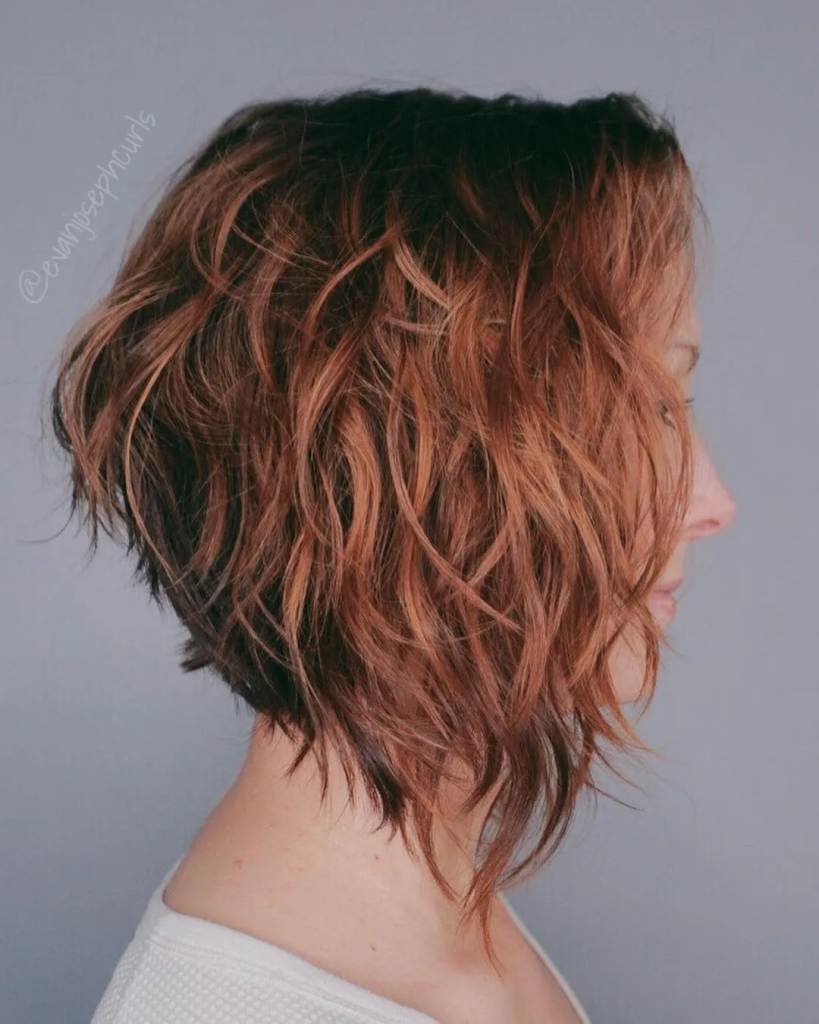
4. Layered Shag
The layered shag is a fantastic choice for thin hair. The choppy layers add texture and movement, making thin hair look thicker and more dynamic. The shag’s lived-in feel is effortlessly chic and requires minimal styling.
5. Layered Lob with Side Sweep
A layered lob (long bob) with a side sweep adds volume and asymmetry. The longer length on one side creates visual interest, while the layers add body and movement. This style is elegant, modern, and incredibly flattering for thin hair.
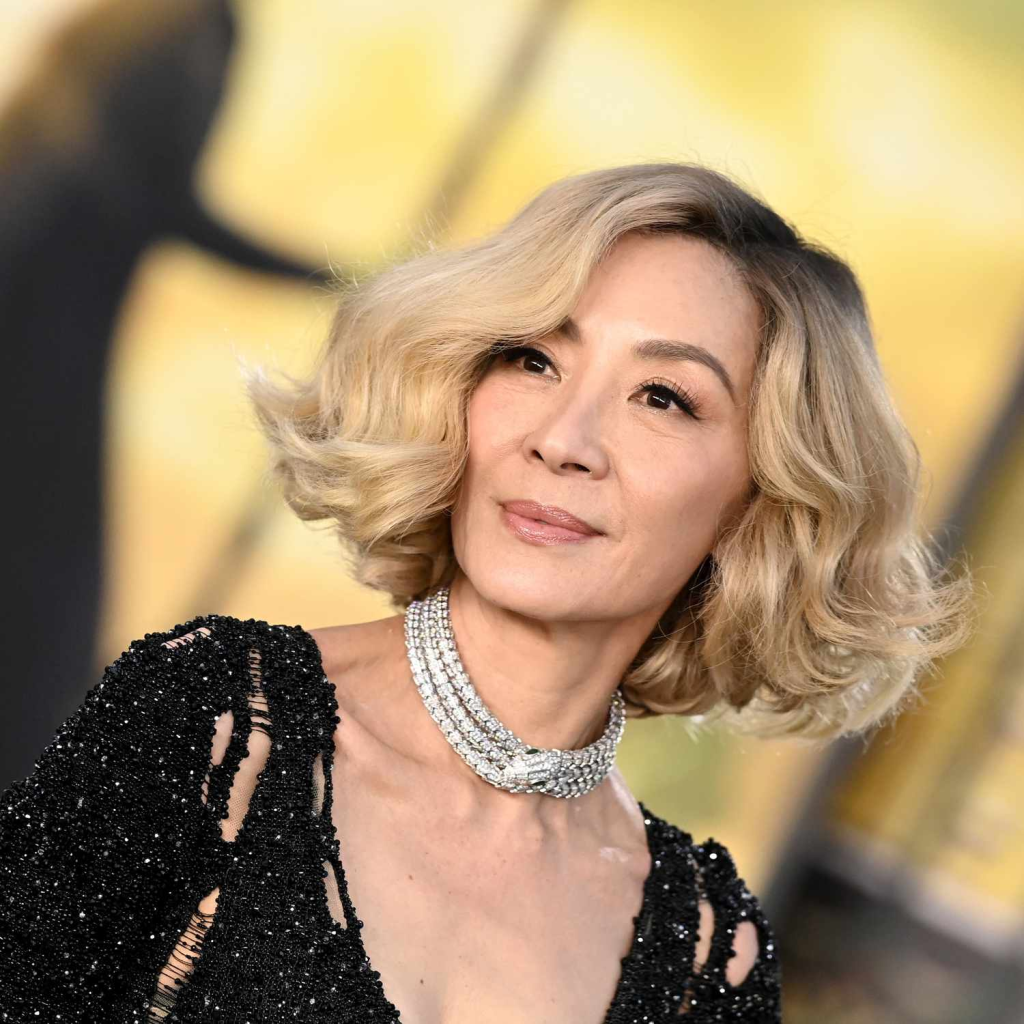
6. Stacked Layered Bob
A stacked layered bob features layers that are cut shorter in the back and gradually lengthen toward the front. The stacking creates volume and lift at the crown, making thin hair appear fuller. This style is polished, sophisticated, and timeless.
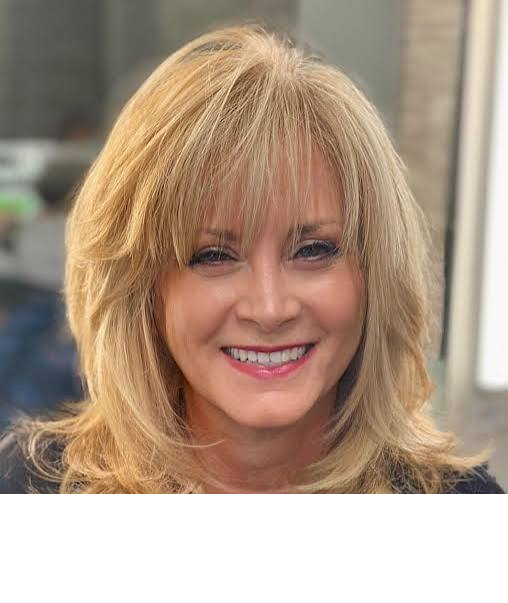
7. Layered Pixie with Wispy Bangs
A layered pixie with wispy bangs adds softness and volume around the face. The wispy bangs blend seamlessly into the layers, creating a delicate, feminine look. This style is perfect for those who want a soft, romantic feel.
8. Choppy Layered Cut
A choppy layered cut uses piecey, uneven layers to add texture and movement. The choppy ends create the illusion of thickness and density. This style is edgy, modern, and perfect for women who want a bold, statement look.
9. Layered Shoulder-Length Cut
A shoulder-length cut with soft layers is a versatile and flattering choice for thin hair. The layers add body and movement, while the length allows for various styling options. This style is elegant and easy to maintain.
10. Layered Curly Cut
For women with naturally curly or wavy hair, a layered curly cut is a beautiful choice. The layers remove weight, allowing curls to spring up with volume and bounce. This style celebrates natural texture and adds fullness to thin curls.
11. Layered Bob with Side Bangs
A layered bob with side bangs adds volume and face-framing softness. The side bangs draw attention to the eyes and cheekbones, while the layers add body and movement. This style is classic, elegant, and versatile.
12. Graduated Layered Cut
A graduated layered cut features layers that gradually lengthen from the back to the front. This creates a beautiful, sweeping line that adds volume and movement. This style is polished and sophisticated.
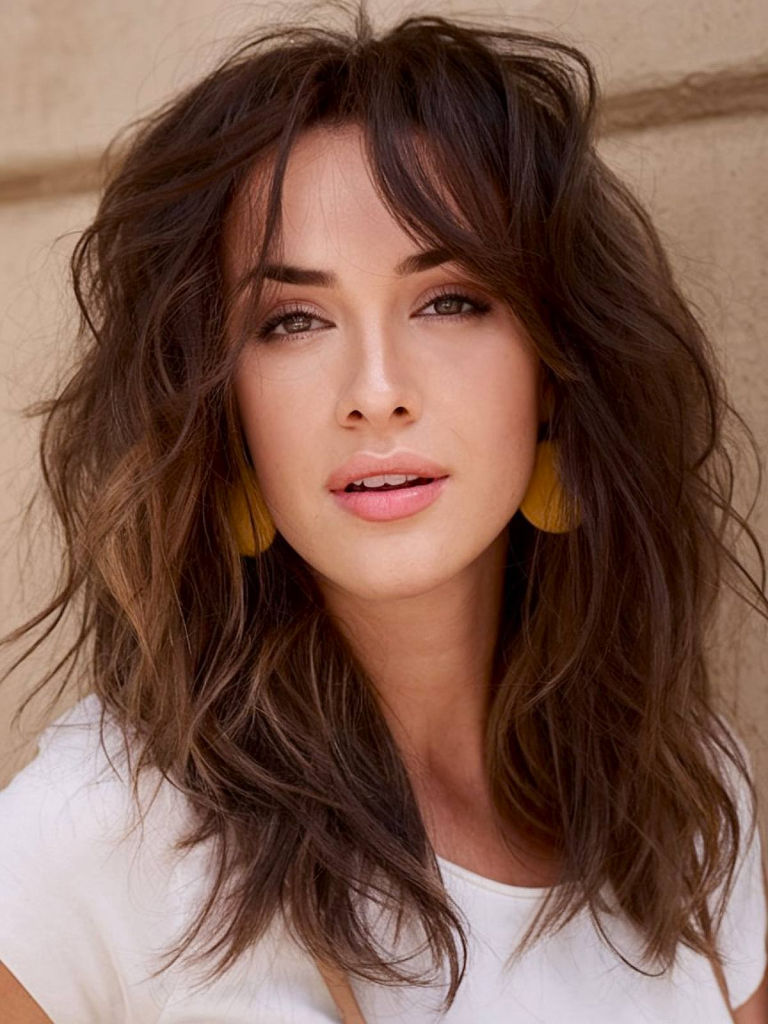
13. Layered Cut with Long Bangs
A layered cut with long, sweeping bangs adds volume and drama to thin hair. The bangs can be styled to the side or worn forward, adding fullness around the face. This style is versatile and flattering for many face shapes.
14. Soft Layered Shag
A soft layered shag removes internal weight and adds movement without trying too hard. The soft layers create a lived-in, effortless look that adds volume and texture. This style is perfect for those who want a relaxed, natural look.
Section: Styling Tips for Thin Hair
Styling thin hair starts with the right products and techniques. Use a volumizing shampoo and conditioner to add body to your hair. Apply a root-lifting spray or mousse to damp hair, focusing on the roots. Blow-dry your hair upside down to create lift at the roots, then use a round brush to add volume and smooth the ends.
A texturizing spray or dry shampoo can add grip and texture, making thin hair look thicker. Avoid heavy products that can weigh hair down and make it look flat. For added fullness, consider using a color-safe volumizing powder at the roots. Regular trims are essential to keep the layers fresh and prevent the hair from looking thin and straggly.
Frequently Asked Questions About Layered Hairstyles for Thin Hair
Are layered hairstyles good for thin hair?
Yes, layered hairstyles are excellent for thin hair. Layers remove weight from the ends, allowing the hair to spring up with more volume at the roots. They also add movement and texture, making thin hair look thicker and more dynamic.
What is the best layered hairstyle for thin hair over 50?
A short layered pixie or a textured layered bob are excellent choices. These styles add volume at the crown and are easy to maintain, making them perfect for women over 50.
How often should I trim layered thin hair?
To maintain the volume and shape of your layers, it is recommended to get a trim every four to six weeks. This will keep the layers fresh and prevent the hair from looking thin.
What products should I use for thin hair?
Use volumizing shampoo and conditioner, root-lifting spray or mousse, and texturizing spray or dry shampoo. Avoid heavy products that can weigh hair down.
Can curly hair have layers for thin hair?
Yes, layered curly cuts are beautiful for thin curly hair. The layers remove weight, allowing curls to spring up with volume and bounce.
Conclusion
Layered hairstyles are a powerful tool for women over 50 with thin hair, offering the volume, movement, and fullness that can transform your look and boost your confidence. Whether you choose a short pixie, a textured bob, or a shoulder-length cut, the right layers can make thin hair look thick, dynamic, and full of life. With the right products, styling techniques, and regular trims, you can enjoy a beautiful, voluminous hairstyle that flatters your face shape and makes you feel fabulous every day.
Pin Title: 14 Layered Hairstyles for Women Over 50 with Thin Hair That Add Volume and Life
Pin Description: Discover 14 layered hairstyles for women over 50 with thin hair that add volume and life. Transform your look with these flattering styles.
Pin Image Text: 14 Layered Hairstyles for Women Over 50 with Thin Hair | Add Volume and Life | Transform Your Look Today
12 Medium Length Hairstyles for Thick Hair Half Up Half Down Braid That Are Stunning
Thick hair is a beautiful blessing, but it can also be a styling challenge. The weight and volume that make it so luscious can also make it difficult to manage, especially when you want to create an elegant, stylish look. The half up half down braid is a stunning solution that works beautifully with medium length hair, allowing you to showcase your hair’s natural volume while keeping it off your face in a chic, practical style. This versatile look is perfect for everything from casual days to formal events.
The appeal of medium length hairstyles for thick hair half up half down braid styles lies in their ability to balance practicality with beauty. The half up half down style allows you to showcase the length and volume of your hair while keeping the front sections neatly styled. Adding a braid elevates the look, creating a sophisticated, romantic, or boho vibe depending on the braid style you choose. From simple three-strand braids to intricate Dutch braids and fishtails, there is a variation to suit every occasion and personal style.
In this guide, we will explore a variety of medium length hairstyles for thick hair that incorporate the half up half down braid. We will cover different braid styles, from classic to modern, and provide step-by-step instructions for creating each look. We will also share tips on how to manage thick hair for these styles, including product recommendations and techniques for keeping your braid secure and polished. Get ready to elevate your hairstyle game with these stunning braided looks.
12 Medium Length Hairstyles for Thick Hair Half Up Half Down Braid
Here are twelve stunning half up half down braid styles for medium length thick hair.
1. Classic Half Up Half Down Braid
The classic half up half down braid is a timeless and elegant style. Take the top section of your hair and divide it into three sections. Braid a simple three-strand braid, securing it with a clear elastic. The braid adds texture and interest to the top of the style, while the rest of your hair flows freely.
2. Dutch Braid Half Up Half Down
A Dutch braid is a beautiful variation that appears raised above the hair surface. Braid the top section of your hair in a Dutch braid, crossing the strands under instead of over. This creates a stunning, three-dimensional effect. Secure the braid at the back and let the rest of your hair fall naturally.
3. Fishtail Braid Half Up Half Down
A fishtail braid adds a romantic, bohemian feel to the half up half down style. Divide the top section of your hair into two sections. Take a small piece from the outside of the left section and cross it over to the right. Repeat on the other side, alternating until you reach the desired length. Secure with an elastic.
4. French Braid Half Up Half Down
A French braid is a classic and elegant choice. Start at the crown and begin braiding, adding in small sections of hair as you work your way down. Once you reach the nape of your neck, secure the braid and let the remaining hair flow free. This style is sophisticated and beautiful.
5. Waterfall Braid Half Up Half Down
The waterfall braid is a stunning and romantic style that creates the illusion of water cascading down your hair. Start a French braid at the side of your head, but instead of adding all the hair to the braid, drop the bottom section and let it fall into the rest of your hair. This creates a beautiful, cascading effect.
6. Pull-Through Braid Half Up Half Down
A pull-through braid is a modern and stylish variation. Divide the top section of your hair into two sections. Tie the bottom section over the top section with a small elastic, then pull the top section through the middle to create a loop. Repeat this process down the length of the hair to create a beautiful, textured braid.
7. Rope Braid Half Up Half Down
A rope braid is a simple yet stunning style that involves twisting two sections of hair around each other. Divide the top section of your hair into two sections and twist each section tightly. Wrap the twisted sections around each other and secure with an elastic. This creates a beautiful, rope-like effect.
8. Crown Braid Half Up Half Down
A crown braid is a regal and elegant style. Braid two sections of hair from the sides of your head, bringing them across the top and securing them at the back. This creates a crown-like effect that is perfect for special occasions.
9. Messy Braid Half Up Half Down
For a more relaxed, bohemian look, a messy braid is a perfect choice. Braid the top section of your hair loosely, pulling on the edges to create a undone, textured look. The messy braid adds a casual, effortless vibe to the half up half down style.
10. Zig-Zag Braid Half Up Half Down
A zig-zag braid adds a unique, playful element to the half up half down style. Braid the top section of your hair in a zig-zag pattern, using small sections of hair to create a dynamic, eye-catching braid. This style is fun and modern.
11. Bubble Braid Half Up Half Down
The bubble braid is a trendy and fun style that creates a series of bubbles along the braid. Secure the top section of your hair in a ponytail, then use small elastics to create sections along the length of the ponytail. Gently pull on each section to create a bubble effect.
12. Side Braid Half Up Half Down
A side braid adds asymmetry and interest to the half up half down style. Take the top section of your hair from one side and braid it down the side of your head, securing it at the back. This creates a beautiful, face-framing effect that is both elegant and modern.
Section: Styling Tips for Thick Hair Half Up Half Down Braids
Styling thick hair into a half up half down braid requires a few key techniques. Start by using a texturizing spray or dry shampoo to add grip to your hair, making it easier to braid and hold the style. Use a strong-hold hairspray to secure the braid and prevent flyaways. If your hair is very thick, consider using a small amount of styling cream to smooth the hair and reduce frizz.
When braiding thick hair, use small, even sections to create a clean, polished braid. Keep the braid taut to ensure it holds its shape. Secure the braid with a clear or coordinating elastic, and use bobby pins to secure any loose strands. Finish with a light-hold hairspray to keep the style in place without weighing it down.
Frequently Asked Questions About Half Up Half Down Braids for Thick Hair
Is a half up half down braid suitable for thick hair?
Yes, a half up half down braid is a beautiful and practical choice for thick hair. It allows you to showcase your volume while keeping hair off your face. The weight of thick hair can actually help the braid hold its shape beautifully.
How do I keep my braid secure in thick hair?
Use a texturizing spray or dry shampoo to add grip to your hair. Braid tightly and secure with a strong-hold elastic. Use bobby pins to secure any loose strands and finish with a light-hold hairspray.
What is the best braid for thick hair?
A Dutch braid, French braid, or fishtail braid are all excellent choices for thick hair. These braids hold their shape well and look full and beautiful with thick strands.
Can I do a half up half down braid on medium length hair?
Yes, medium length hair is ideal for half up half down braids. The length allows the braid to be visible and adds to the overall look. Braids work beautifully on hair that is at least shoulder-length.
How do I prevent my braid from frizzing?
Use a styling cream or serum to smooth the hair before braiding. Finish with a light-hold hairspray to control flyaways and keep the braid looking polished.
Conclusion
Medium length hairstyles with a half up half down braid are a stunning and versatile choice for women with thick hair. From classic three-strand braids to intricate Dutch braids and trendy bubble braids, there is a style to suit every occasion and personal preference. These looks allow you to showcase your hair’s natural volume while keeping it practical and stylish. With the right techniques and products, you can create a beautiful, polished braid that will turn heads wherever you go.
Pin Title: 12 Medium Length Hairstyles for Thick Hair Half Up Half Down Braid That Are Stunning
Pin Description: Discover 12 stunning medium length hairstyles for thick hair featuring half up half down braids. Elegant looks for every occasion.
Pin Image Text: 12 Medium Length Hairstyles for Thick Hair Half Up Half Down Braid | Stunning Braided Looks | Elevate Your Style Today
15 Short Curly Haircuts for Men That Are Modern and Masculine
For too long, the world of men’s hairstyles has been dominated by straight, sleek looks that leave curly-haired men feeling like they have limited options. The truth is that curly hair is a gift, offering texture, volume, and a distinctive personality that straight hair simply cannot replicate. The right curly haircut can be a powerful statement of style and confidence, celebrating natural texture and creating a look that is both modern and masculine.
The best short curly haircuts for men are designed to work with your natural curl pattern, not against it. The key is to find a style that embraces your curls, whether they are tight coils, loose waves, or anything in between. From classic crew cuts with texture to modern fades and tapered styles, there is a curly haircut that will flatter your face shape and lifestyle. The right cut will also make your curls easier to manage, reducing frizz and enhancing definition.
In this guide, we will explore a variety of short curly haircuts for men that are modern, stylish, and masculine. We will cover everything from low-maintenance styles to more polished looks, ensuring there is a style for every man and every occasion. We will also provide styling tips, product recommendations, and maintenance advice to help you keep your curls looking their best. Get ready to embrace your natural texture and discover a haircut that makes you feel confident and handsome.
15 Short Curly Haircuts for Men
Here are fifteen short curly haircuts for men that are modern, stylish, and masculine.
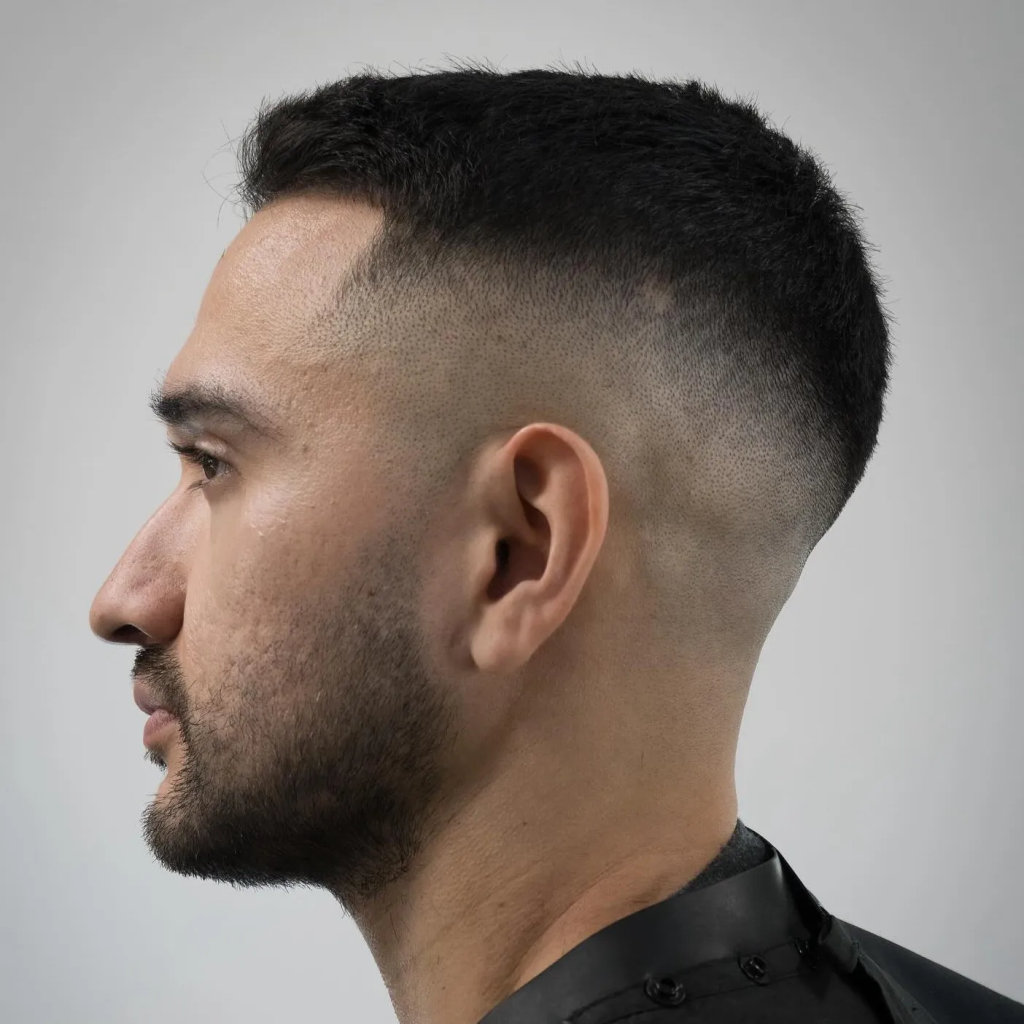
1. Textured Crew Cut
A textured crew cut is a classic, low-maintenance style that works beautifully with curly hair. The top is cut short but with enough length to showcase the natural curl pattern, while the sides and back are tapered. This style is clean, masculine, and incredibly versatile.
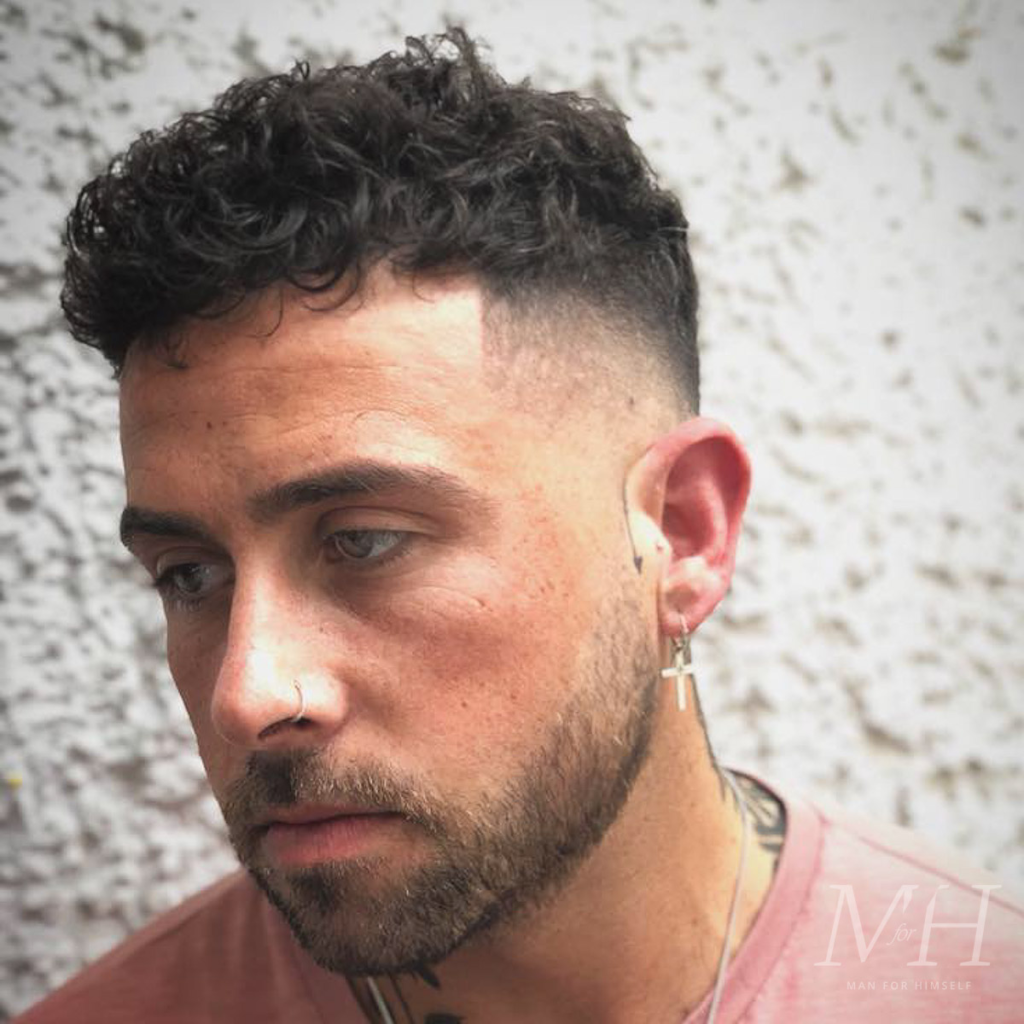
2. Curly Fade
A curly fade is a modern and stylish cut that features a gradual fade from short to long. The curls on top are left longer to showcase the texture, while the sides are faded for a clean, sharp look. This style is bold, contemporary, and very popular.
3. Tapered Curly Cut
A tapered curly cut features longer curls on top that gradually shorten towards the sides and back. This creates a clean, polished silhouette that is both professional and stylish. The taper allows the curls to shine while keeping the overall look neat.
4. Curly Quiff
A curly quiff adds height and volume to the front of the hair, creating a bold, confident look. The curls are styled up and back, adding structure and definition. This style is perfect for men who want a modern, eye-catching look.
5. Curly Pompadour
A curly pompadour is a classic, sophisticated style that features volume and height at the front. The curls are styled up and back, creating a dramatic, polished silhouette. This style is ideal for formal occasions or men who want a refined look.
6. Curly Caesar Cut
The Caesar cut is a timeless style that works beautifully with curly hair. The hair is cut short and uniform, with a fringe that falls forward. This style is low-maintenance, masculine, and perfect for men who want a classic, no-fuss look.
7. Curly Undercut
A curly undercut features short, faded sides and longer curls on top. The contrast between the short sides and the voluminous curls creates a bold, modern look. This style is edgy, stylish, and perfect for men who want to make a statement.
8. Curly Buzz Cut
A curly buzz cut is the ultimate low-maintenance style. The hair is cut very short all over, allowing the natural curl pattern to be visible without requiring styling. This style is clean, masculine, and perfect for men who prefer a minimalist look.
9. Curly Crop
A curly crop features short, textured curls that are cut evenly all over. The crop is simple, clean, and easy to maintain. This style is versatile and works well for men with any face shape.
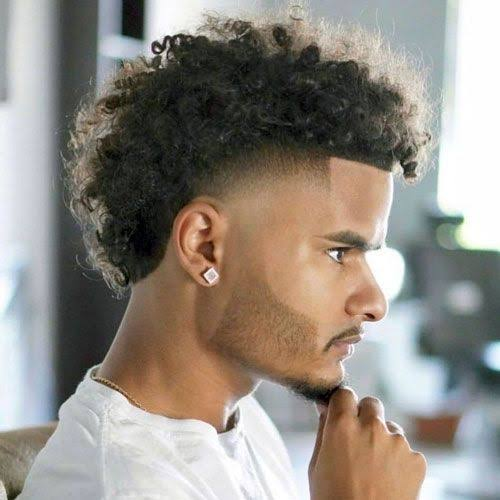
10. Curly Mohawk
A curly Mohawk is a bold, statement-making style. The curls on top are left longer and styled upward, while the sides are shaved or very closely cropped. This style is edgy, modern, and perfect for men who love to stand out.
11. Curly Side Part
A curly side part adds structure and sophistication to curly hair. The curls are styled with a defined side part, creating a polished, professional look. This style is perfect for men who want a refined, elegant haircut.
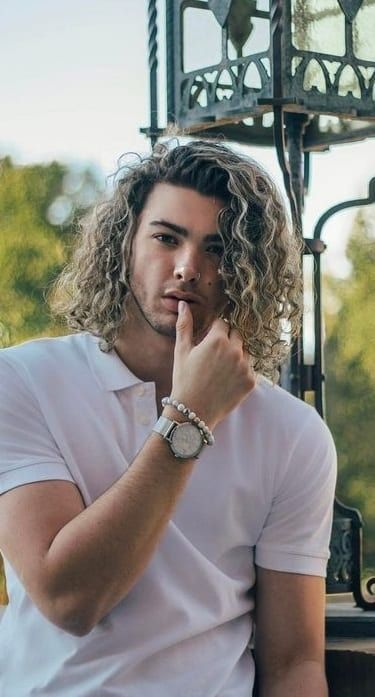
12. Messy Curly Cut
A messy curly cut is a relaxed, effortless style. The curls are left slightly longer and styled with a texturizing product to create a tousled, lived-in look. This style is perfect for men who want a casual, low-maintenance style.
13. Curly Brush Cut
A curly brush cut is similar to a buzz cut but with slightly more length on top. The hair is cut short and uniform, allowing the curls to be visible. This style is clean, masculine, and easy to maintain.
14. Curly Comb Over
A curly comb over features longer curls on top that are styled to one side. The sides are tapered or faded for a clean finish. This style is elegant, polished, and perfect for formal occasions.
15. Curly French Crop
A curly French crop features short, textured curls on top with a fringe that falls forward. The sides are closely cropped, creating a clean, modern silhouette. This style is low-maintenance, stylish, and versatile.
Section: Styling Tips for Curly Hair
Styling curly hair starts with the right products and techniques. Use a moisturizing shampoo and conditioner designed for curly hair to keep your curls hydrated and healthy. After washing, apply a leave-in conditioner or curl cream to damp hair to define and enhance your curls.
For maximum definition, scrunch your hair as it dries, either with your hands or using a diffuser attachment on your blow dryer. Avoid brushing your curls when dry, as this can cause frizz and disrupt the curl pattern. Use a small amount of styling cream or pomade to tame flyaways and add shine. Regular trims are essential to maintain the shape of your haircut and prevent split ends.
Frequently Asked Questions About Short Curly Haircuts for Men
What is the best short haircut for curly hair?
The best short haircut for curly hair depends on your curl pattern and personal style. Textured crew cuts, fades, and tapered cuts are all excellent options. The key is to work with a stylist who understands how to cut curly hair.
Are fades good for curly hair?
Yes, fades are excellent for curly hair. The faded sides create a clean, sharp contrast with the curls on top, creating a modern and stylish look.
How do I style short curly hair?
Use moisturizing products and a curl cream or gel to define your curls. Scrunch your hair as it dries, and avoid brushing when dry. A small amount of styling cream can tame flyaways.
How often should I trim curly hair?
To maintain the shape of your haircut and prevent split ends, it is recommended to get a trim every four to six weeks.
Can I get a curly haircut if I have receding hairline?
Yes, many curly haircuts can be adapted for a receding hairline. A textured crew cut, buzz cut, or French crop can be flattering and minimize the appearance of a receding hairline.
Conclusion
Short curly haircuts for men offer a world of stylish, modern options that celebrate natural texture. Whether you prefer a classic crew cut, a bold fade, or a sophisticated pompadour, there is a curly haircut that will make you feel confident and handsome. Embrace your curls, work with a skilled stylist, and discover the transformative power of a haircut that works with your natural texture. With the right products and maintenance, your curls will be your greatest asset.
Pin Title: 15 Short Curly Haircuts for Men That Are Modern and Masculine
Pin Description: Discover 15 modern and masculine short curly haircuts for men. Embrace your natural texture with these stylish looks.
Pin Image Text: 15 Short Curly Haircuts for Men | Modern and Masculine Styles | Embrace Your Natural Texture
13 Best Haircuts for Round Faces Men That Flatter and Define
Finding the right haircut can be a transformative experience, especially when it comes to flattering your face shape. For men with round faces, the goal is to create the illusion of length and definition, adding angles and structure that balance the soft curves of the face. The right haircut can elongate the face, highlight your best features, and give you a more sculpted, defined appearance. The key is to choose styles that add height at the top and keep the sides shorter.
The best haircuts for round faces men are those that create vertical lines and avoid adding width to the sides. Styles with volume on top, such as quiffs and pompadours, are particularly effective at creating the illusion of a longer face. Tapered and faded sides also help to slim the face, creating a clean, sharp silhouette. From classic cuts to modern trends, there is a wide range of styles that work beautifully for round faces.
In this guide, we will explore a variety of haircuts that are specifically designed to flatter and define round faces for men. We will cover everything from short, low-maintenance styles to more polished, statement-making looks. We will also provide styling tips, product recommendations, and advice on how to communicate your desired look to your barber. Get ready to discover a haircut that makes you look and feel your best.
13 Best Haircuts for Round Faces Men
Here are thirteen haircuts that are designed to flatter and define round faces.
1. Classic Pompadour
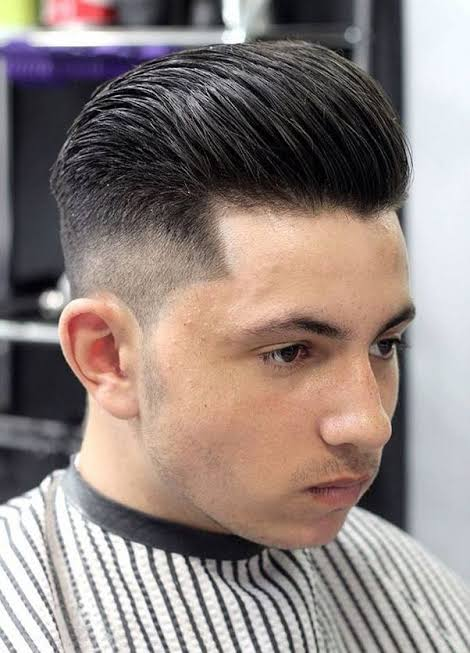
The pompadour is a classic, sophisticated style that adds significant height at the front. The volume on top elongates the face, creating a more balanced, defined silhouette. The sides are kept shorter to avoid adding width. This style is perfect for formal occasions or men who want a polished look.
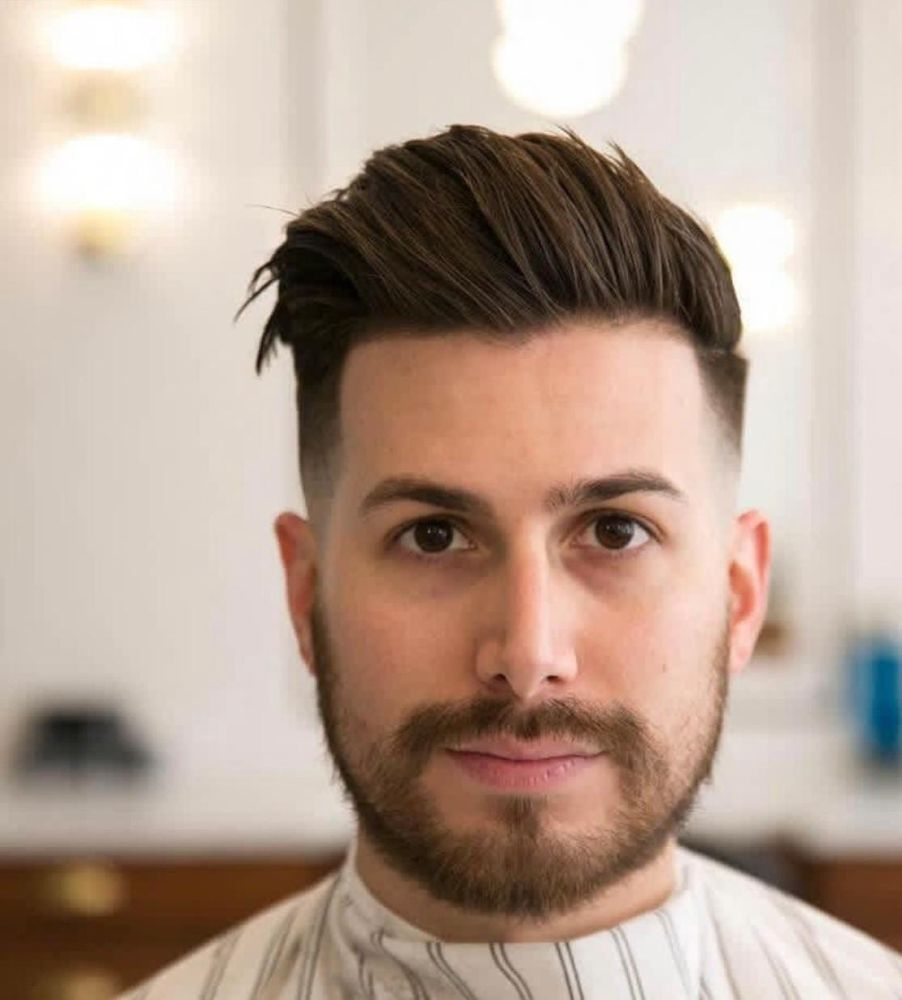
2. Modern Quiff
The modern quiff is similar to the pompadour but with a more relaxed, textured feel. The hair is styled upward and slightly back, adding volume and height at the front. The sides are tapered for a clean finish. This style is versatile, stylish, and flattering for round faces.
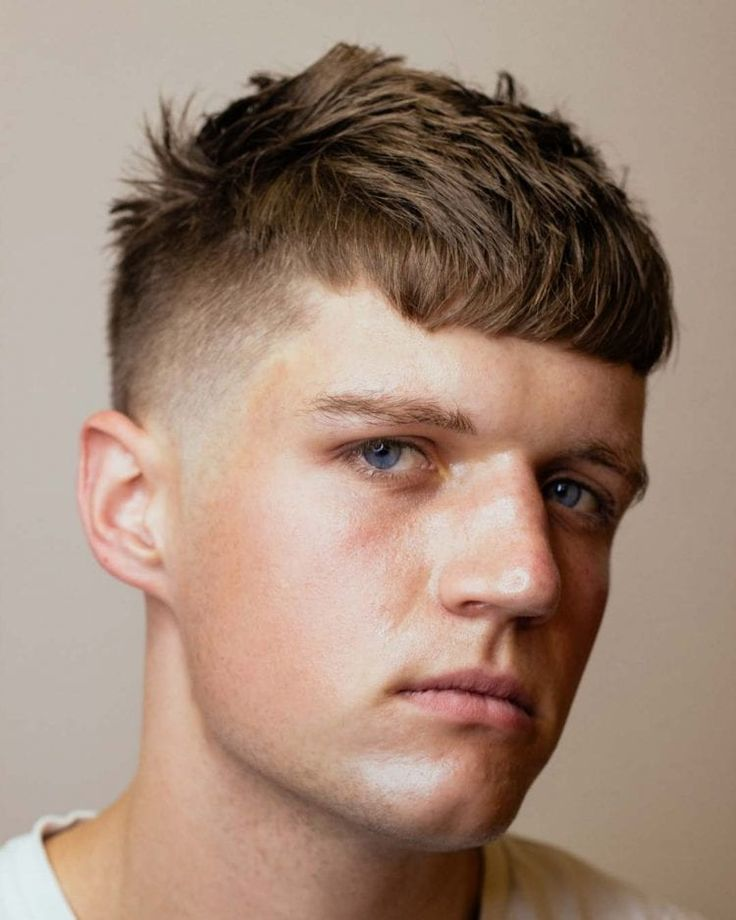
3. Textured Crop
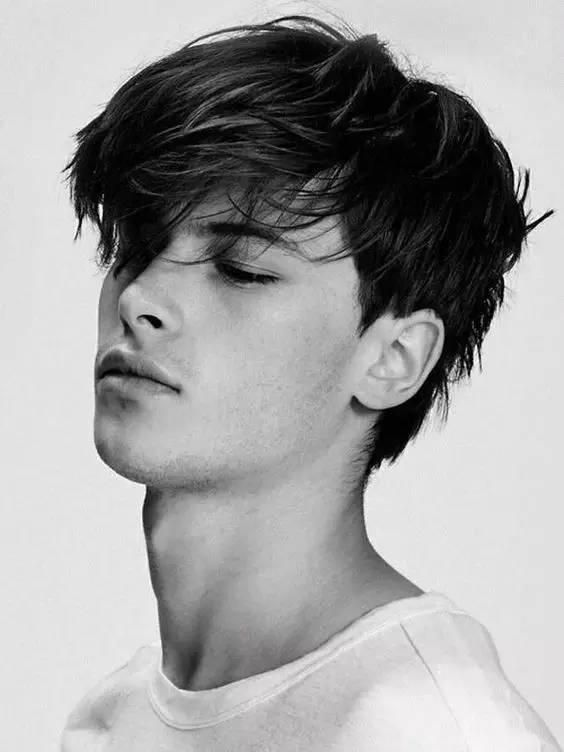
A textured crop features short, textured hair on top with a fringe that falls forward. The texture adds height and dimension, while the short sides keep the look clean. This style is low-maintenance and perfect for men who want a modern, casual look.
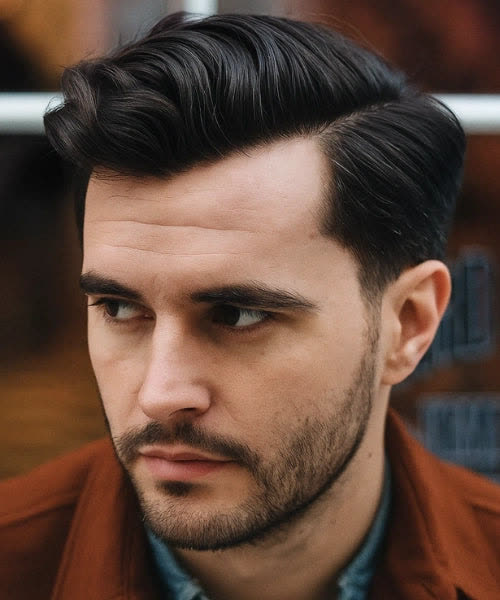
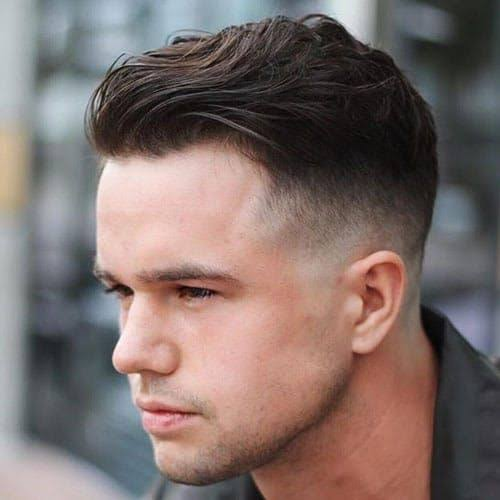
4. Side Part with Volume
A side part with volume on top is a classic, timeless style. The hair is parted to one side and styled with height at the front. The volume elongates the face, while the side part adds structure and definition. This style is professional, elegant, and versatile.
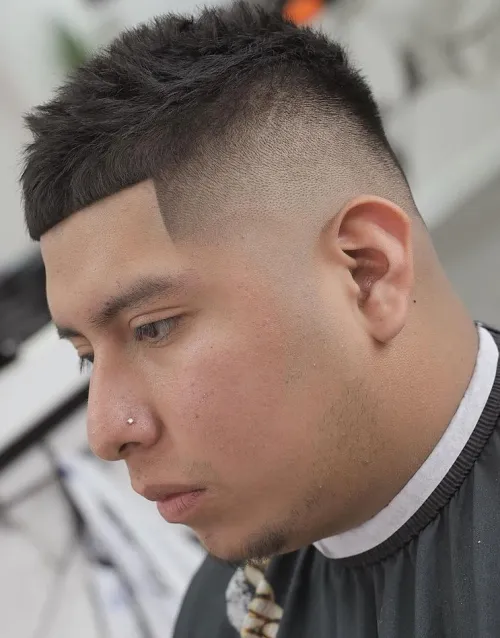
5. Fade with Textured Top
A fade with a textured top is a modern, stylish choice. The sides are faded short, while the top is left longer and textured. The contrast between the short sides and the voluminous top creates a slimming effect, making the face appear longer and more defined.
6. Comb Over Fade
A comb over fade features longer hair on top that is combed to one side, with faded sides. The height and asymmetry of the comb over add definition to the face, while the fade keeps the sides clean and slim. This style is polished, modern, and very flattering.
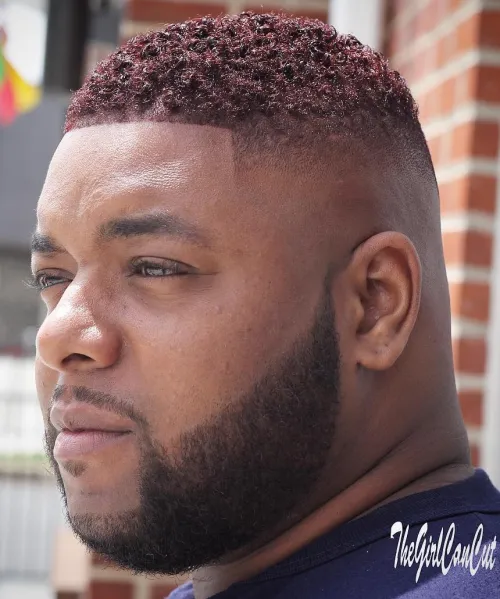
7. High Top Fade
A high top fade features significant volume on top, with the sides faded high up the head. The height on top creates the illusion of a longer face, while the faded sides add sharpness and definition. This style is bold, confident, and perfect for men who want to make a statement.
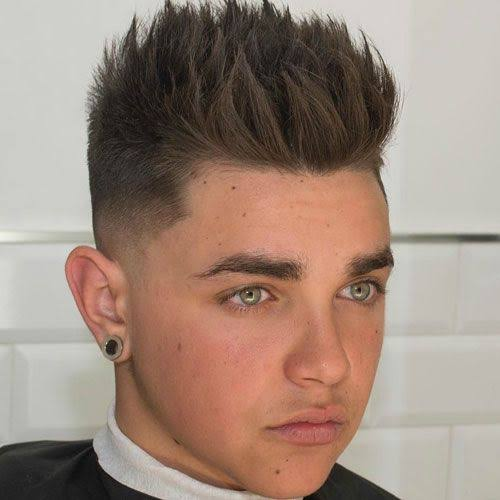
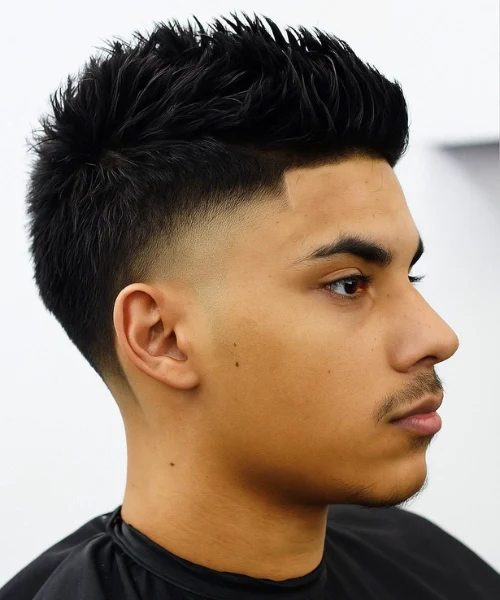
8. Spiky Haircut
A spiky haircut adds height and texture at the top, creating a vertical line that elongates the face. The spikes can be styled up or slightly to the side. The sides are kept short to avoid adding width. This style is edgy, youthful, and fun.
9. Ivy League Cut
The Ivy League cut is a classic, preppy style that features slightly longer hair on top that can be styled with a side part or brushed back. The top is kept neat and polished, while the sides are tapered. This style is professional, elegant, and flattering for round faces.
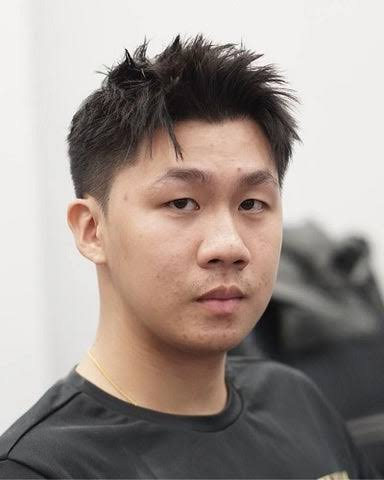
10. Messy Textured Cut
A messy textured cut adds volume and height at the top, creating a relaxed, effortless look. The texture and height elongate the face, while the short sides keep the silhouette clean. This style is perfect for men who want a casual, low-maintenance look.
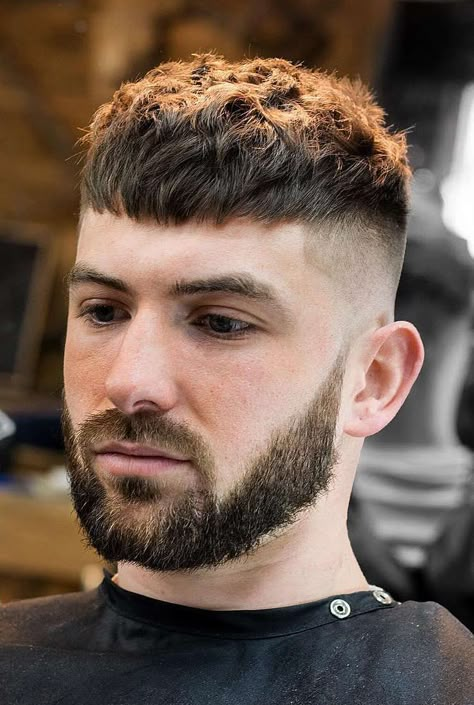
11. French Crop
The French crop features short, textured hair on top with a straight fringe. The fringe adds a horizontal line that can soften the face, while the short sides keep the look clean. This style is low-maintenance, stylish, and versatile.
12. Slicked Back Undercut
A slicked back undercut features longer hair on top that is slicked back, with short, faded sides. The height and volume at the top elongate the face, while the slicked-back style adds a polished, sophisticated feel. This style is elegant and modern.
13. Faux Hawk
A faux hawk is a subtle version of a Mohawk, with volume concentrated at the center of the head. The height at the top creates a vertical line, while the short sides keep the look clean. This style is edgy, modern, and perfect for men who want a bold, unique look.
Section: Styling Tips for Round Faces
When styling a haircut for a round face, the goal is to create height and avoid adding width. Use a volumizing product, such as a mousse or thickening spray, to add lift at the roots. Blow-dry your hair upward to create height at the top. Use a styling product, such as a pomade or wax, to define the style and hold it in place.
Keep the sides of your hair short to avoid adding width to your face. A fade or taper is an excellent choice. Avoid styles that add volume to the sides or create a round silhouette. Regular trims are essential to maintain the shape and keep the sides from growing out and adding unnecessary width.
Frequently Asked Questions About Haircuts for Round Faces
What is the best haircut for a round face?
The best haircuts for a round face are those that add height at the top and keep the sides short. Pompadours, quiffs, and fades with textured tops are all excellent choices.
Should men with round faces have long hair?
Men with round faces can have long hair, but it is important to keep it styled with volume at the top and avoid adding width to the sides. Long hair that is all one length can make a round face appear rounder.
Are fades good for round faces?
Yes, fades are excellent for round faces. The short sides create a slimming effect, while the longer hair on top adds height and definition.
How do I make my face look less round with a haircut?
Choose a haircut with volume on top and short sides. This creates vertical lines that elongate the face and make it appear more oval.
What should I tell my barber for a round face?
Tell your barber that you want a haircut with height on top and short sides. Ask for a fade or taper to keep the sides clean and slim.
Conclusion
Choosing the right haircut for a round face is about creating balance, definition, and the illusion of length. The styles outlined in this guide offer a range of options that flatter and define, from classic pompadours to modern fades and textured crops. By adding height at the top and keeping the sides short, these haircuts create a more sculpted, balanced silhouette. Work with a skilled barber, use the right products, and enjoy the confidence that comes with a haircut that makes you look and feel your best.
Pin Title: 13 Best Haircuts for Round Faces Men That Flatter and Define
Pin Description: Discover 13 best haircuts for round faces men that flatter and define. From pompadours to fades, find your perfect style.
Pin Image Text: 13 Best Haircuts for Round Faces Men | Flatter and Define Your Face | Find Your Perfect Style
14 Messy Pixie Haircut for Women Over 60 That Exude Confidence and Style
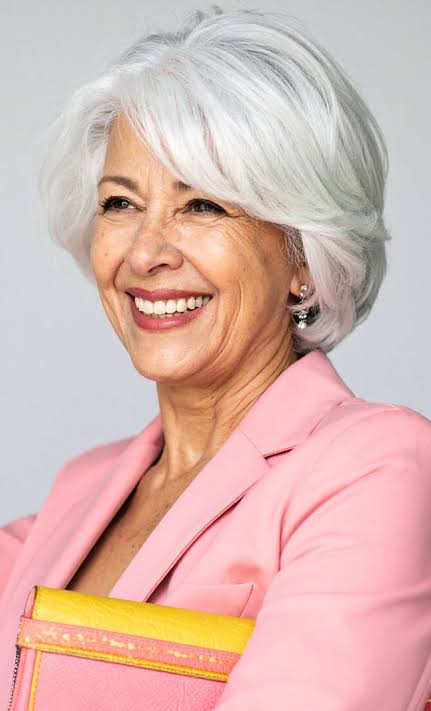
There is a certain freedom that comes with age, a liberation from the expectations and pressures of youth that allows you to embrace who you truly are. This freedom is often reflected in the choices women make about their appearance, including their hair. For women over 60, the messy pixie haircut has emerged as a powerful statement of confidence, style, and authenticity. It is a look that says you are comfortable in your own skin, unafraid to break the rules, and ready to embrace a modern, effortless aesthetic.
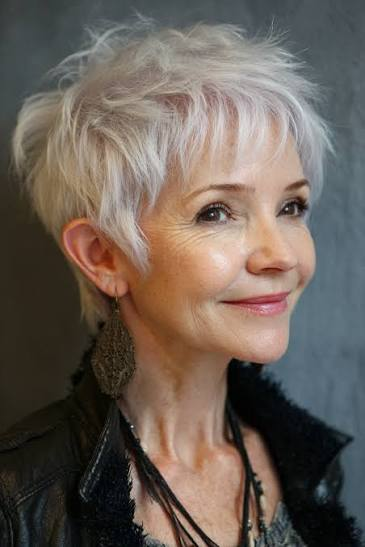
The messy pixie haircut for women over 60 is a perfect blend of edgy and feminine, offering a style that is both bold and soft. The messy texture adds volume and movement, which is especially flattering for hair that may have become finer with age. The cut is low-maintenance, allowing for a wash-and-go style that still looks polished and put-together. The choppy, piecey layers also soften facial features, creating a youthful, vibrant appearance. It is a cut that defies age and celebrates individuality.
In this guide, we will explore a variety of messy pixie haircuts that are perfect for women over 60. We will cover styles ranging from soft and subtle to bold and dramatic, ensuring there is a look for every personality and hair type. We will also provide styling tips, product recommendations, and maintenance advice to help you achieve and maintain a messy pixie that makes you feel confident and stylish. Get ready to embrace the freedom and beauty of a modern, messy pixie.
14 Messy Pixie Haircuts for Women Over 60
Here are fourteen messy pixie haircuts that exude confidence and style for women over 60.
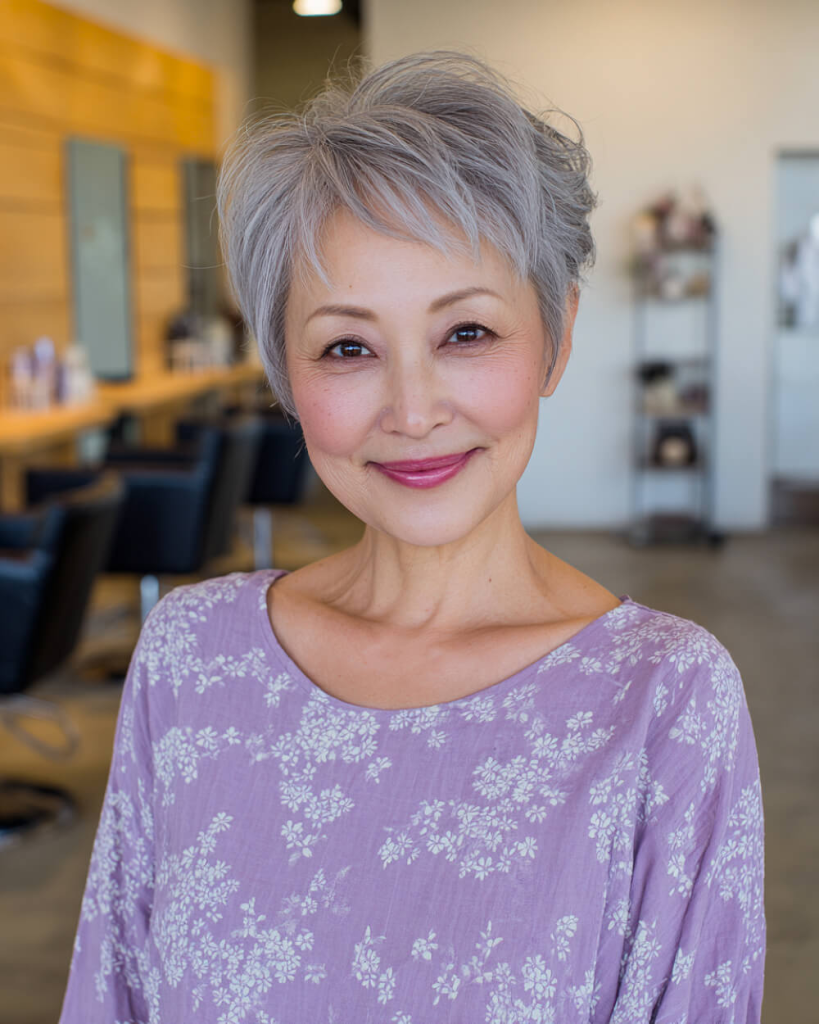
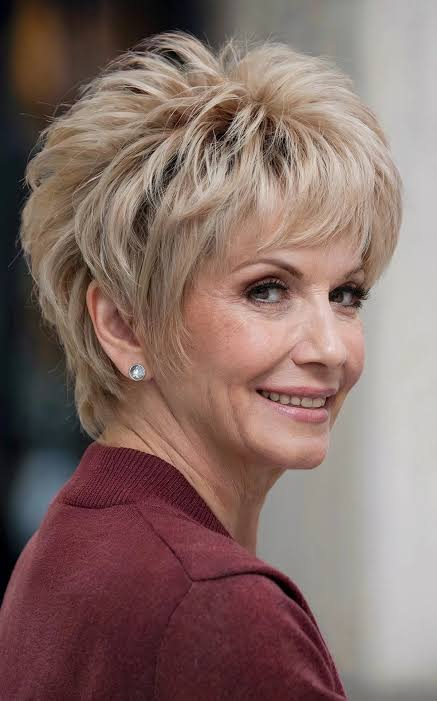
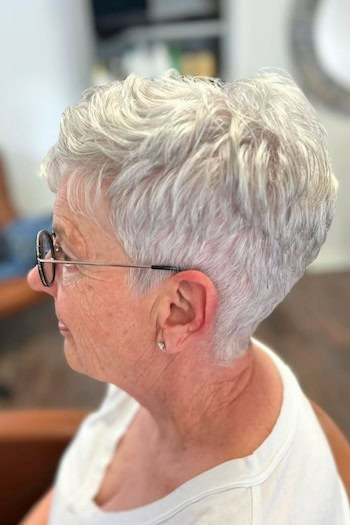
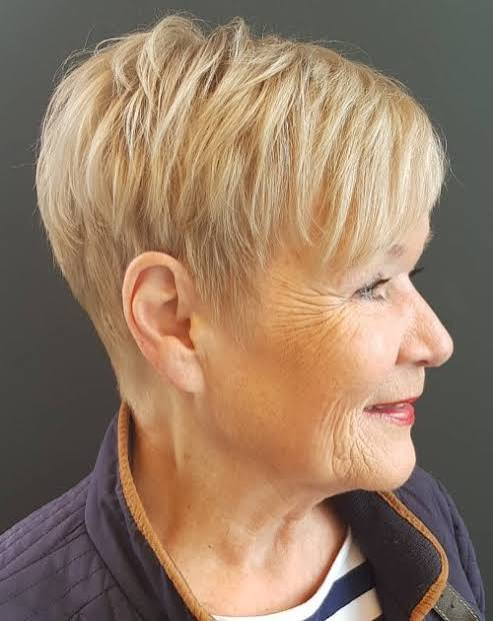
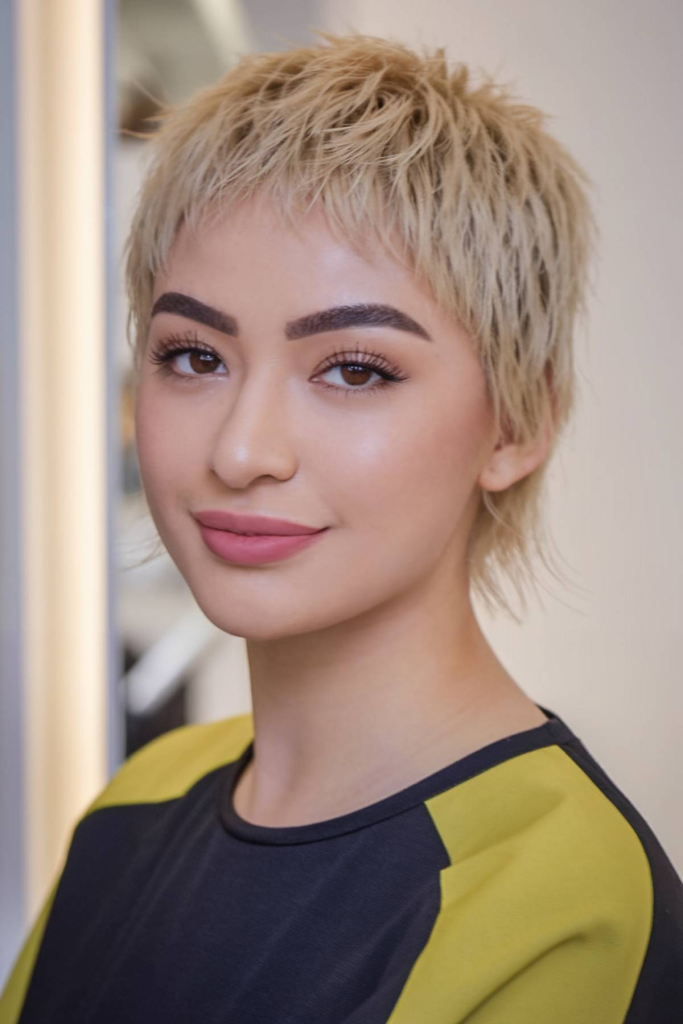
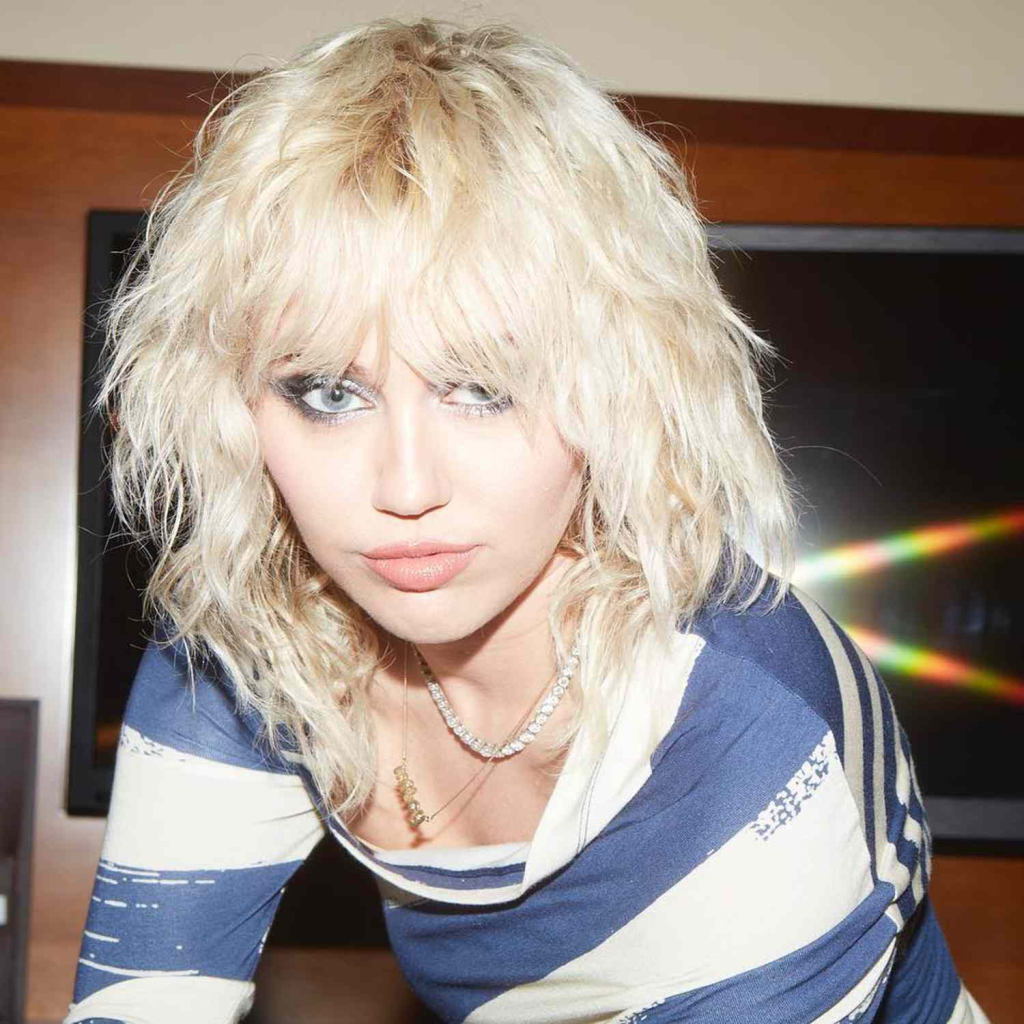
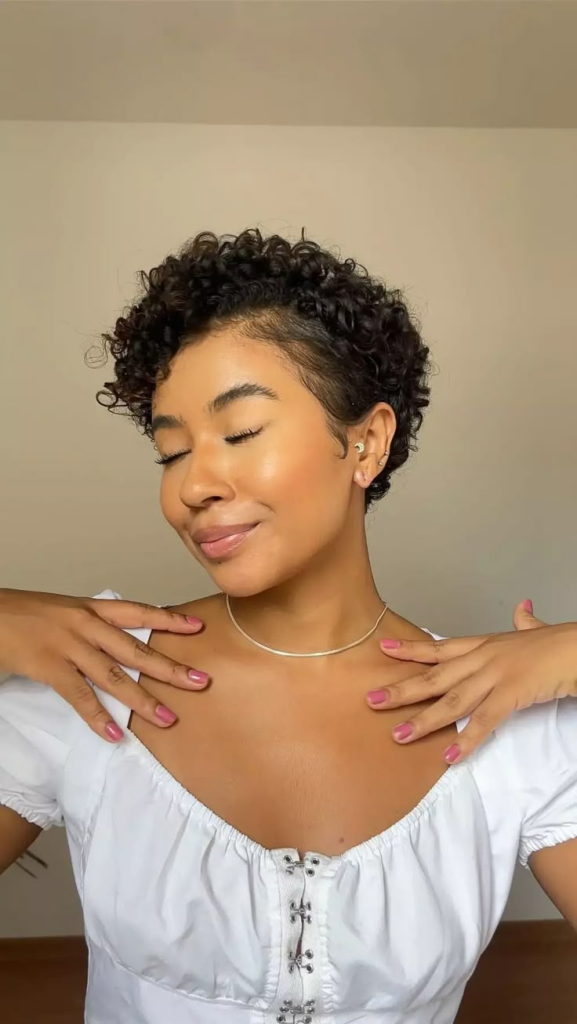
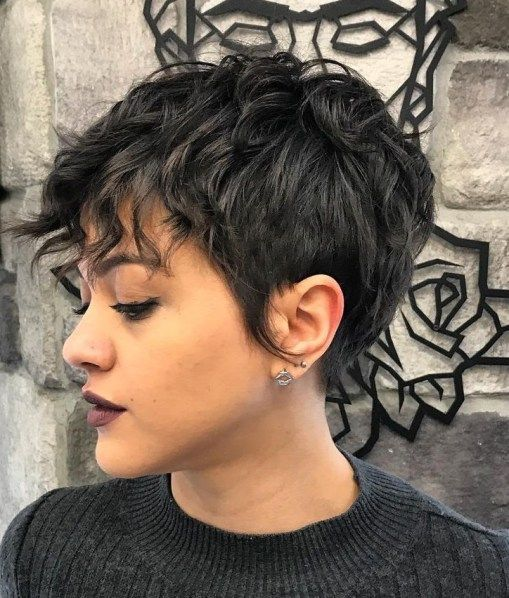
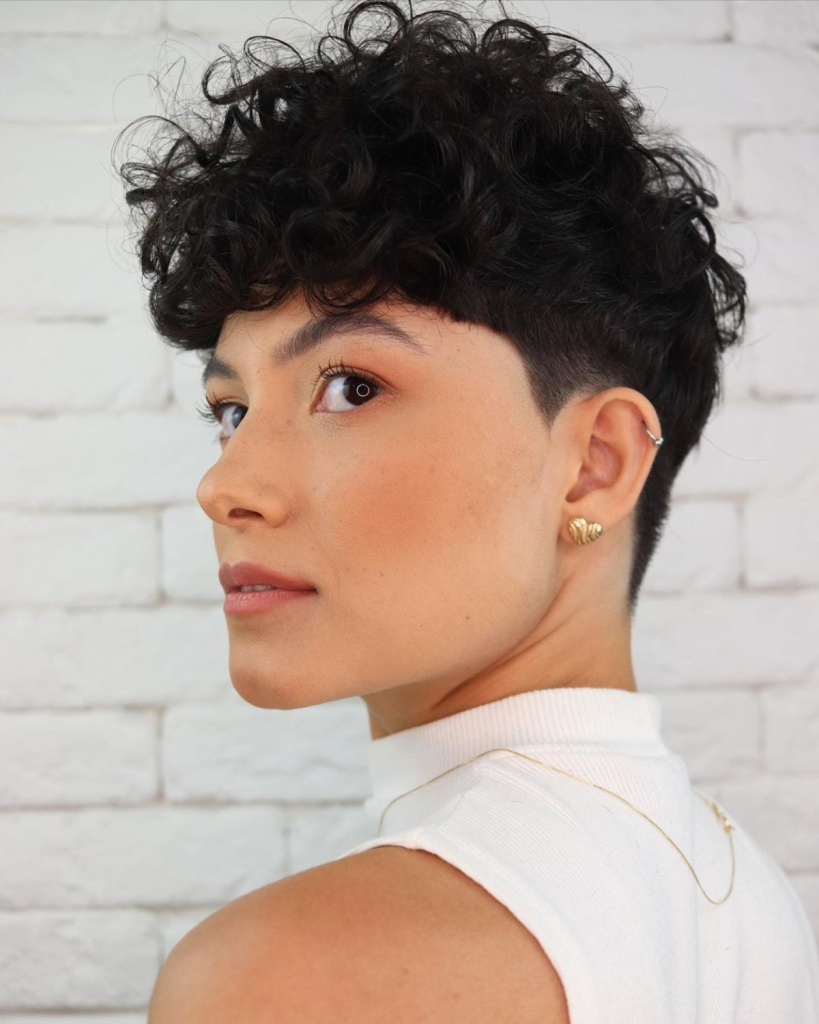
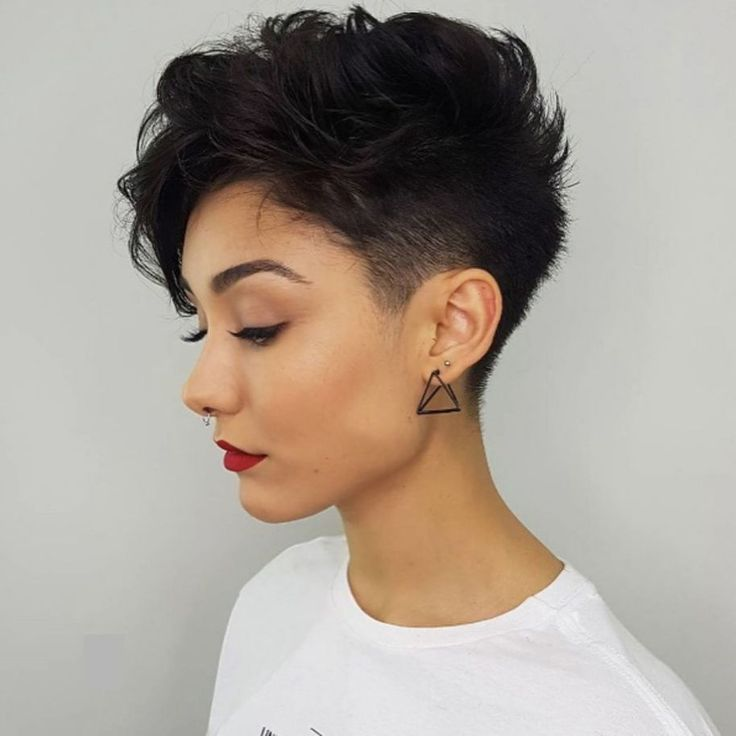
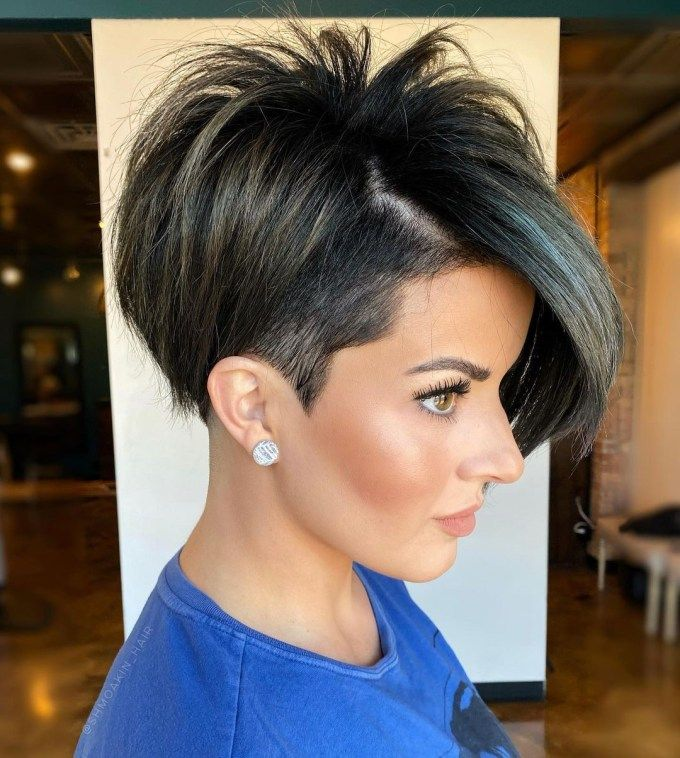
1. Classic Messy Pixie
The classic messy pixie features choppy, textured layers that create volume and movement. The messy texture adds a youthful, relaxed feel while maintaining a stylish silhouette. This cut is low-maintenance and incredibly flattering for women over 60.
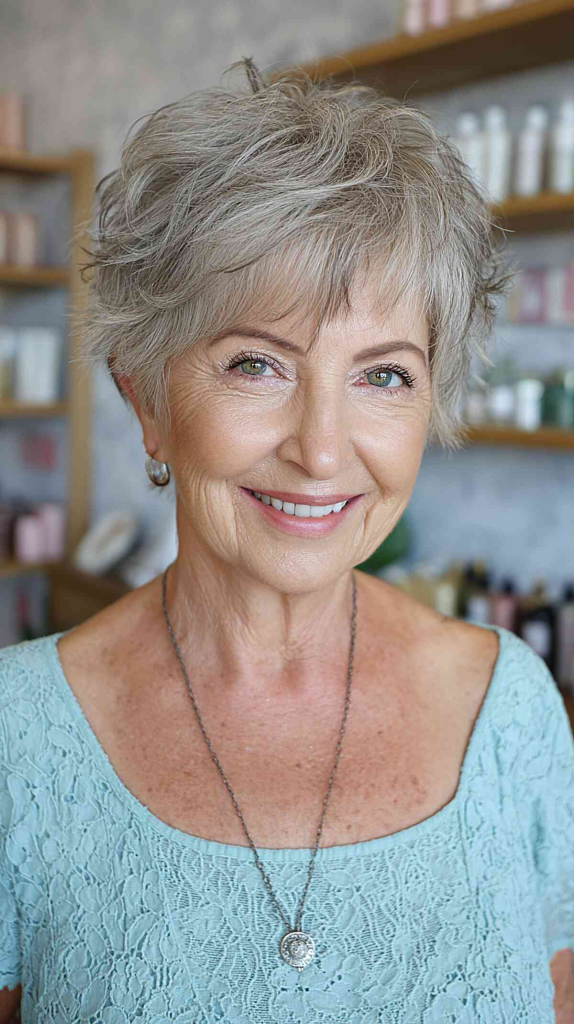
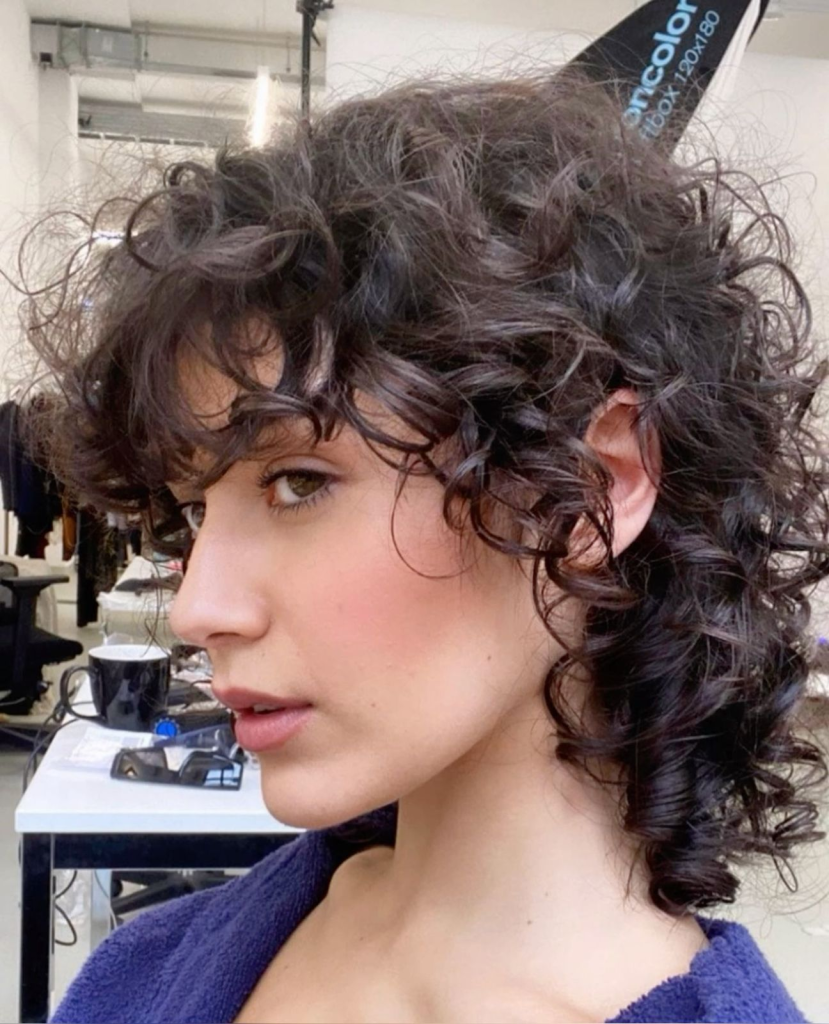
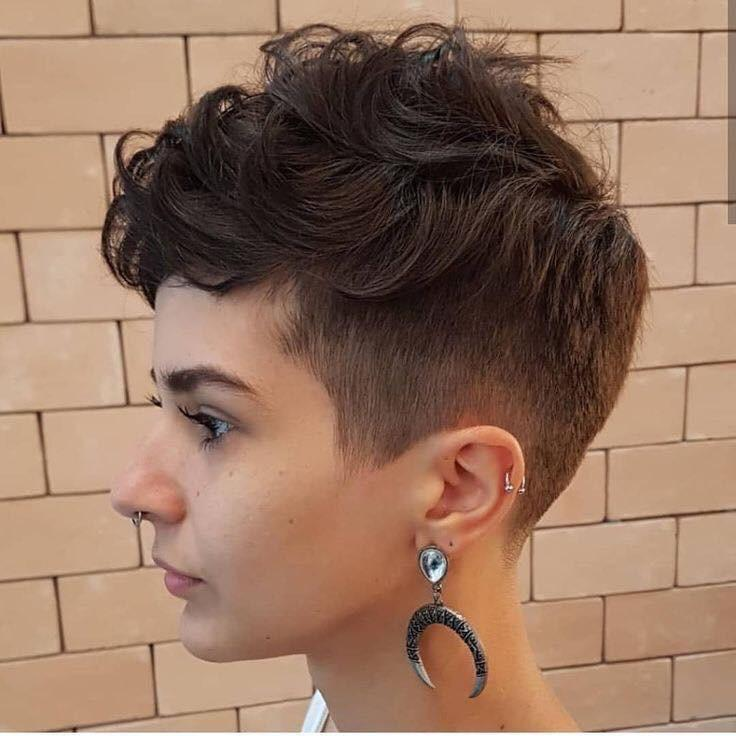
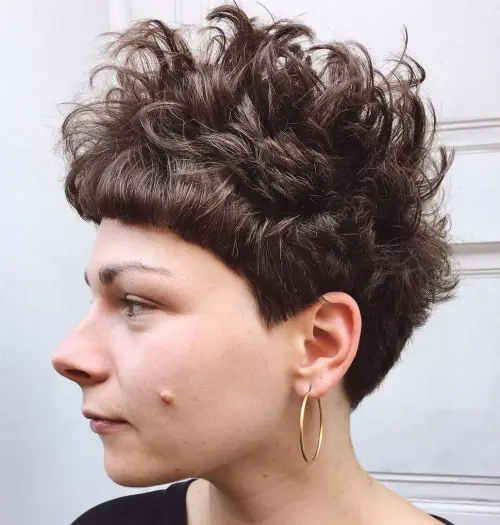
2. Textured Messy Pixie
A textured messy pixie uses soft, tousled layers to create dimension and movement. The added texture gives the hair a modern, relaxed appearance. This style is ideal for enhancing natural volume and body, making it perfect for thinner hair.
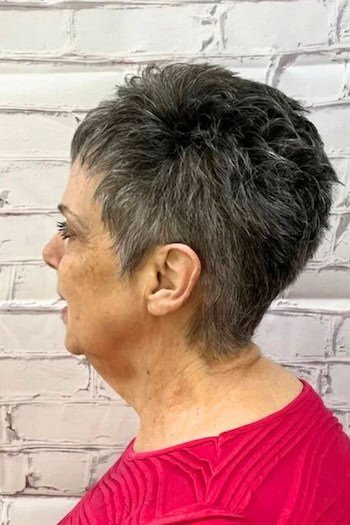
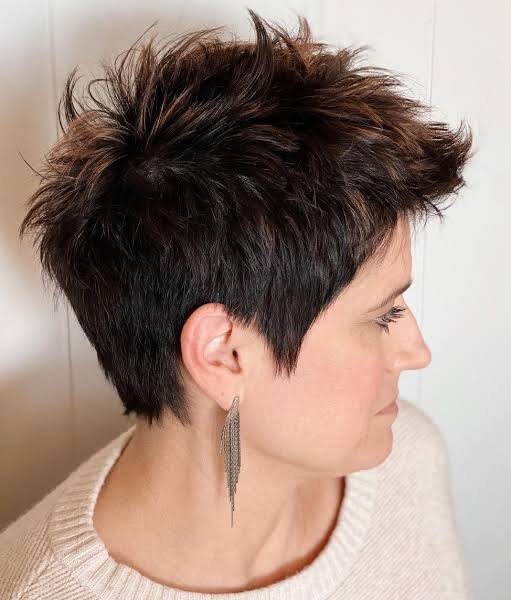
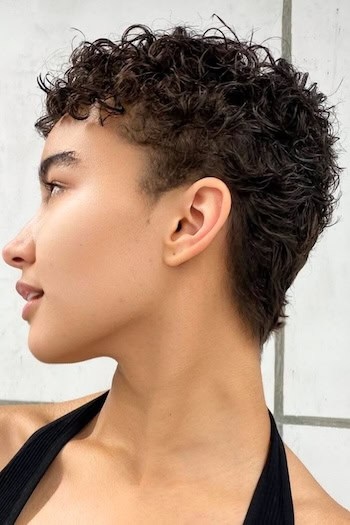
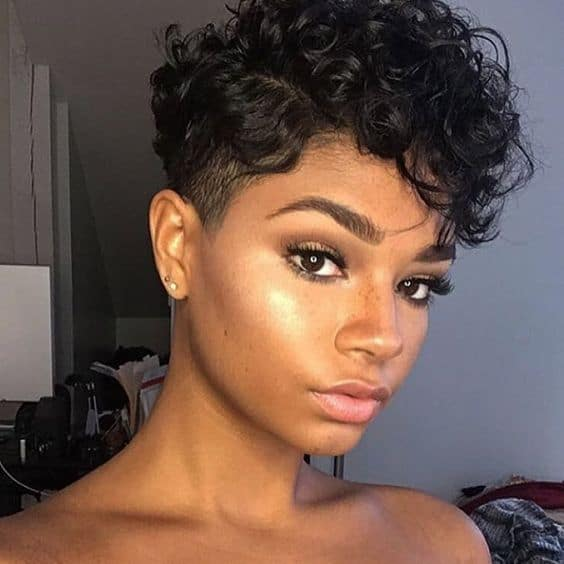
3. Choppy Messy Pixie
Choppy layers give the messy pixie an edgy, modern feel. The piecey texture adds movement and visual interest, making this a bold choice for women who want a statement look. A little pomade or texture spray is all you need to style this look.
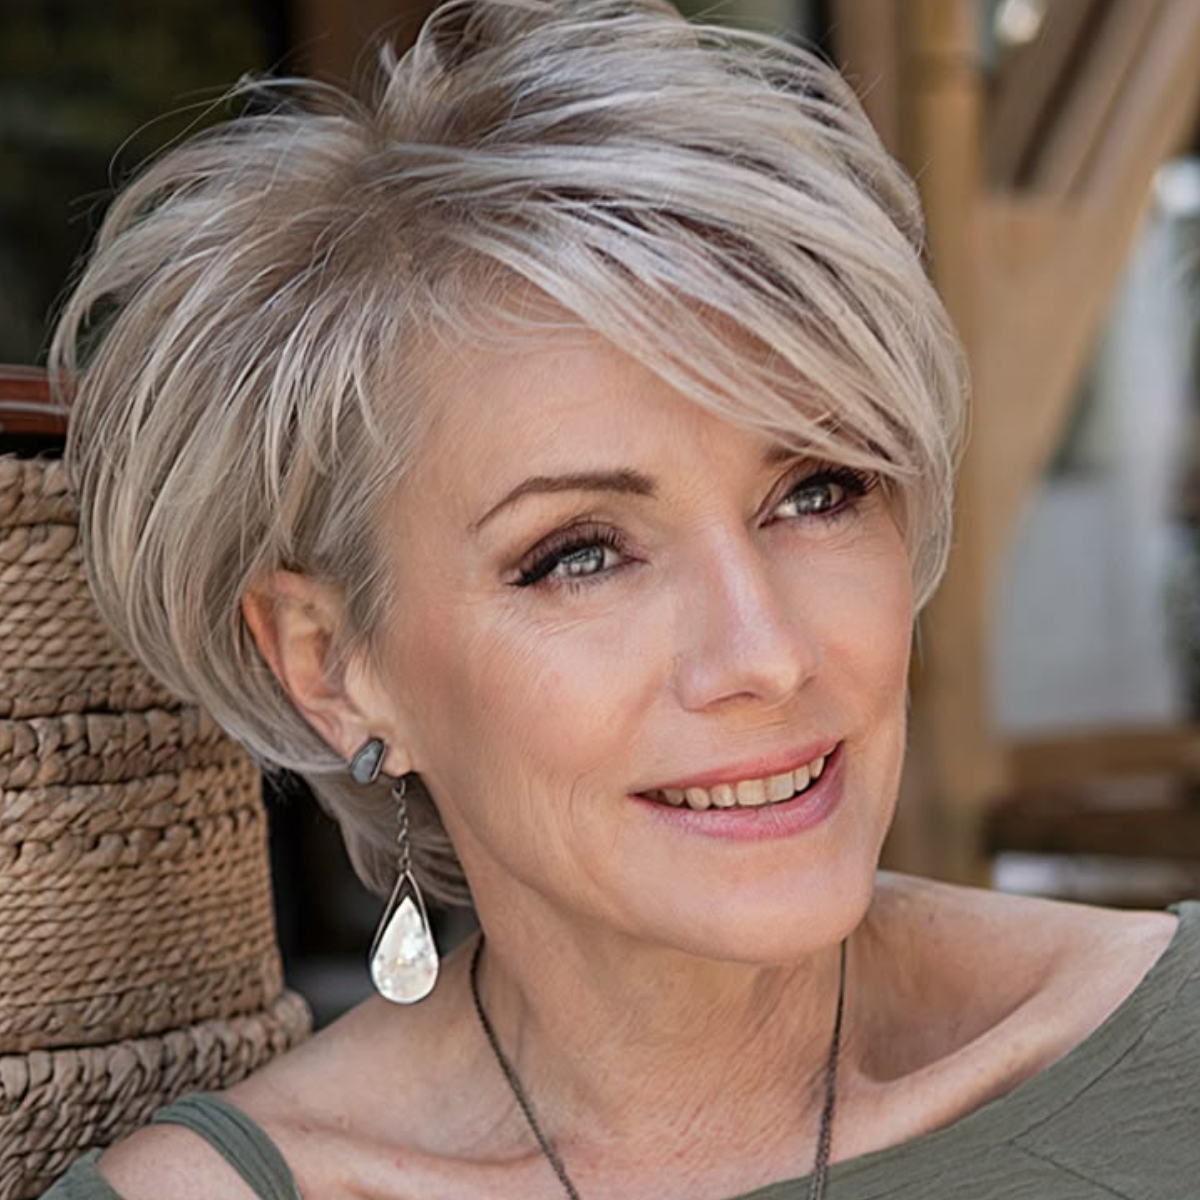
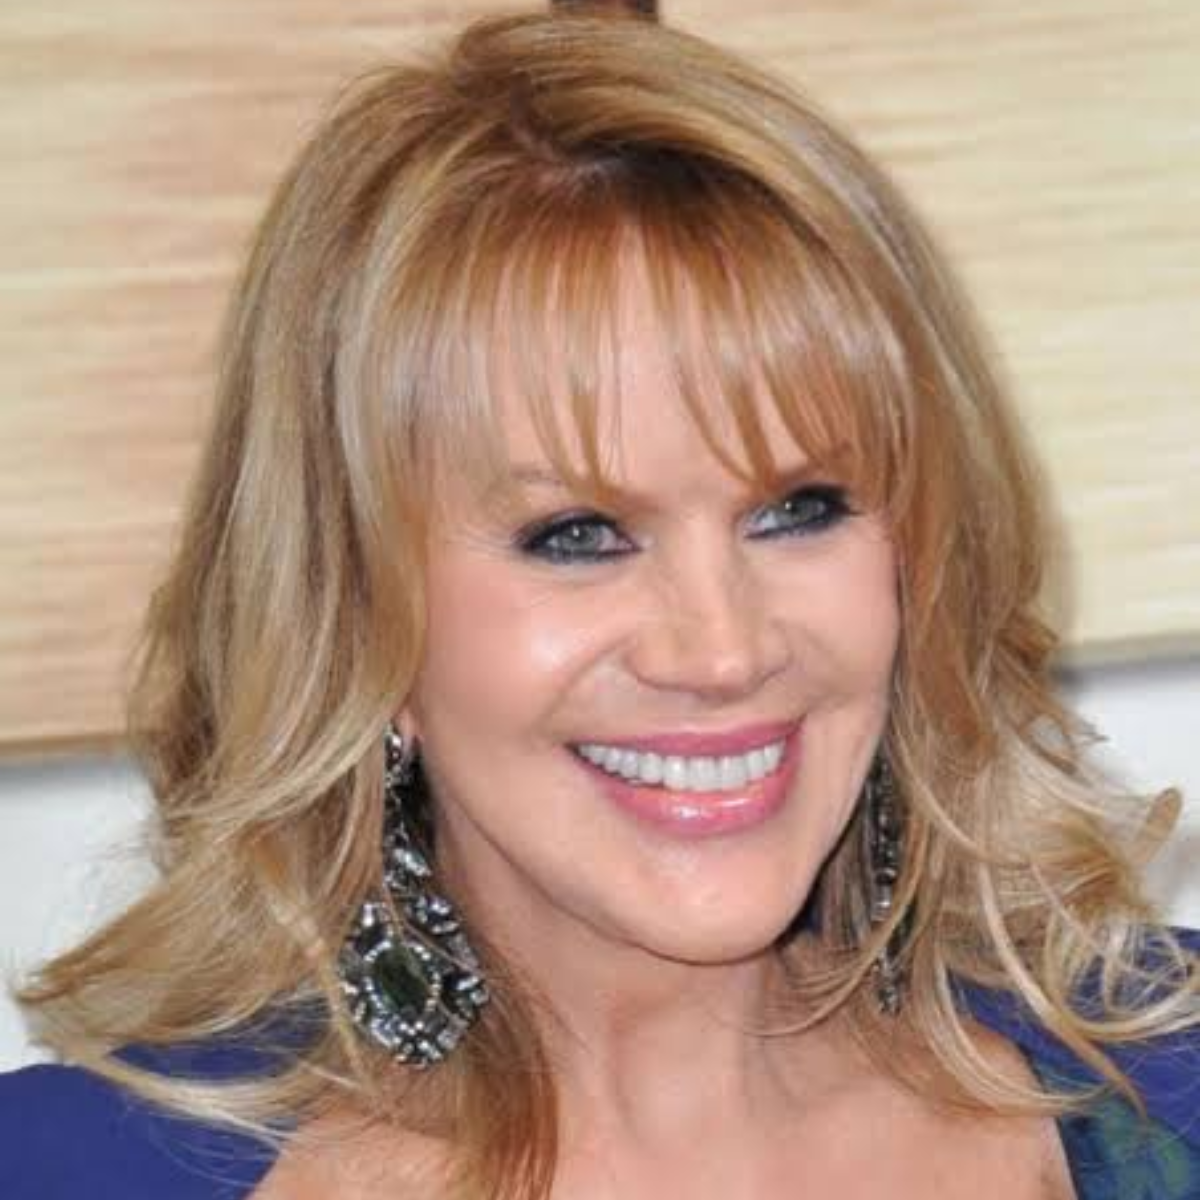
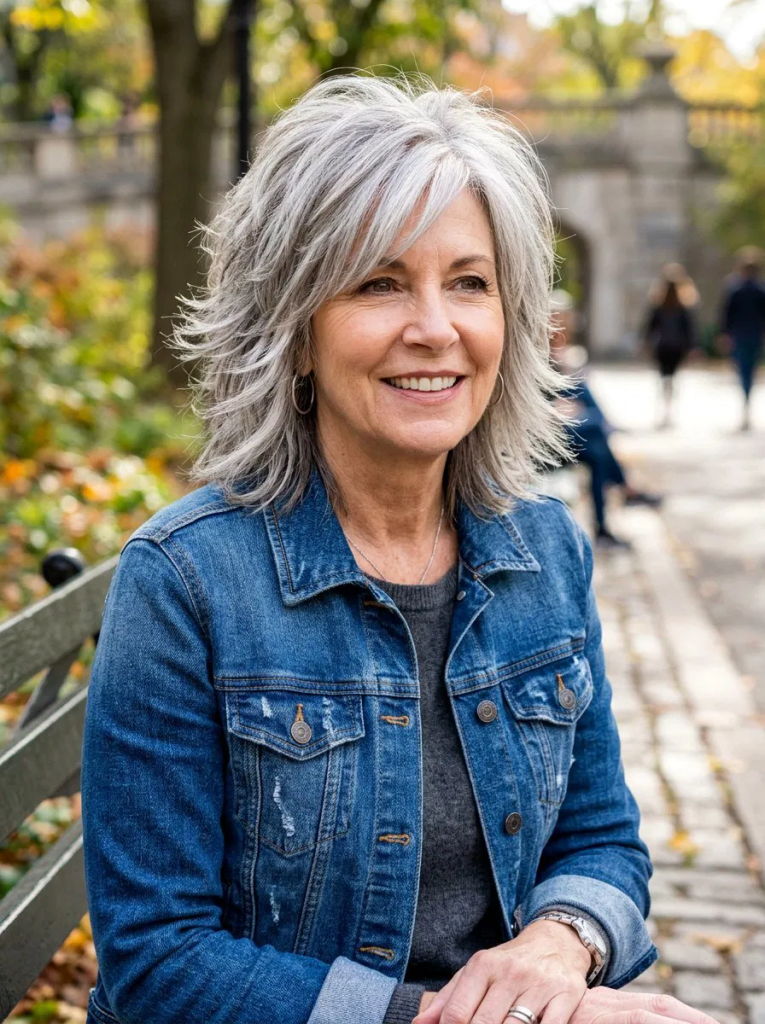
4. Messy Pixie with Side-Swept Bangs
Side-swept bangs add softness and elegance to the messy pixie silhouette. The angled fringe gently frames the face and highlights cheekbones, creating a graceful and refined look. This style is versatile and flatters many face shapes.
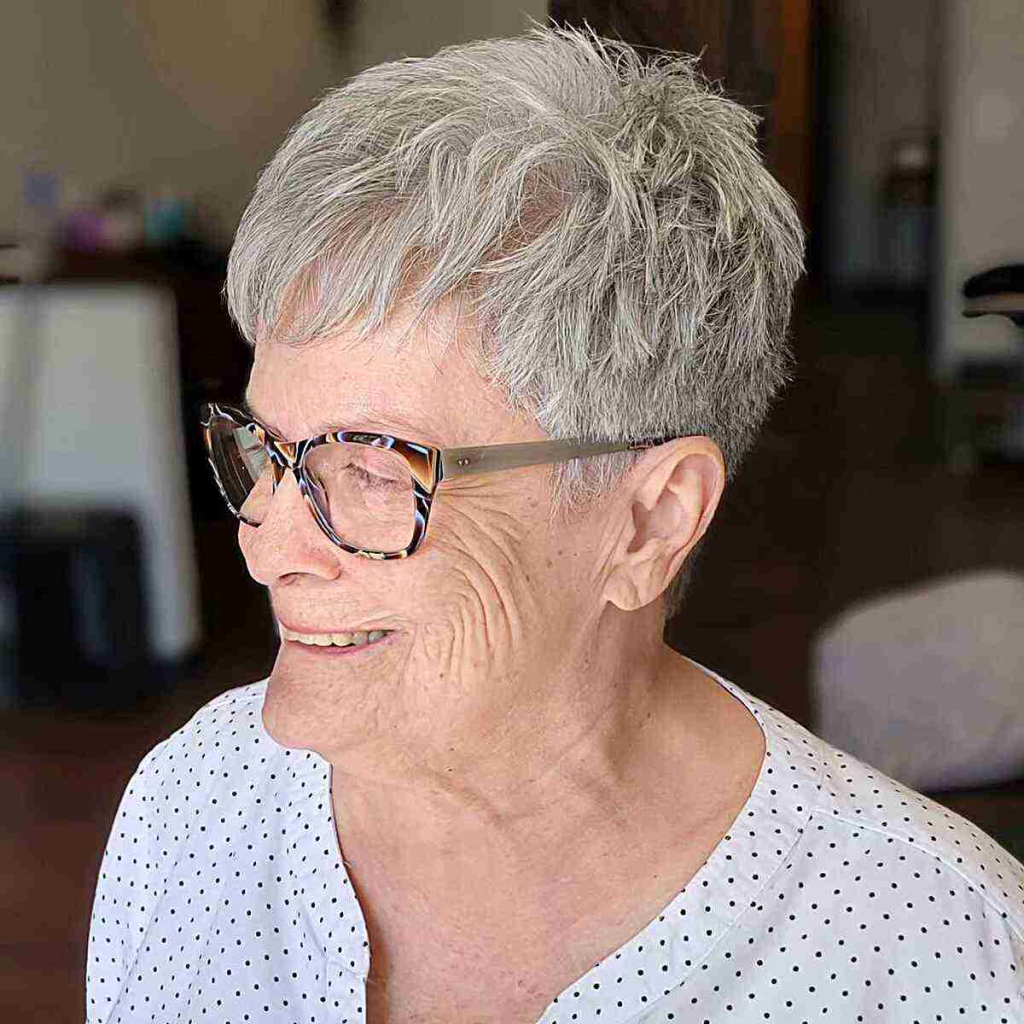
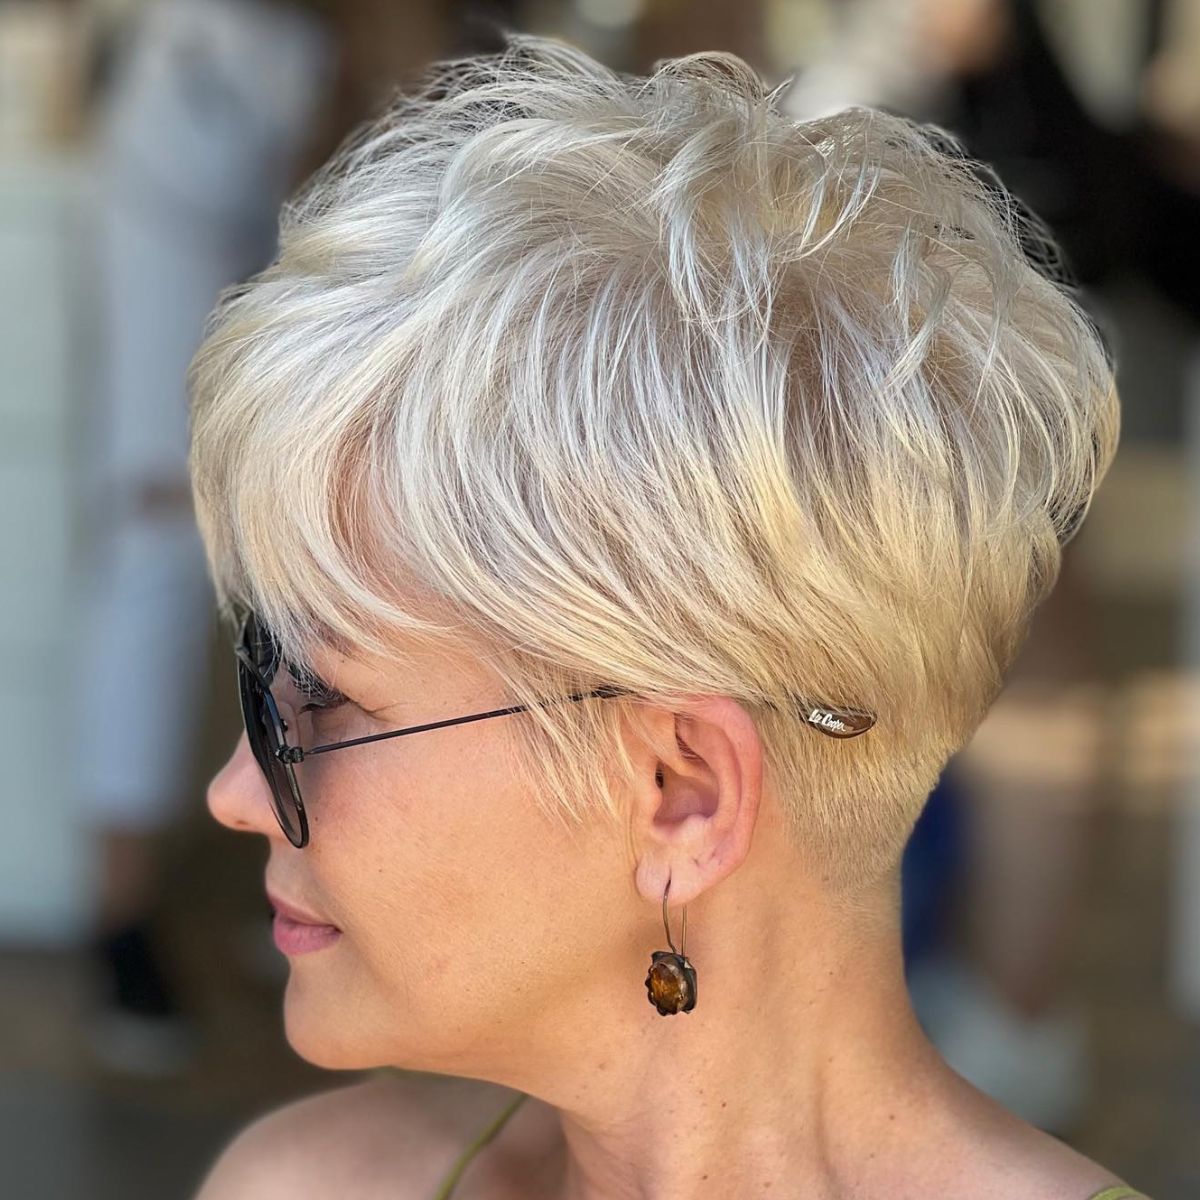
5. Voluminous Messy Pixie
A voluminous messy pixie focuses on lift at the crown and fullness throughout the cut. Strategic layering creates depth and dimension, making this an excellent choice for fine or thinning hair. The result is a fuller, more youthful appearance.
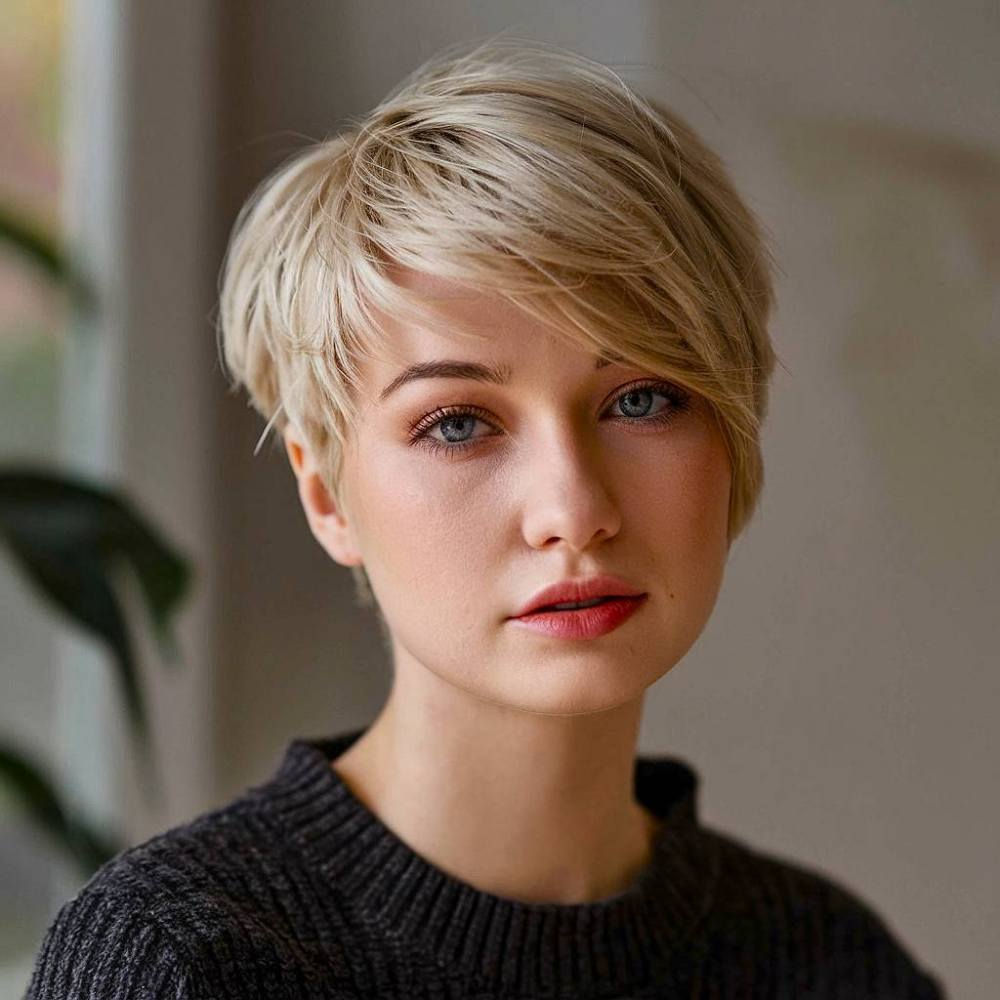
6. Feathered Messy Pixie
Feathered layers create a light, airy feel that softens facial features. This messy pixie moves naturally and feels feminine and graceful. It works well for straight or slightly wavy hair and requires minimal styling.
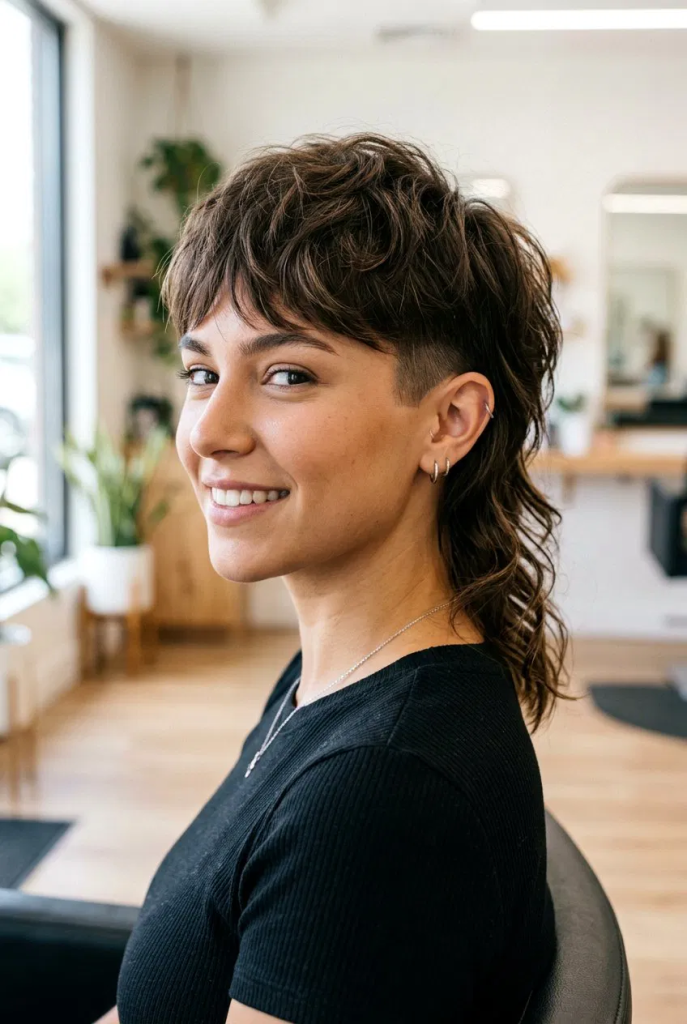
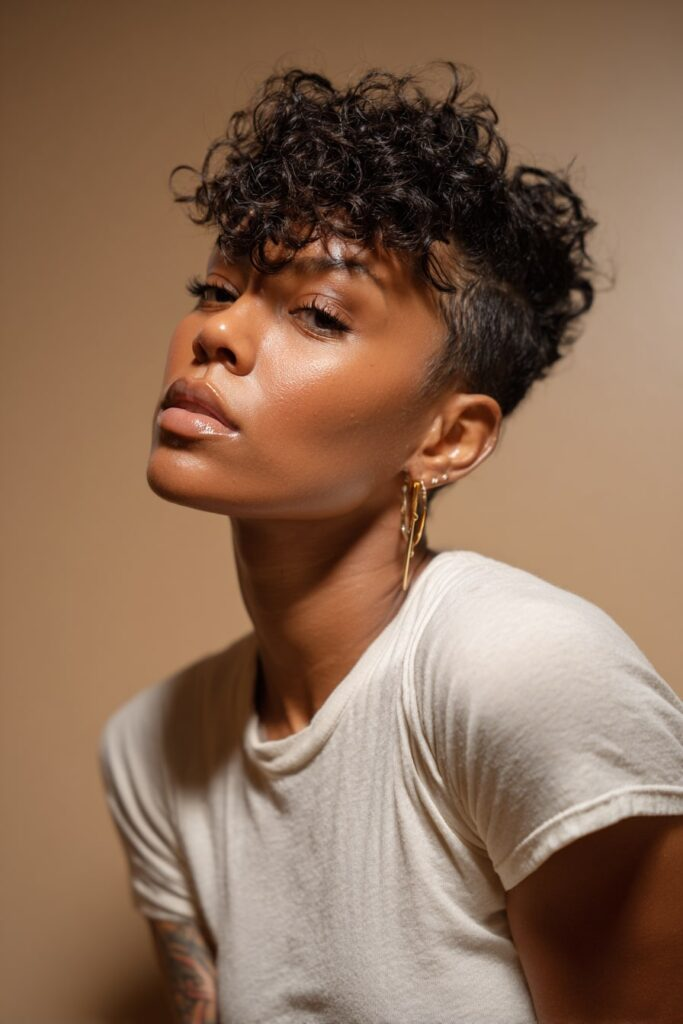
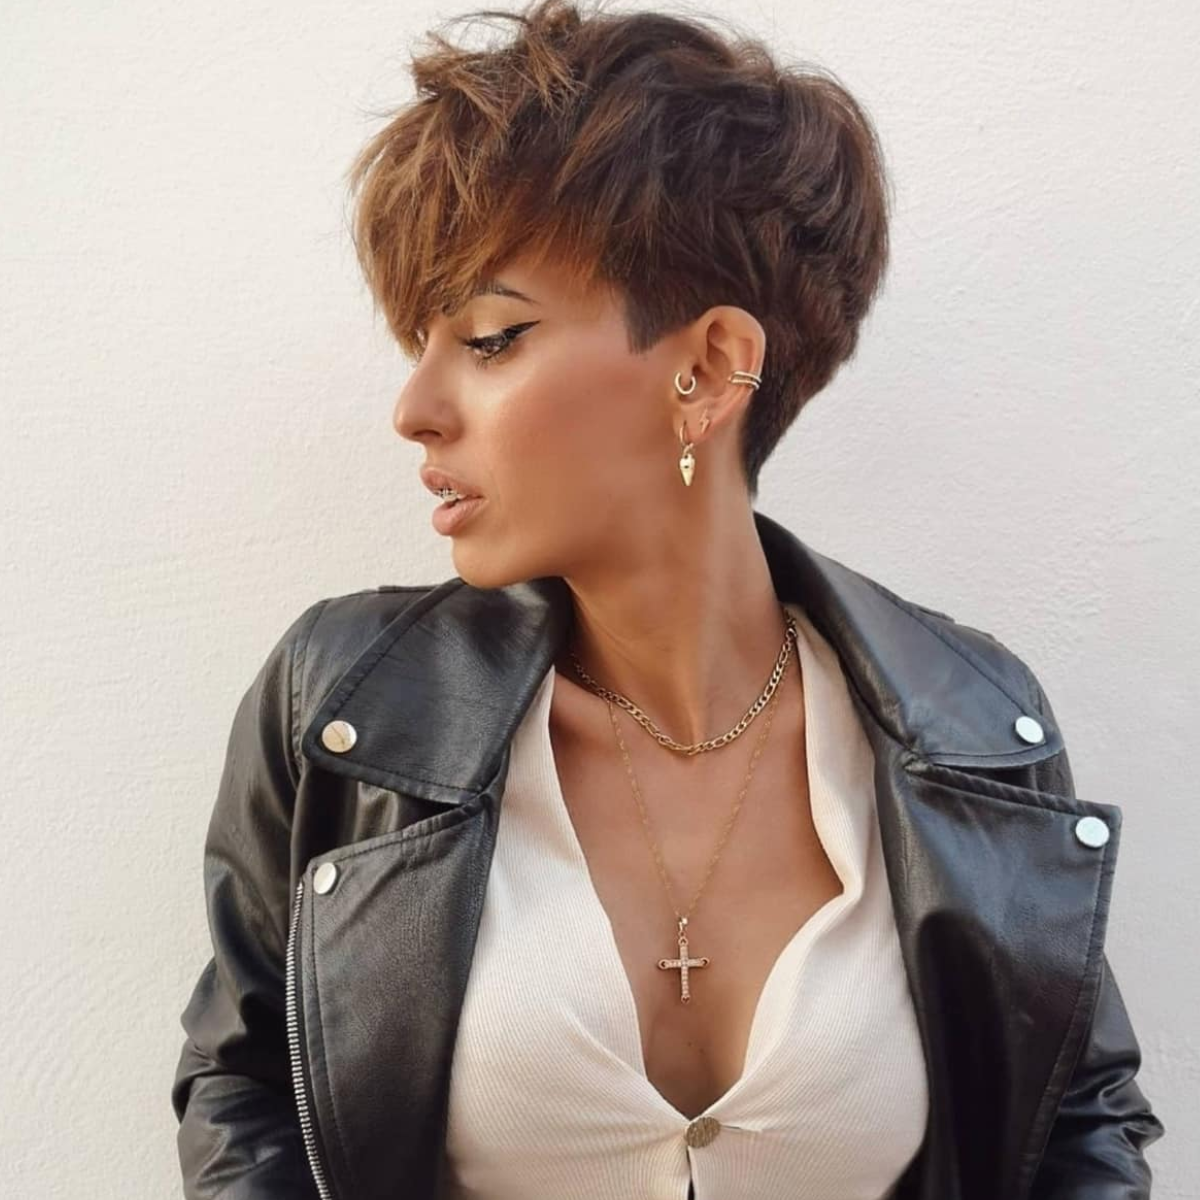
7. Asymmetrical Messy Pixie
An asymmetrical messy pixie features uneven lengths for a stylish twist. One side slightly longer adds interest and drama, bringing attention to facial features and creating a modern edge. This cut is bold, confident, and fashion-forward.
8. Messy Pixie with Curtain Bangs
Curtain bangs add a soft, face-framing element to the messy pixie. The bangs part in the middle and sweep to the sides, creating a romantic and trendy look. This style is polished yet effortless, perfect for any occasion.
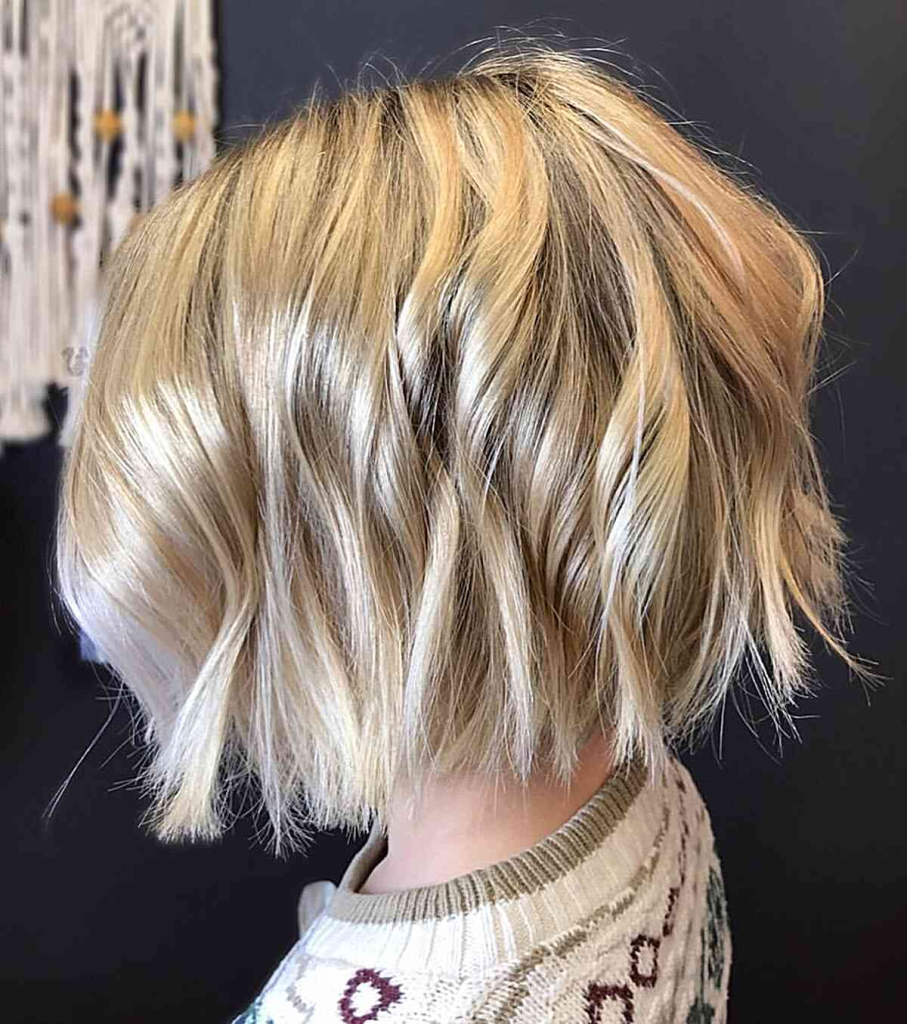
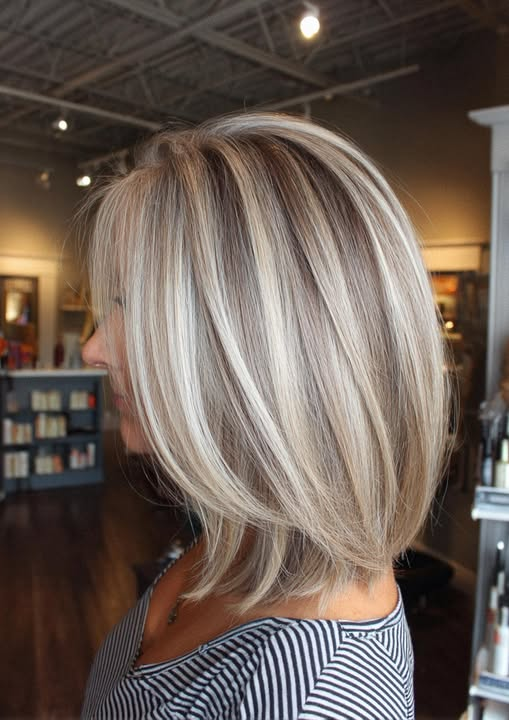
9. Messy Pixie with Highlights
Highlights add significant dimension to a messy pixie, making the layers pop and the style look more dynamic. The color variation creates depth and visual interest, giving the illusion of more volume and texture.
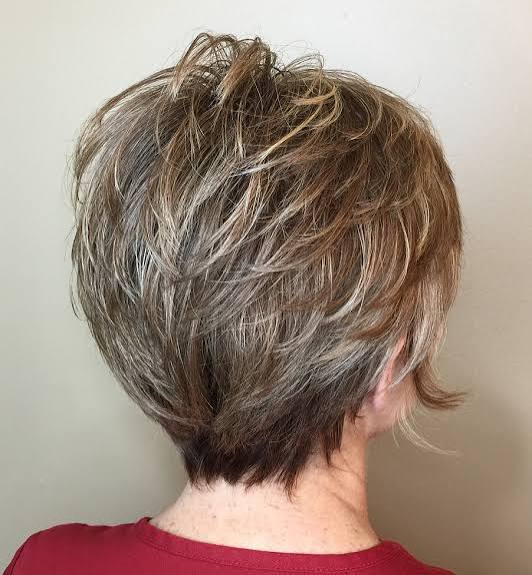
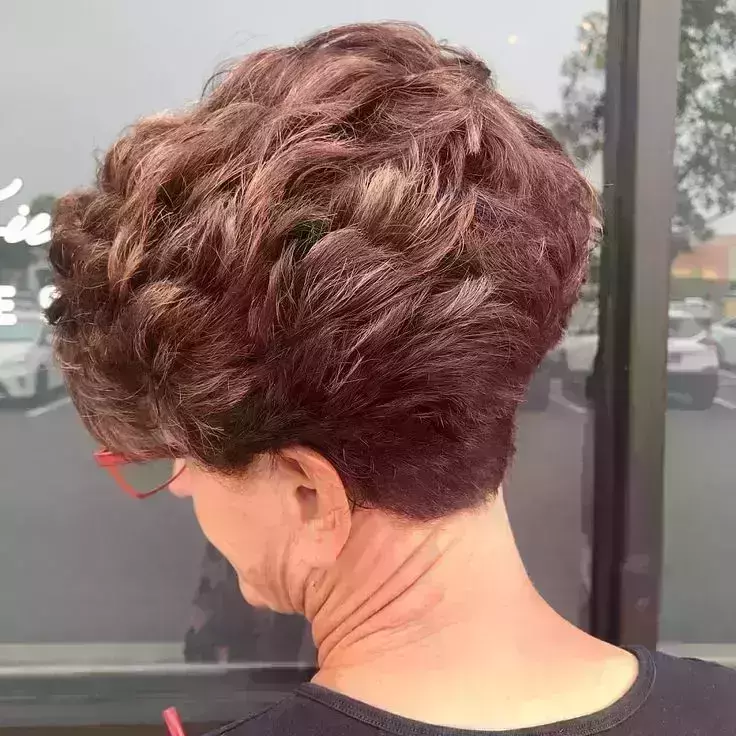
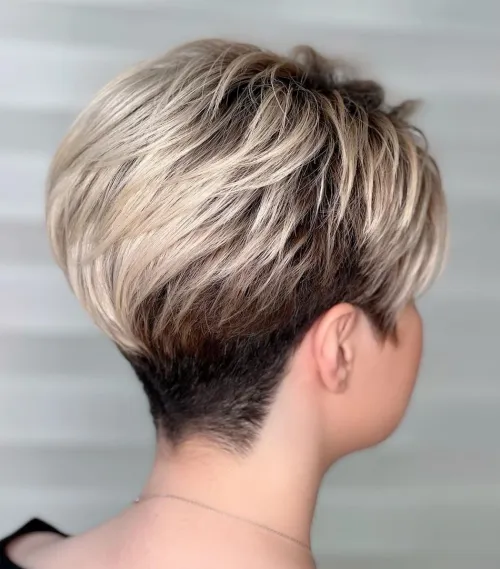
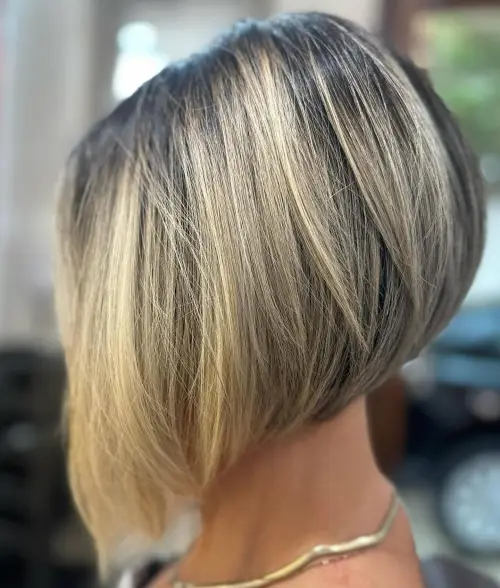
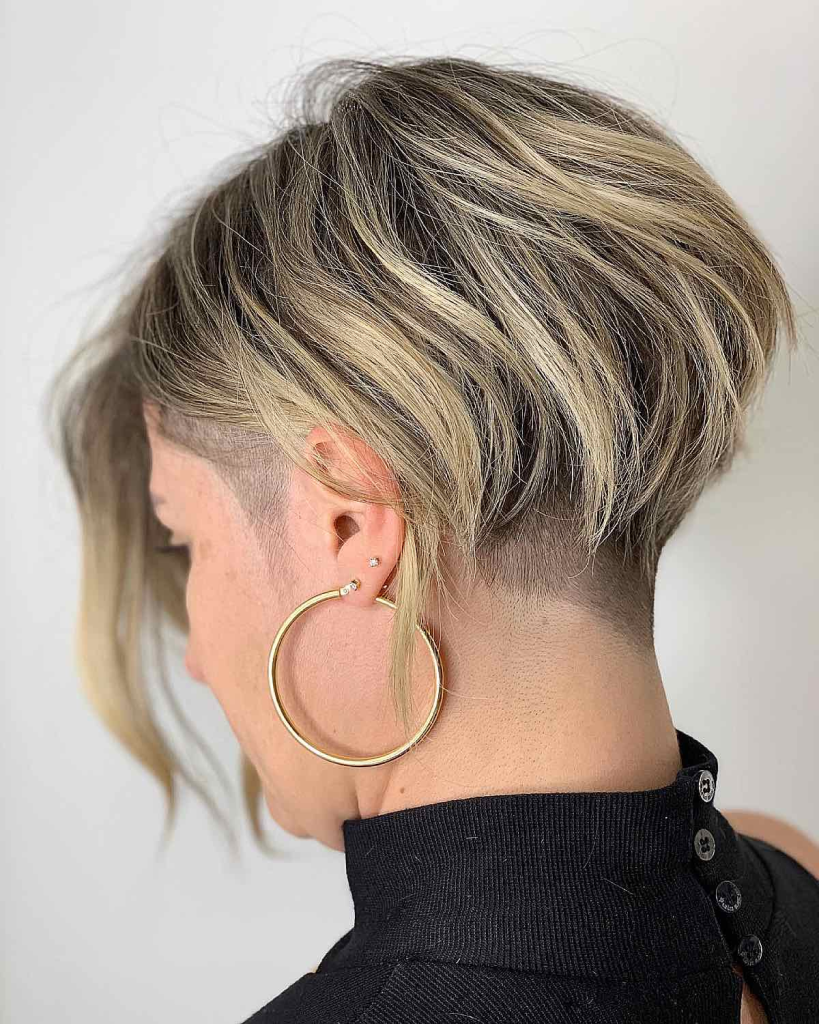
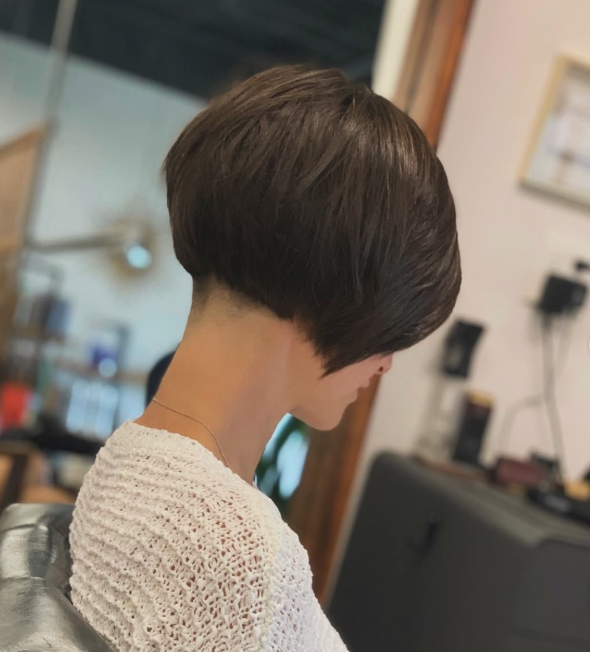
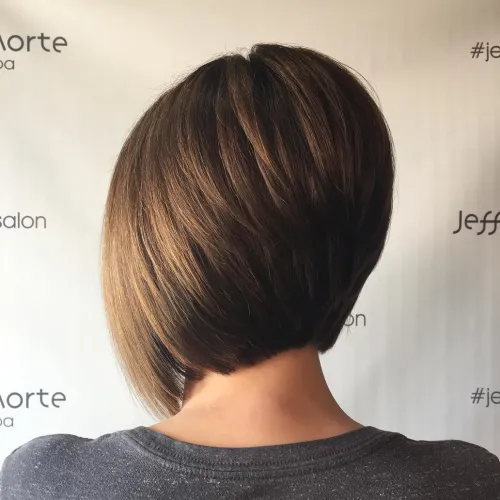
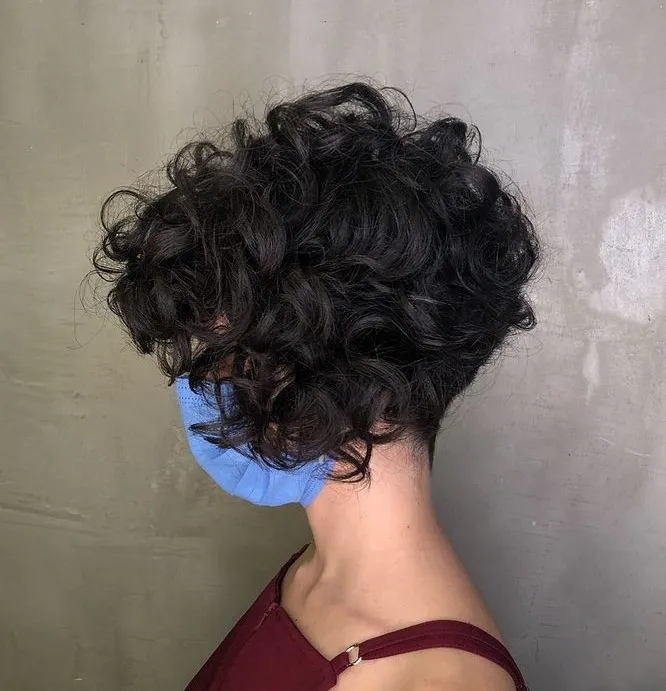
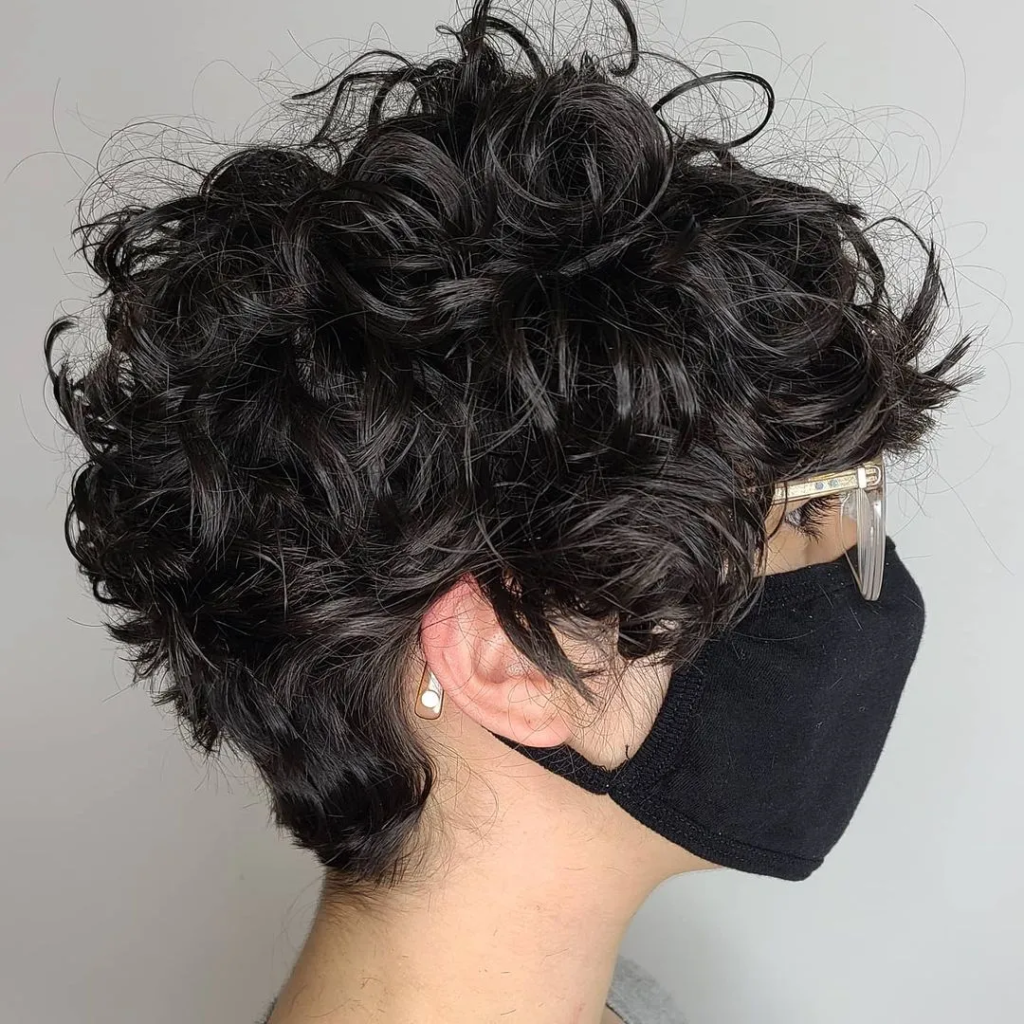
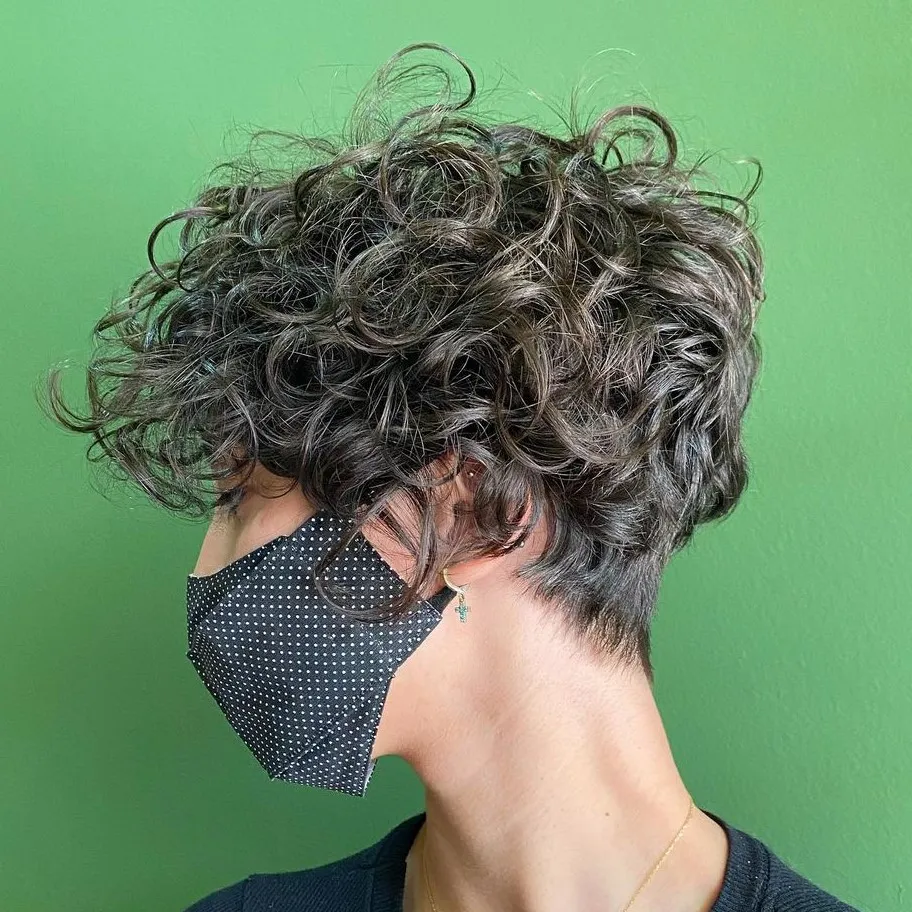
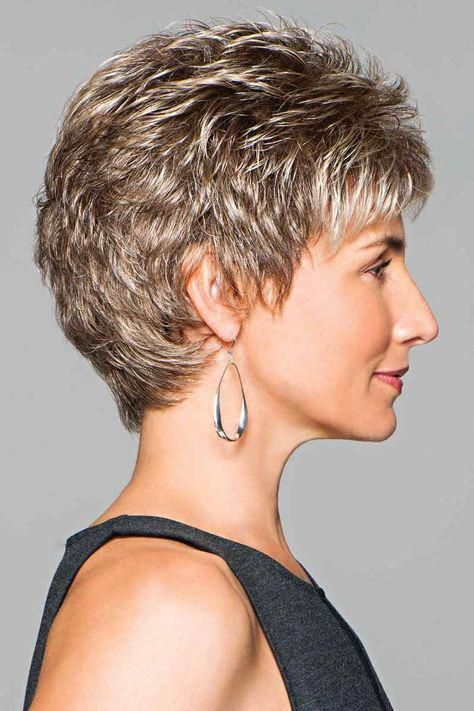
10. Short Stacked Messy Pixie
A short stacked messy pixie features a stacked back that adds volume and lift. The layers are concentrated at the crown, creating a rounded, full silhouette. This style is especially flattering for those with fine hair.
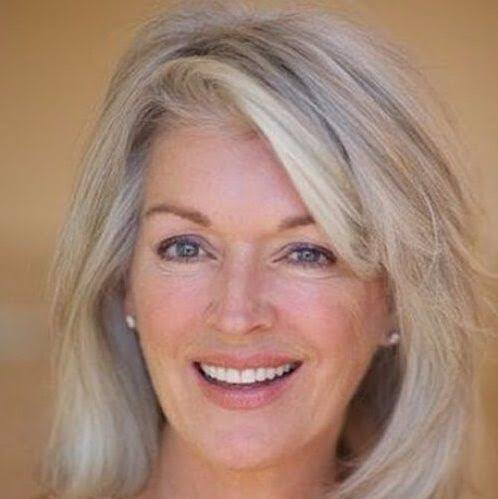
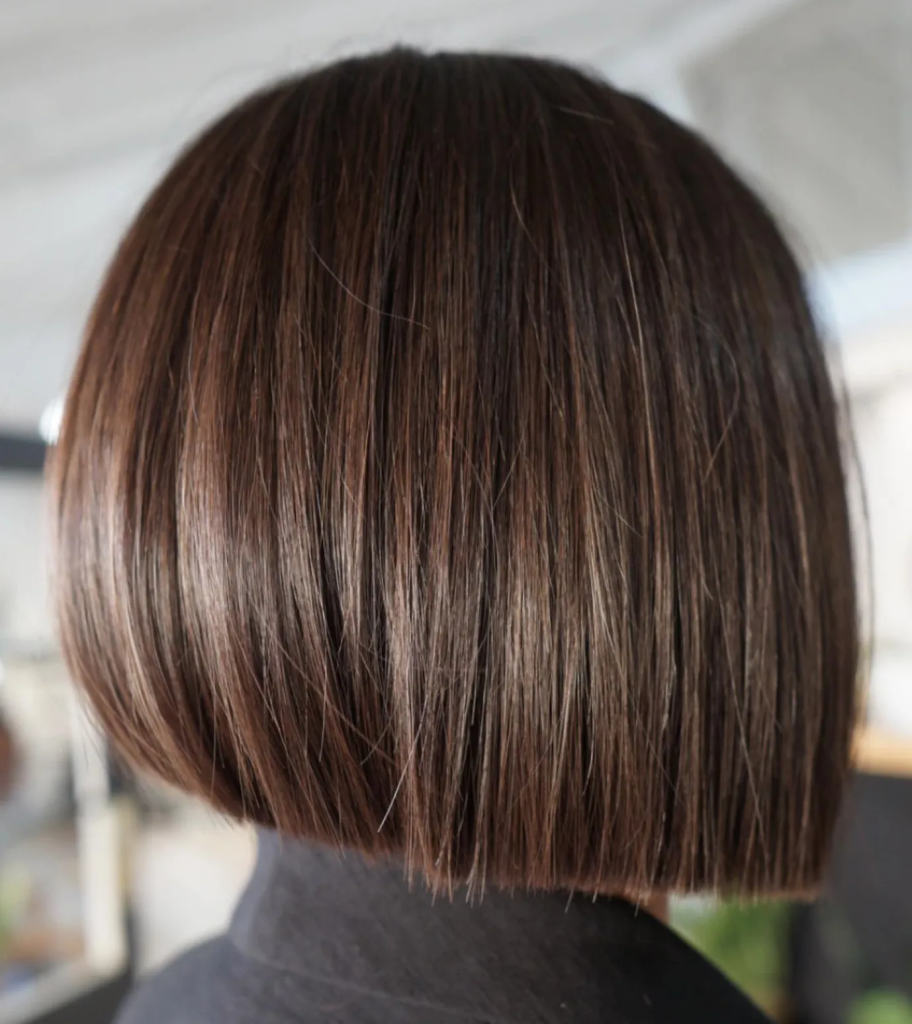
11. Messy Pixie with Wispy Ends
Wispy ends give the messy pixie a soft, romantic feel. The ends are light and delicate, blending seamlessly into the layers. This style is elegant and feminine, perfect for those who want a softer take on the pixie.
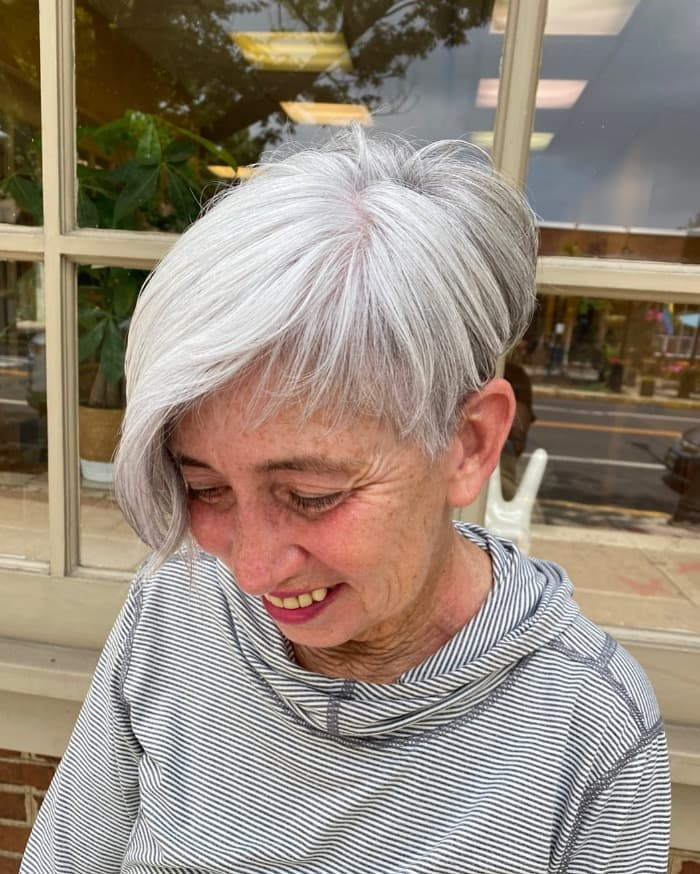
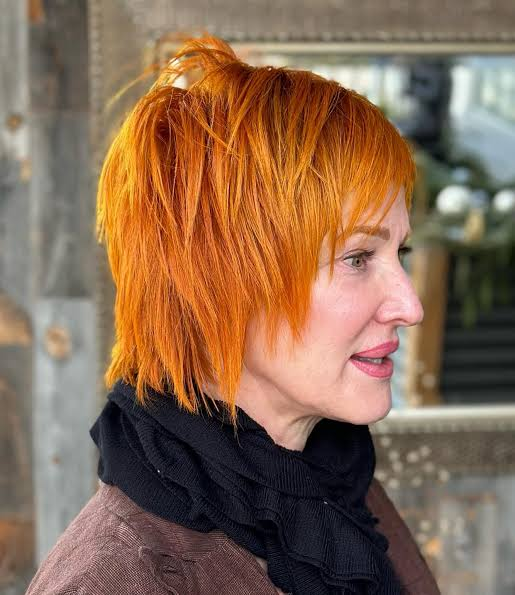
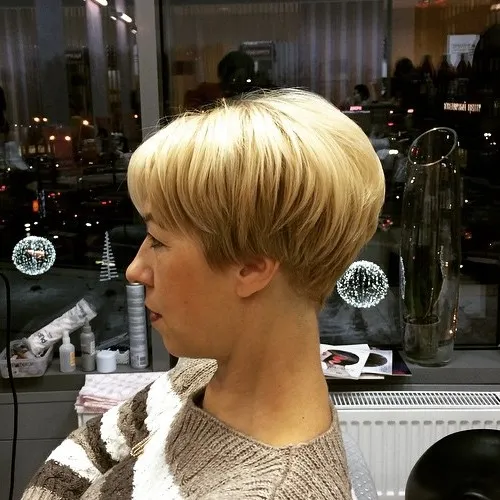
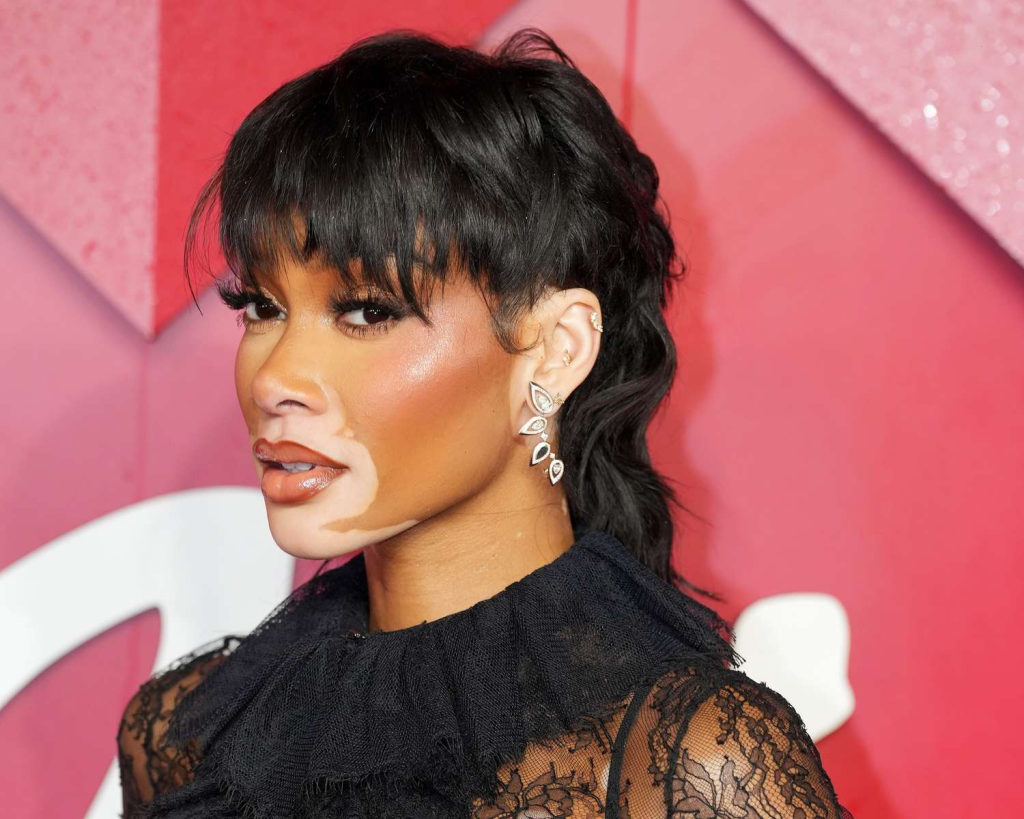
12. Messy Pixie with Long Bangs
A messy pixie with long bangs creates a dramatic and face-framing effect. The bangs are cut longer and can be swept to the side or worn forward for a more mysterious look. This style is elegant, versatile, and adds length to the face.
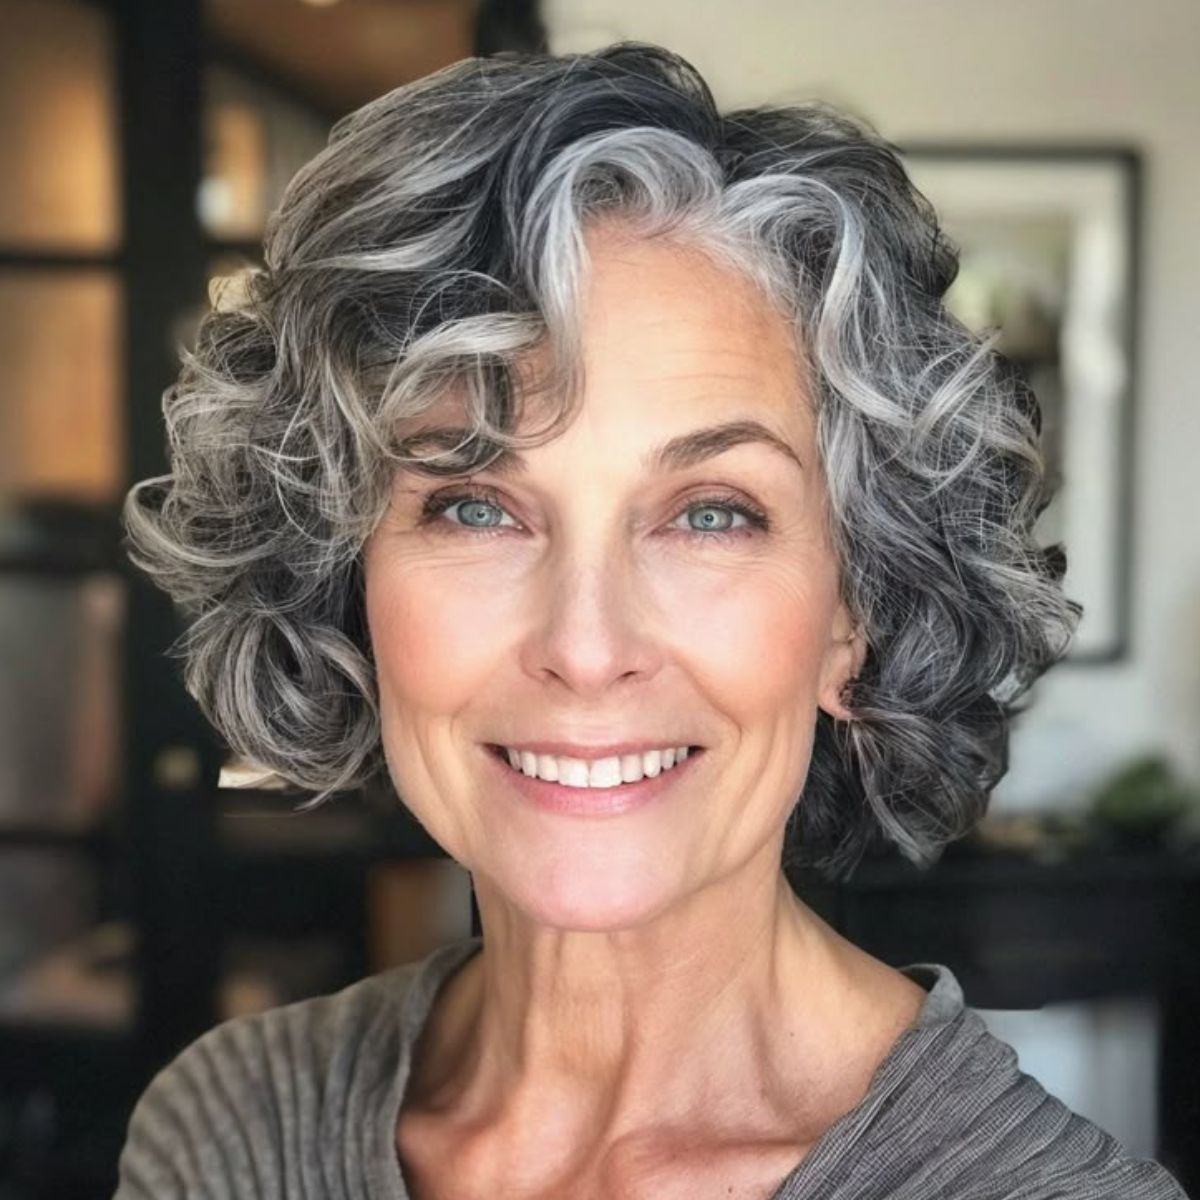
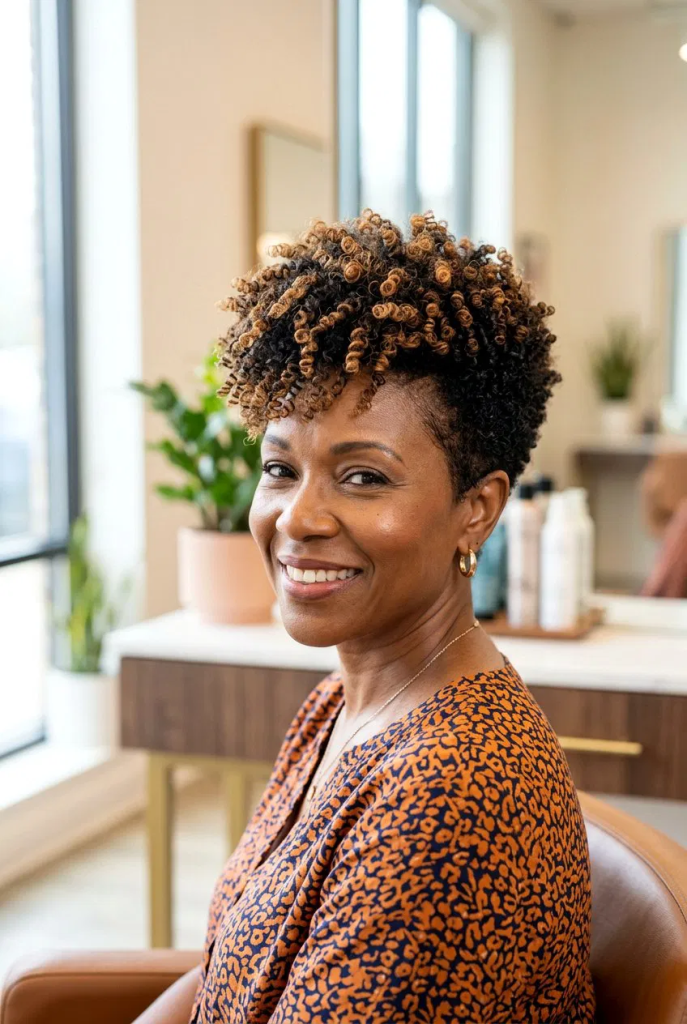
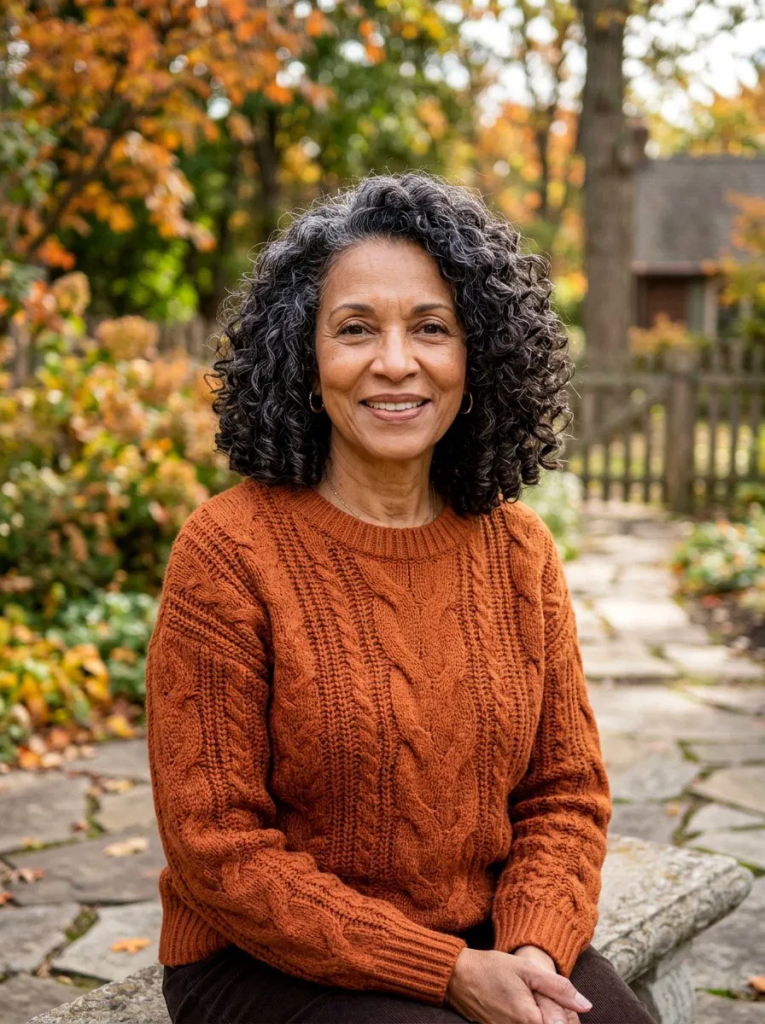
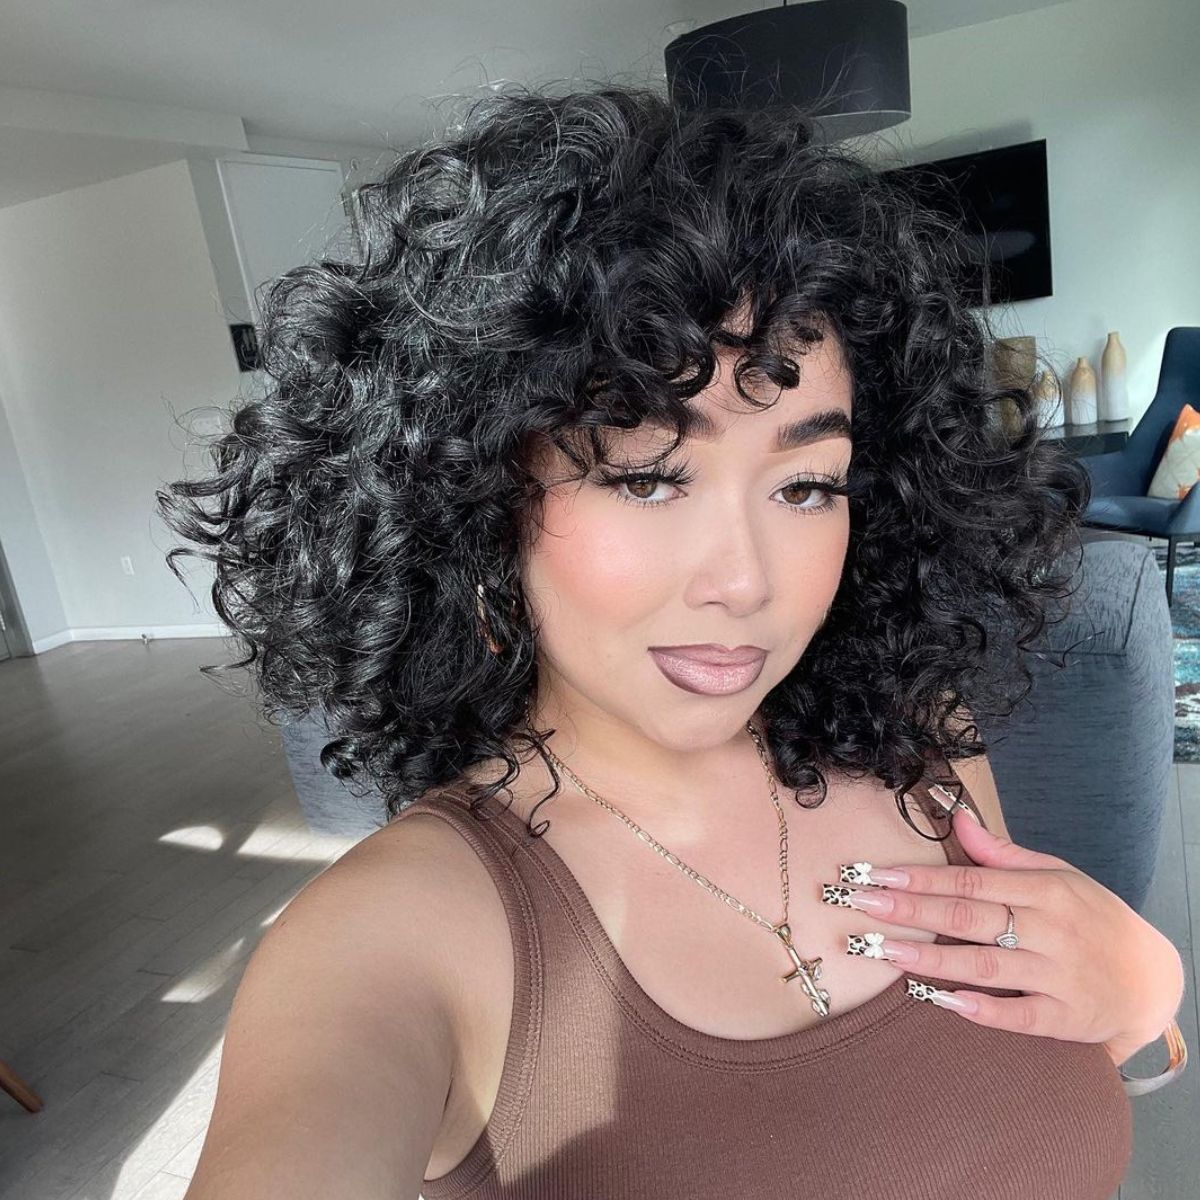
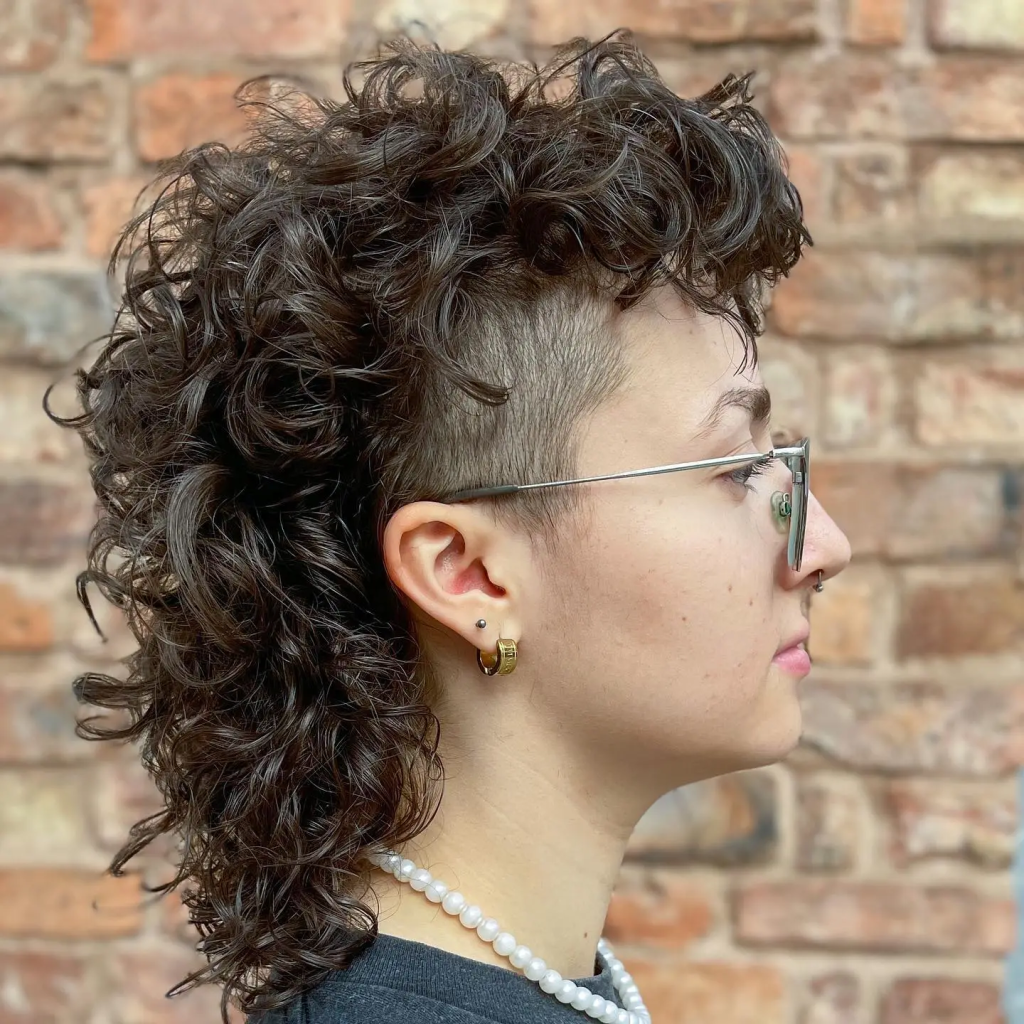
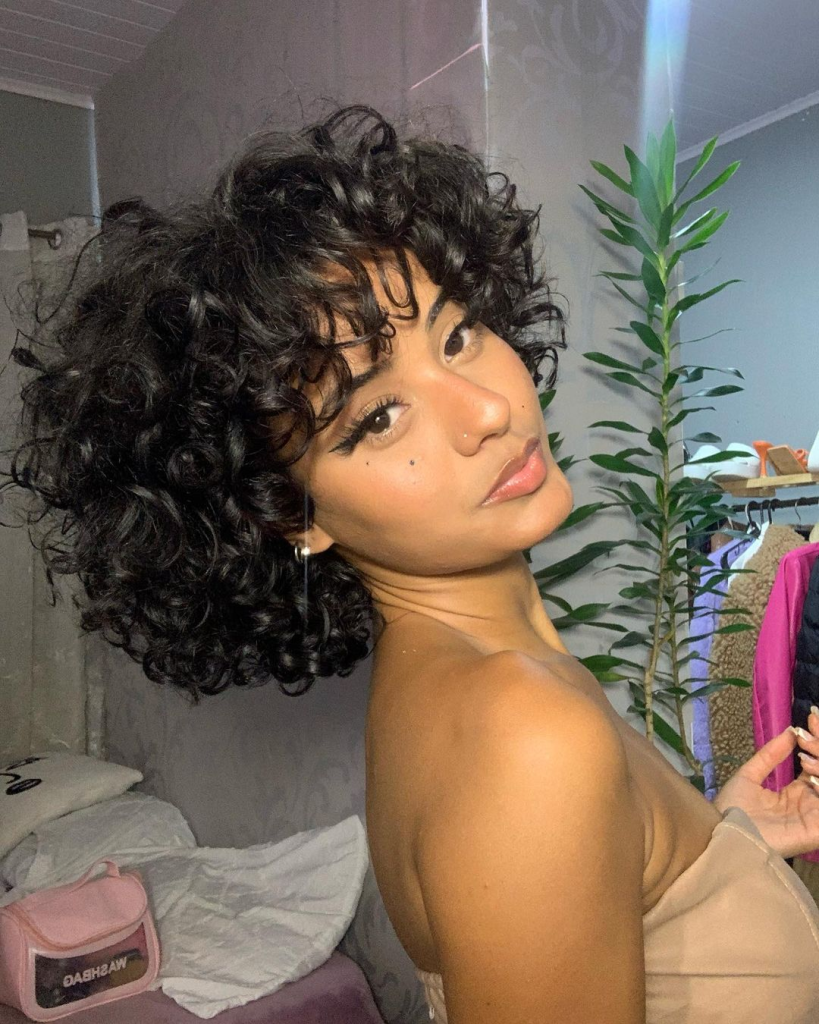
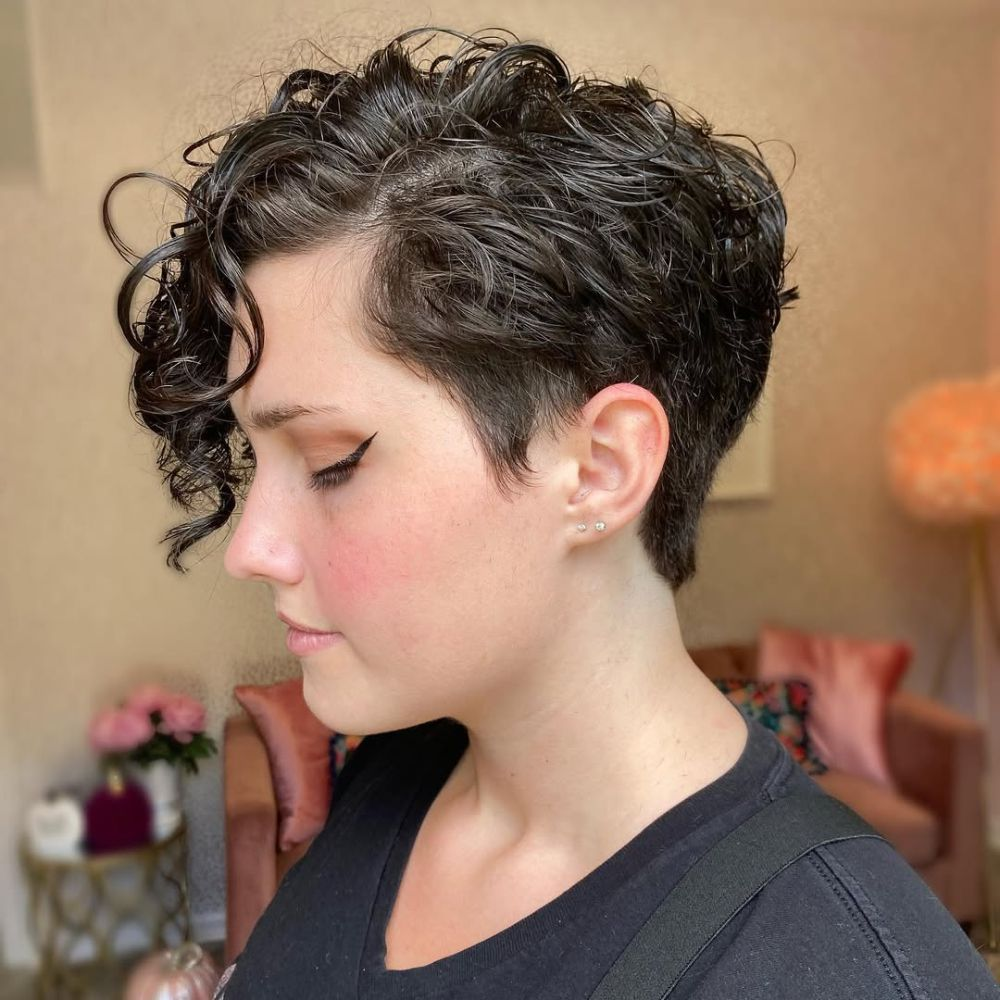
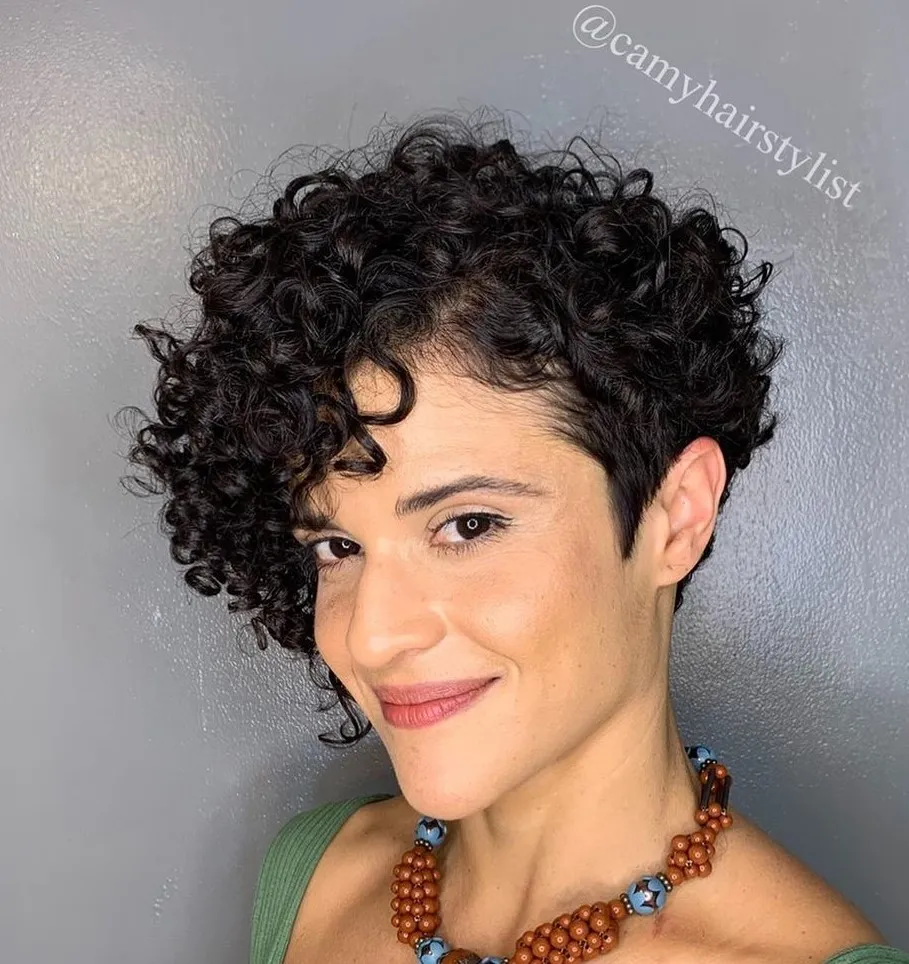
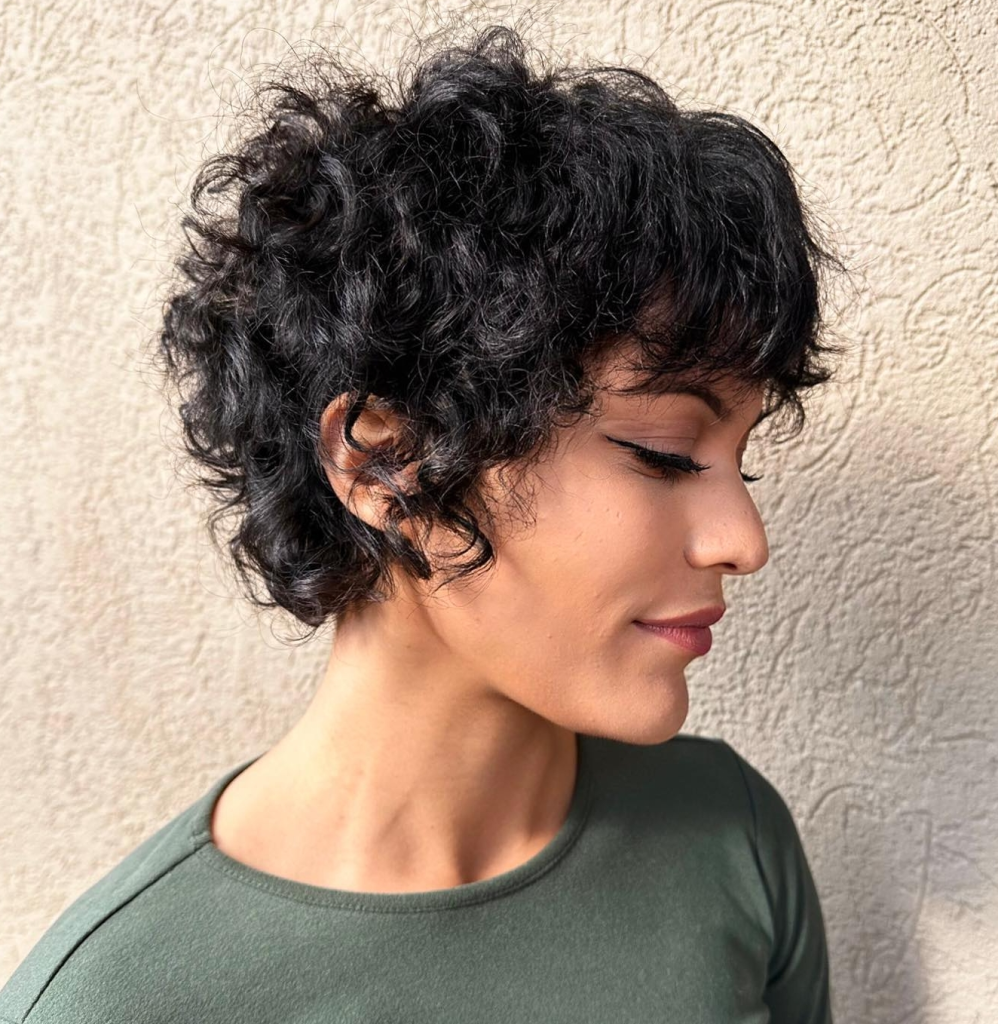
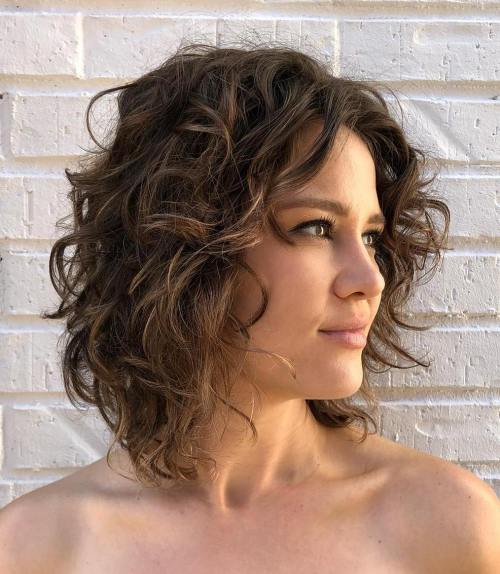
13. Curly Messy Pixie
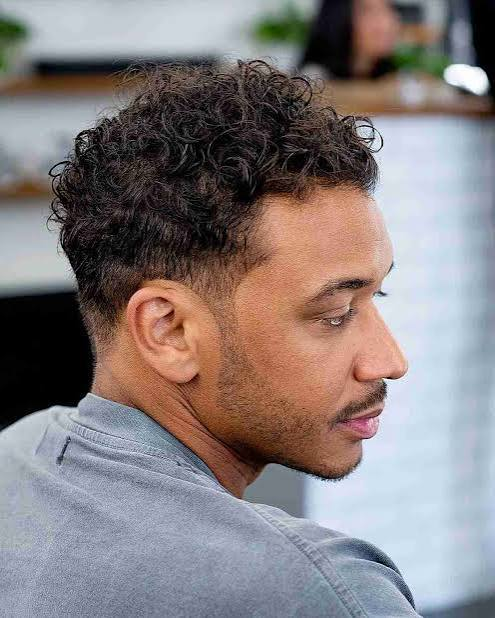
A curly messy pixie embraces natural curls or waves for added personality. The shape allows curls to sit beautifully while maintaining structure, adding volume and playful charm. This style is confident, lively, and full of texture.
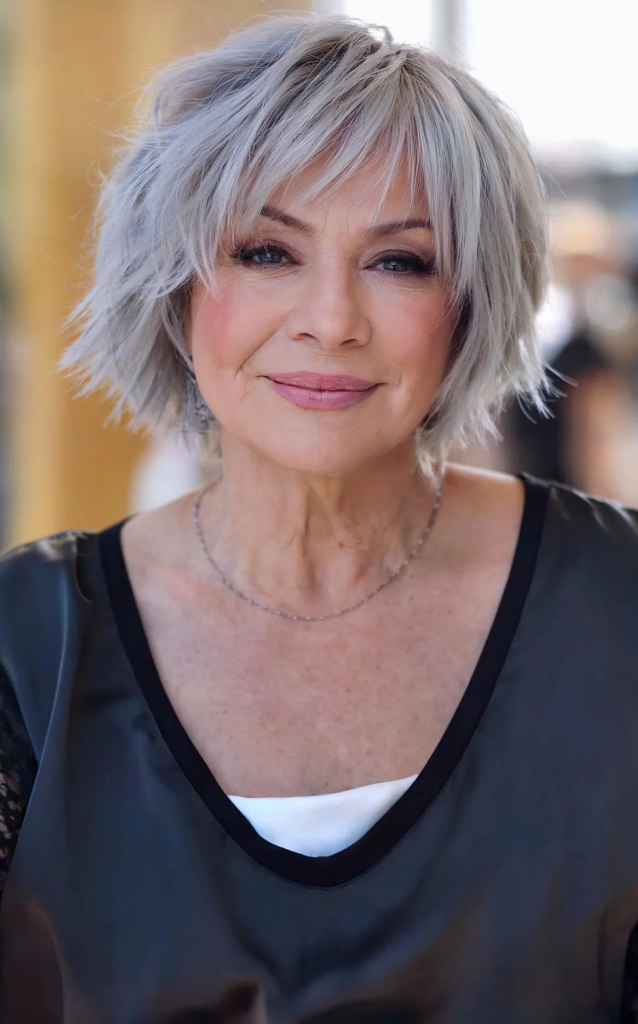
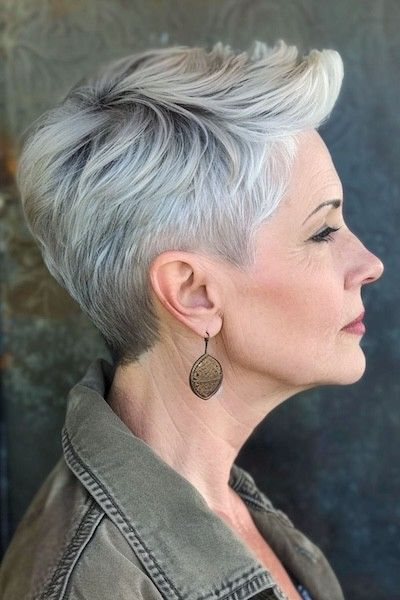
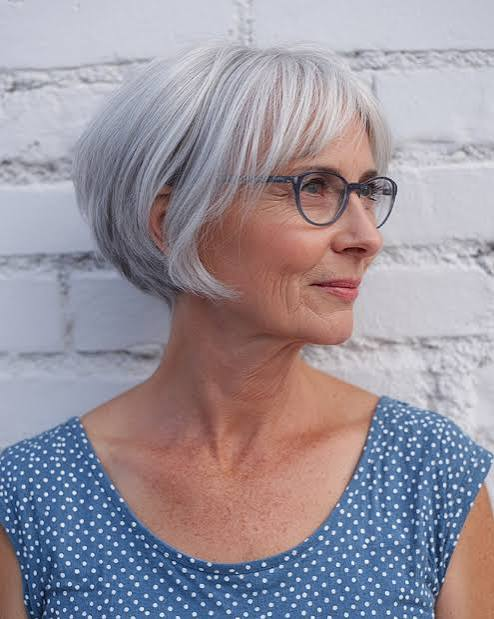
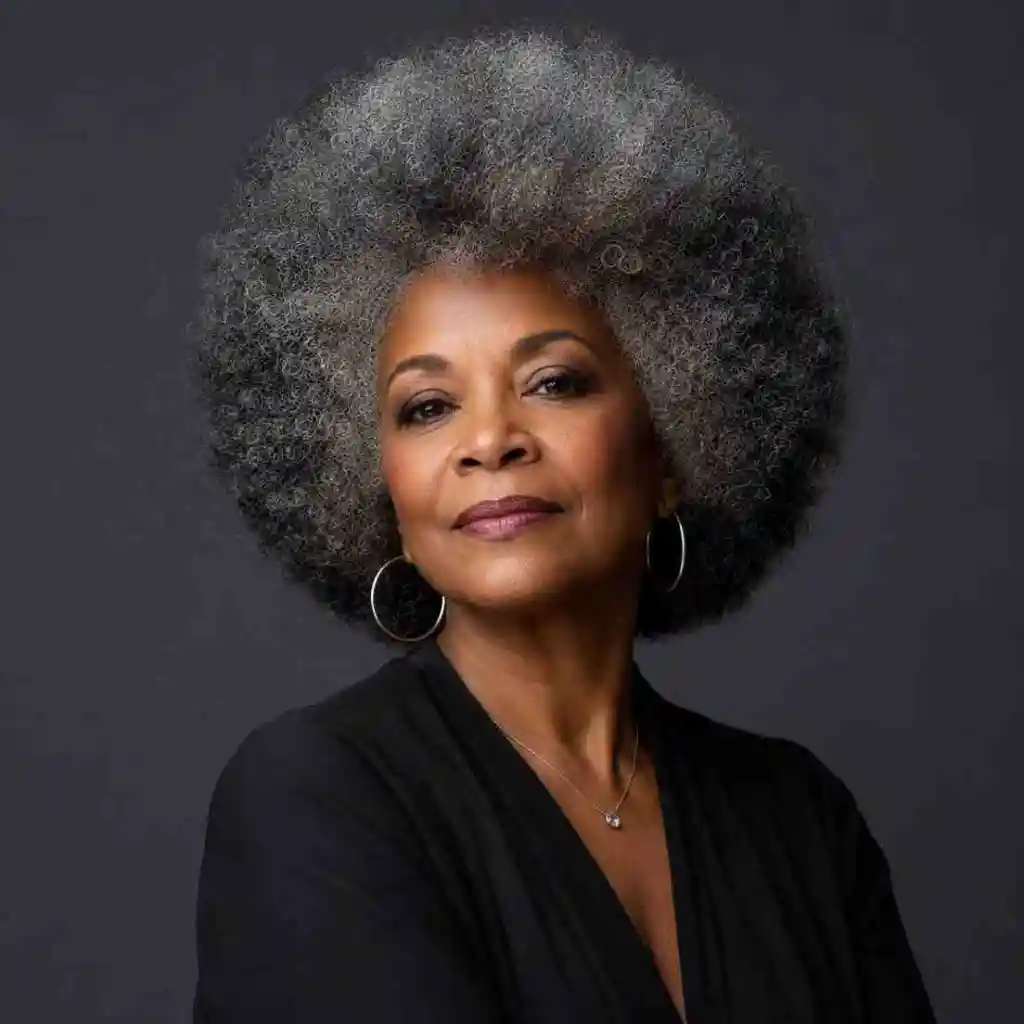
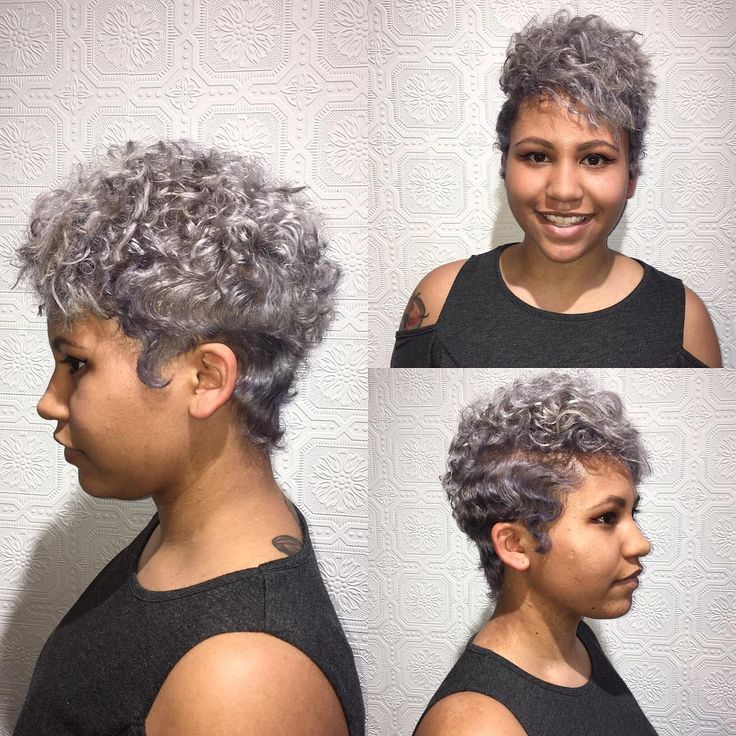
14. Silver Messy Pixie
Embracing your natural silver or gray hair with a messy pixie is a stunning combination. The messy texture adds dimension to silver tones, creating a beautiful, multi-faceted look. This style is both sophisticated and trendy, a true celebration of aging gracefully.
Section: Styling Tips for a Messy Pixie
Styling a messy pixie is all about embracing texture and effortlessness. The goal is to achieve a lived-in, tousled look that feels modern and cool. Start by applying a texturizing spray or mousse to damp hair, focusing on the roots and ends. Use your fingers to tousle and piece out the layers as your hair dries, or use a diffuser for added volume and texture.
A little pomade or styling cream can be rubbed between your palms and worked through the ends for piecey definition and shine. Dry shampoo is your friend for refreshing the style between washes and adding grip to the layers. To maintain the shape of your messy pixie, be prepared to visit your stylist every four to six weeks for a trim.
Frequently Asked Questions About Messy Pixie Haircuts for Women Over 60
Is a messy pixie suitable for women over 60?
Yes, a messy pixie is highly suitable and flattering for women over 60. The texture adds volume and movement, which can be especially beneficial for hair that may have become finer with age. The cut is modern, stylish, and exudes confidence.
Will a messy pixie make me look younger?
A messy pixie can create a youthful, vibrant appearance. The texture and layers soften facial features and add a modern edge that defies age. It is a fresh, confident look that can take years off your appearance.
How do I style a messy pixie?
Apply a texturizing spray or mousse to damp hair and use your fingers to tousle and piece out the layers as it dries. A little pomade can define the ends. Dry shampoo adds grip between washes.
How often should I trim a messy pixie?
To maintain the shape and layers of a messy pixie, it is recommended to get a trim every four to six weeks. This will keep the style looking fresh and prevent it from growing out awkwardly.
Can I have a messy pixie if I have curly hair?
Absolutely. A curly messy pixie embraces natural curls and adds volume and texture. The layers allow curls to spring up with bounce and movement, creating a playful, confident look.
Conclusion
The messy pixie haircut is a powerful and liberating choice for women over 60, offering a style that is both modern and timeless. It exudes confidence, celebrates individuality, and embraces the natural beauty of aging. Whether you choose a classic, textured, or silver variation, the messy pixie is a cut that will make you feel stylish, vibrant, and unapologetically yourself. Embrace the freedom and beauty of a messy pixie and discover the transformative power of a haircut that reflects your inner confidence.
Pin Title: 14 Messy Pixie Haircut for Women Over 60 That Exude Confidence and Style
Pin Description: Discover 14 messy pixie haircuts for women over 60 that exude confidence and style. Embrace a modern, effortless look today.
Pin Image Text: 14 Messy Pixie Haircuts for Women Over 60 | Exude Confidence and Style | Embrace a Modern Effortless Look
Meta Descriptions for Each Article:
Article 1: 14 Layered Hairstyles for Women Over 50 with Thin Hair That Add Volume and Life
Meta Description: Discover 14 layered hairstyles for women over 50 with thin hair that add volume and life. Transform your look with these flattering styles.
Article 2: 12 Medium Length Hairstyles for Thick Hair Half Up Half Down Braid That Are Stunning
Meta Description: Explore 12 stunning medium length hairstyles for thick hair featuring half up half down braids. Elegant looks for every occasion.
Article 3: 15 Short Curly Haircuts for Men That Are Modern and Masculine
Meta Description: Discover 15 modern and masculine short curly haircuts for men. Embrace your natural texture with these stylish looks.
Article 4: 13 Best Haircuts for Round Faces Men That Flatter and Define
Meta Description: Find 13 best haircuts for round faces men that flatter and define. From pompadours to fades, discover your perfect style.
Article 5: 14 Messy Pixie Haircut for Women Over 60 That Exude Confidence and Style
Meta Description: Explore 14 messy pixie haircuts for women over 60 that exude confidence and style. Embrace a modern, effortless look today.
Finding the right haircut can be a transformative experience, especially when it comes to flattering your face shape. For men with round faces, the goal is to create the illusion of length and definition, adding angles and structure that balance the soft curves of the face. The right haircut can elongate the face, highlight your best features, and give you a more sculpted, defined appearance. The key is to choose styles that add height at the top and keep the sides shorter.
The best haircuts for round faces men are those that create vertical lines and avoid adding width to the sides. Styles with volume on top, such as quiffs and pompadours, are particularly effective at creating the illusion of a longer face. Tapered and faded sides also help to slim the face, creating a clean, sharp silhouette. From classic cuts to modern trends, there is a wide range of styles that work beautifully for round faces.
In this guide, we will explore a variety of haircuts that are specifically designed to flatter and define round faces for men. We will cover everything from short, low-maintenance styles to more polished, statement-making looks. We will also provide styling tips, product recommendations, and advice on how to communicate your desired look to your barber. Get ready to discover a haircut that makes you look and feel your best.
13 Best Haircuts for Round Faces Men
Here are thirteen haircuts that are designed to flatter and define round faces.
1. Classic Pompadour
The pompadour is a classic, sophisticated style that adds significant height at the front. The volume on top elongates the face, creating a more balanced, defined silhouette. The sides are kept shorter to avoid adding width. This style is perfect for formal occasions or men who want a polished look.
2. Modern Quiff
The modern quiff is similar to the pompadour but with a more relaxed, textured feel. The hair is styled upward and slightly back, adding volume and height at the front. The sides are tapered for a clean finish. This style is versatile, stylish, and flattering for round faces.
3. Textured Crop
A textured crop features short, textured hair on top with a fringe that falls forward. The texture adds height and dimension, while the short sides keep the look clean. This style is low-maintenance and perfect for men who want a modern, casual look.
4. Side Part with Volume
A side part with volume on top is a classic, timeless style. The hair is parted to one side and styled with height at the front. The volume elongates the face, while the side part adds structure and definition. This style is professional, elegant, and versatile.
5. Fade with Textured Top
A fade with a textured top is a modern, stylish choice. The sides are faded short, while the top is left longer and textured. The contrast between the short sides and the voluminous top creates a slimming effect, making the face appear longer and more defined.
6.
A comb over fade features longer hair on top that is combed to one side, with faded sides. The height and asymmetry of the comb over add definition to the face, while the fade keeps the sides clean and slim. This style is polished, modern, and very flattering.
7. High Top Fade
A high top fade features significant volume on top, with the sides faded high up the head. The height on top creates the illusion of a longer face, while the faded sides add sharpness and definition. This style is bold, confident, and perfect for men who want to make a statement.
8. Spiky Haircut
A spiky haircut adds height and texture at the top, creating a vertical line that elongates the face. The spikes can be styled up or slightly to the side. The sides are kept short to avoid adding width. This style is edgy, youthful, and fun.
9. Ivy League Cut
The Ivy League cut is a classic, preppy style that features slightly longer hair on top that can be styled with a side part or brushed back. The top is kept neat and polished, while the sides are tapered. This style is professional, elegant, and flattering for round faces.
10. Messy Textured Cut
A messy textured cut adds volume and height at the top, creating a relaxed, effortless look. The texture and height elongate the face, while the short sides keep the silhouette clean. This style is perfect for men who want a casual, low-maintenance look.
11. French Crop
The French crop features short, textured hair on top with a straight fringe. The fringe adds a horizontal line that can soften the face, while the short sides keep the look clean. This style is low-maintenance, stylish, and versatile.
12. Slicked Back Undercut
A slicked back undercut features longer hair on top that is slicked back, with short, faded sides. The height and volume at the top elongate the face, while the slicked-back style adds a polished, sophisticated feel. This style is elegant and modern.
13. Faux Hawk
A faux hawk is a subtle version of a Mohawk, with volume concentrated at the center of the head. The height at the top creates a vertical line, while the short sides keep the look clean. This style is edgy, modern, and perfect for men who want a bold, unique look.
Section: Styling Tips for Round Faces
When styling a haircut for a round face, the goal is to create height and avoid adding width. Use a volumizing product, such as a mousse or thickening spray, to add lift at the roots. Blow-dry your hair upward to create height at the top. Use a styling product, such as a pomade or wax, to define the style and hold it in place.
Keep the sides of your hair short to avoid adding width to your face. A fade or taper is an excellent choice. Avoid styles that add volume to the sides or create a round silhouette. Regular trims are essential to maintain the shape and keep the sides from growing out and adding unnecessary width.
Frequently Asked Questions About Haircuts for Round Faces
What is the best haircut for a round face?
The best haircuts for a round face are those that add height at the top and keep the sides short. Pompadours, quiffs, and fades with textured tops are all excellent choices.
Should men with round faces have long hair?
Men with round faces can have long hair, but it is important to keep it styled with volume at the top and avoid adding width to the sides. Long hair that is all one length can make a round face appear rounder.
Are fades good for round faces?
Yes, fades are excellent for round faces. The short sides create a slimming effect, while the longer hair on top adds height and definition.
How do I make my face look less round with a haircut?
Choose a haircut with volume on top and short sides. This creates vertical lines that elongate the face and make it appear more oval.
What should I tell my barber for a round face?
Tell your barber that you want a haircut with height on top and short sides. Ask for a fade or taper to keep the sides clean and slim.
Conclusion
Choosing the right haircut for a round face is about creating balance, definition, and the illusion of length. The styles outlined in this guide offer a range of options that flatter and define, from classic pompadours to modern fades and textured crops. By adding height at the top and keeping the sides short, these haircuts create a more sculpted, balanced silhouette. Work with a skilled barber, use the right products, and enjoy the confidence that comes with a haircut that makes you look and feel your best.
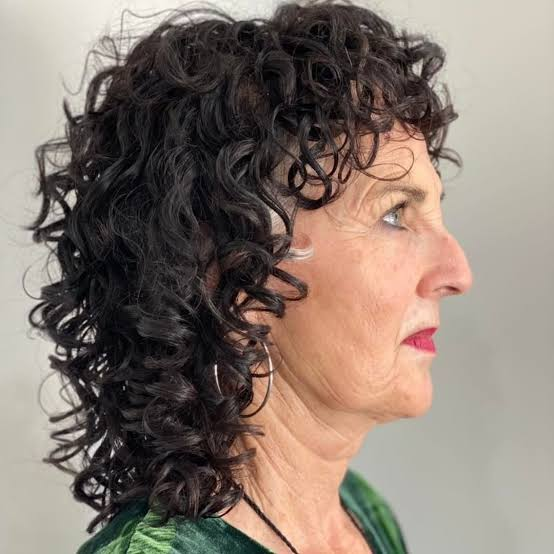
As hair naturally transitions through the aging process, its texture, elasticity, and pigment behavior undergo significant structural changes. For many, silver and gray hair fibers emerge with a coarser, more wire-like texture, while others experience a subtle thinning that causes traditional straight styles to look limp and sparse. Curly hairstyles for older women provide a strategic, incredibly beautiful solution to these shifts by working with the hair’s natural physics rather than against them. Instead of spending hours trying to force thinning hair into a flat blowout, embracing a structured, layered curly cut instantly mimics the density, bounce, and joyful vitality of youthful hair.
The true secret to selecting successful curly hairstyles for older women lies in creating an upward visual lift that flatters changing facial features. Gravity naturally pulls facial contours downward over time, and wearing long, heavy, unlayered hair can inadvertently drag the gaze down with it, accentuating fine lines and a softening jawline. A masterfully sculpted curly crop, bob, or layered lob completely reverses this optical effect. By placing strategic, graduation layers around the cheekbones, eyes, and brow line, the curls act as a soft, organic frame that lifts the features, brightens the eyes, and adds a romantic softness to the overall expression.
In addition to the immediate anti-aging visual benefits, a texture-first approach drastically simplifies your daily morning routine. Gray and silver curls possess an incredible natural luminescence that catches the light beautifully when they are properly moisturized and shaped. You no longer need to subject fragile, maturing hair strands to the damaging heat of flat irons or aggressive chemical straighteners. Whether you want to showcase tight, springy silver coils or soft, flowing gray waves, these 13 elegant curly hairstyles will help you find a look that is sophisticated, low-maintenance, and radiantly confident.
13 Curly Hairstyles for Older Women
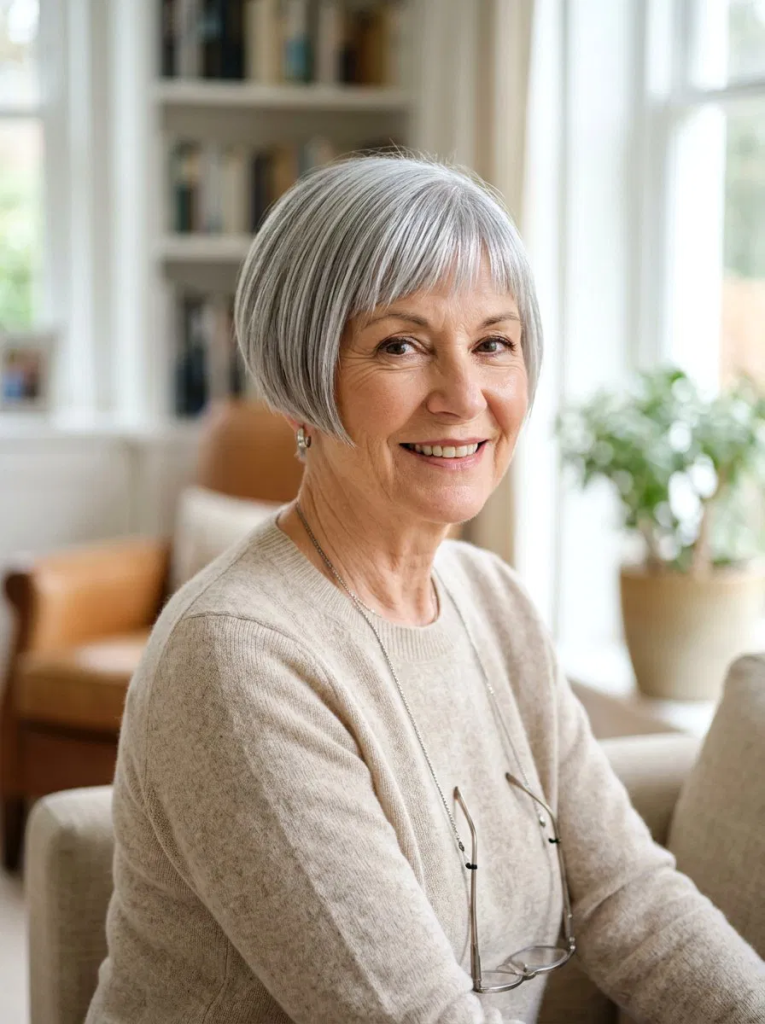
1. The Classic Rounded Silver Pixie-Bob
A timeless and highly sophisticated silhouette that cuts the hair short enough to manage effortlessly while leaving enough length to showcase beautiful curl loops. The shape is kept round and full, hugging the head gracefully to conceal any sparse parting lines. These curly hairstyles for older women look exceptionally clean, bright, and regal on pure white hair.
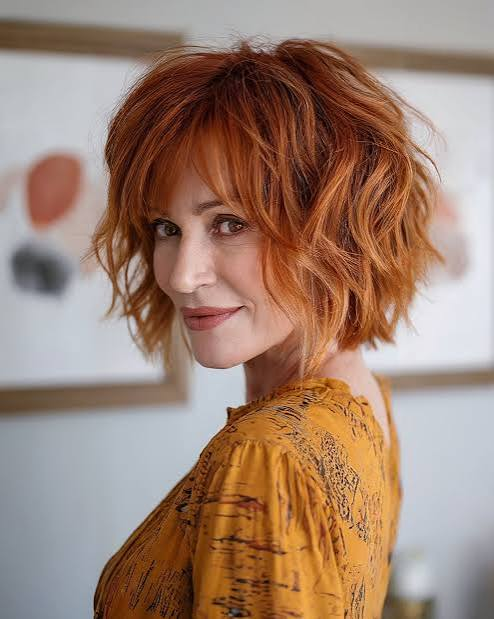
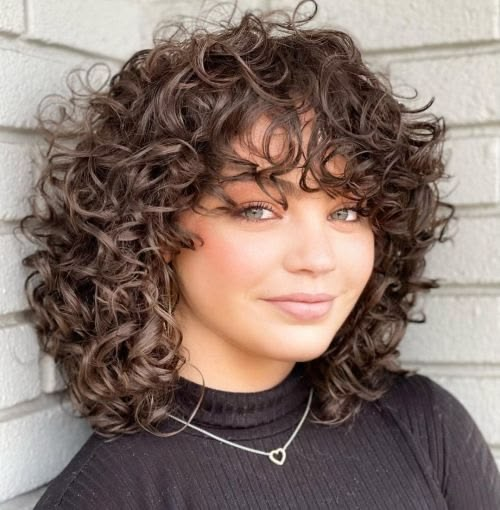
2. Face-Framing Layered Curly Lob
Resting softly right at the collarbone, this long bob uses layered internal texturizing to prevent the bottom from expanding into a heavy shape. Strands around the face are cut into soft, cascading steps that sweep outward, beautifully highlighting the cheekbones. It remains a universally flattering option within the curly hairstyles for older women category.
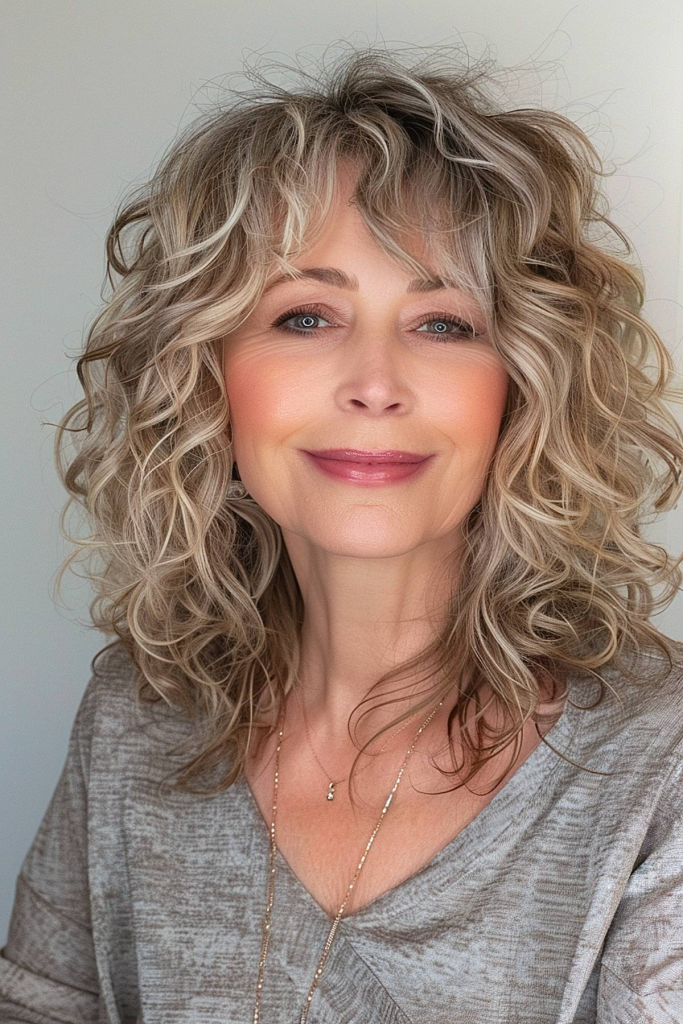
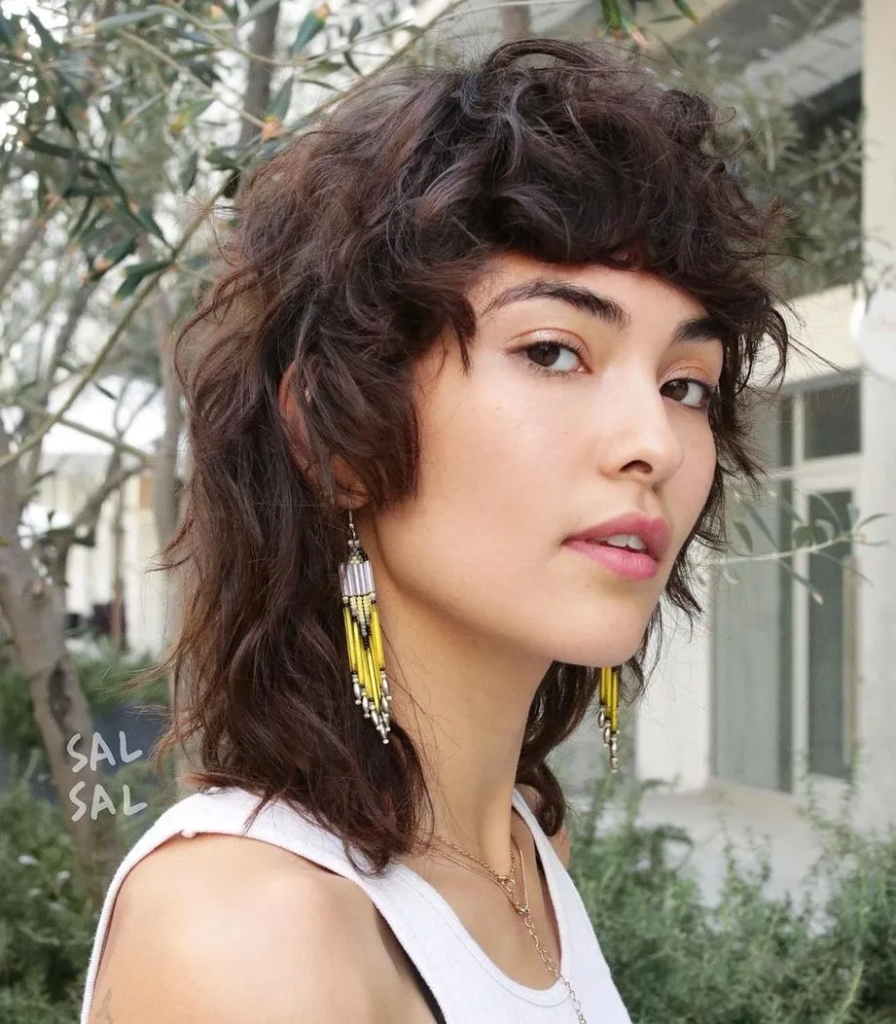
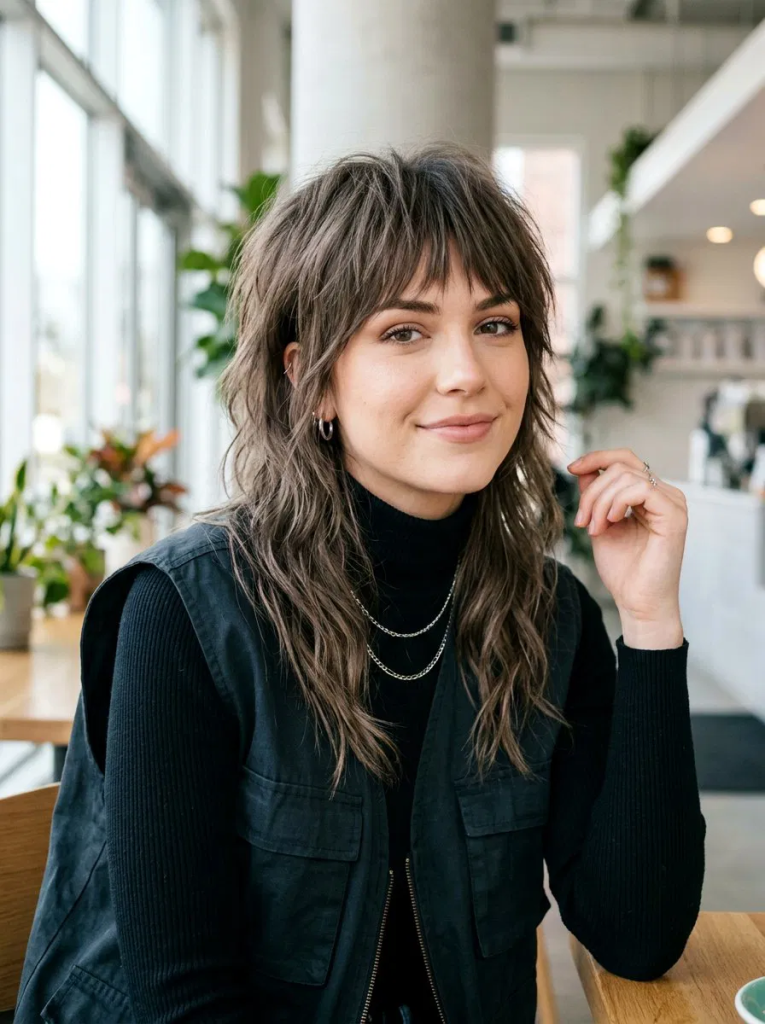
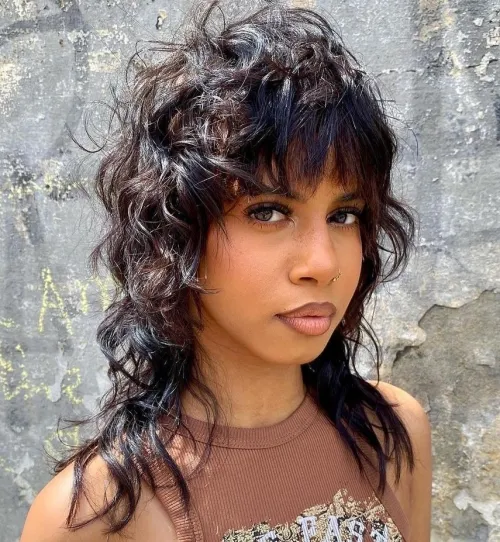
3. The Soft Curly Shag with Wispy Bangs
An incredibly youthful and playful cut filled with plenty of disconnected, piecey layers throughout the crown. It features an ultra-soft, curly fringe that gently skims the eyebrows, which works wonders for softening forehead lines while adding a lovely volume up top. This is a fantastic choice among modern curly hairstyles for older women.
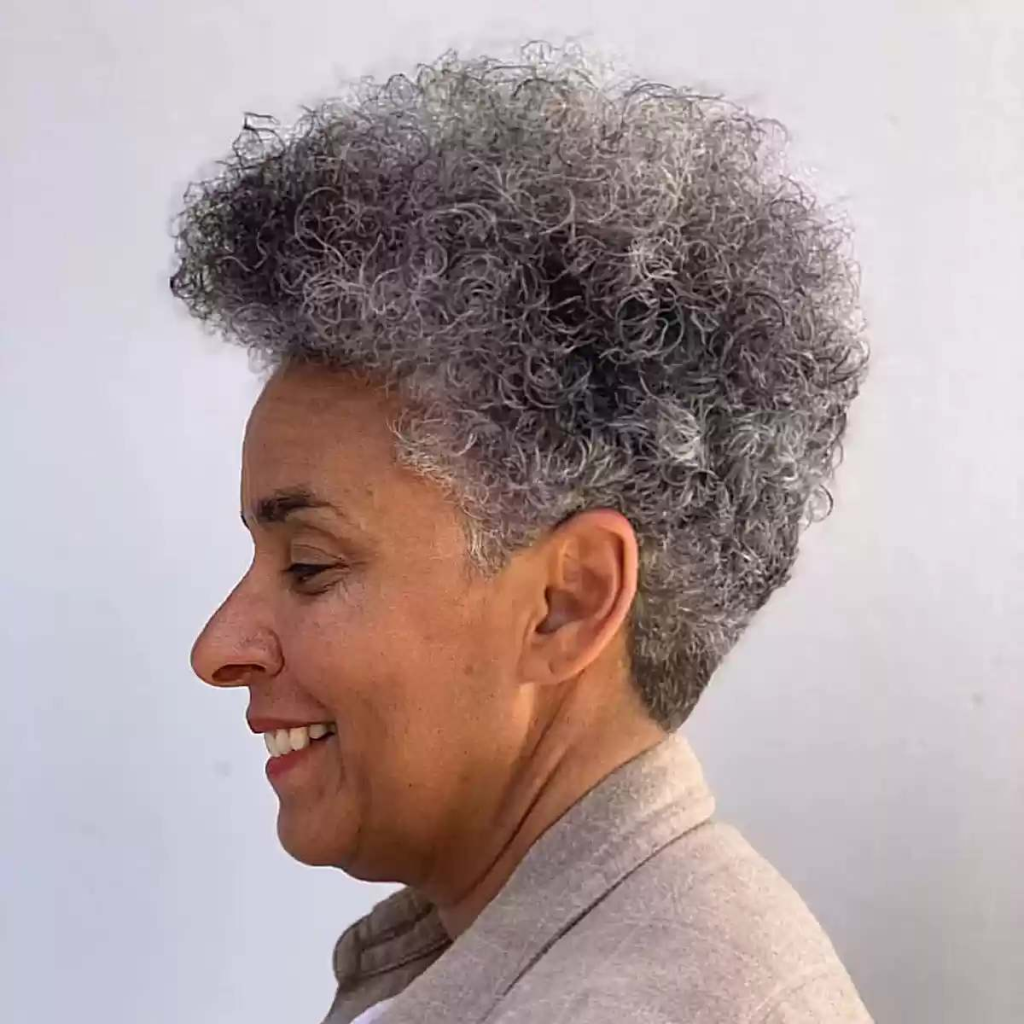
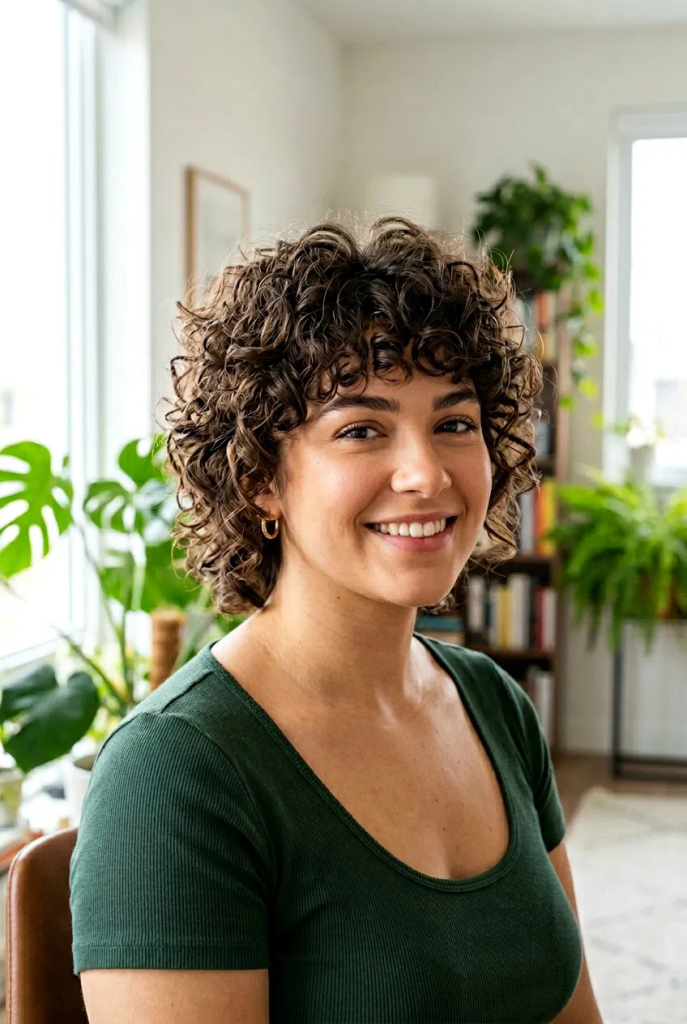
4. Tapered Nape Curly Crop
For women who want ultimate styling ease without sacrificing an ounce of feminine charm. The hair at the back of the neck is cut clean and short, while the top curls are left long, bouncy, and full of natural height. This cut updates the curly hairstyles for older women catalog with a crisp, low-maintenance elegance.
5. The Voluminous Bouncy Wedge Cut
Utilizing precise graduation lines through the back to force the top layers to stack neatly over one another, building an immediate, permanent roundness. The angle slopes down toward the front, giving natural curls a highly structured, organized look that always stays neat. It is a stunning variation of curly hairstyles for older women.
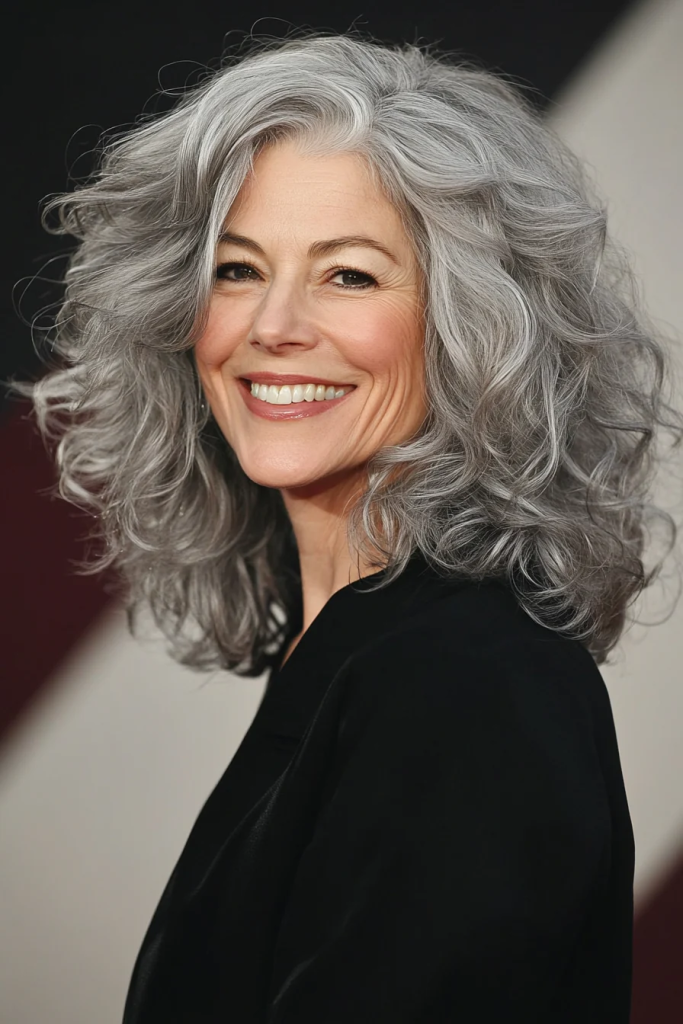
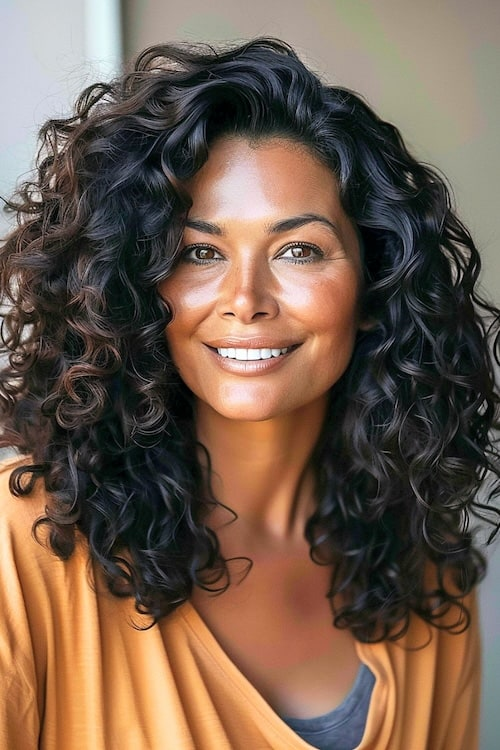
6. Extended Shoulder-Length Spiral Cascade
For older women who proudly want to keep their length while ensuring their curls stay healthy, springy, and full of life. The cut incorporates deep vertical layers to remove interior weight, allowing long silver spirals to dance freely without pulling flat at the roots. It holds an iconic spot inside curly hairstyles for older women trends.
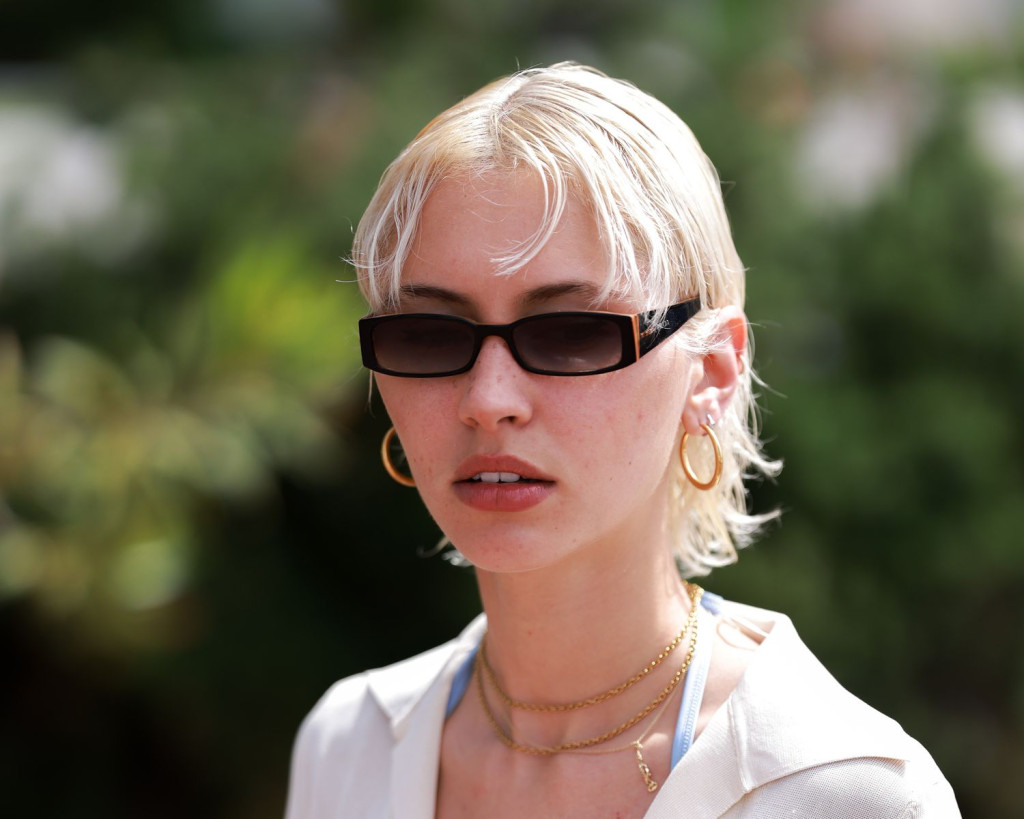
7. The Asymmetrical Textured Side-Sweep
A contemporary, highly stylish cut where one side is clipped slightly shorter to encourage a deep, dramatic side parting. The rest of the curls sweep gracefully across the forehead, adding an elegant, artistic touch that pairs beautifully with bold eyewear. This is an exceptional choice for modern curly hairstyles for older women.
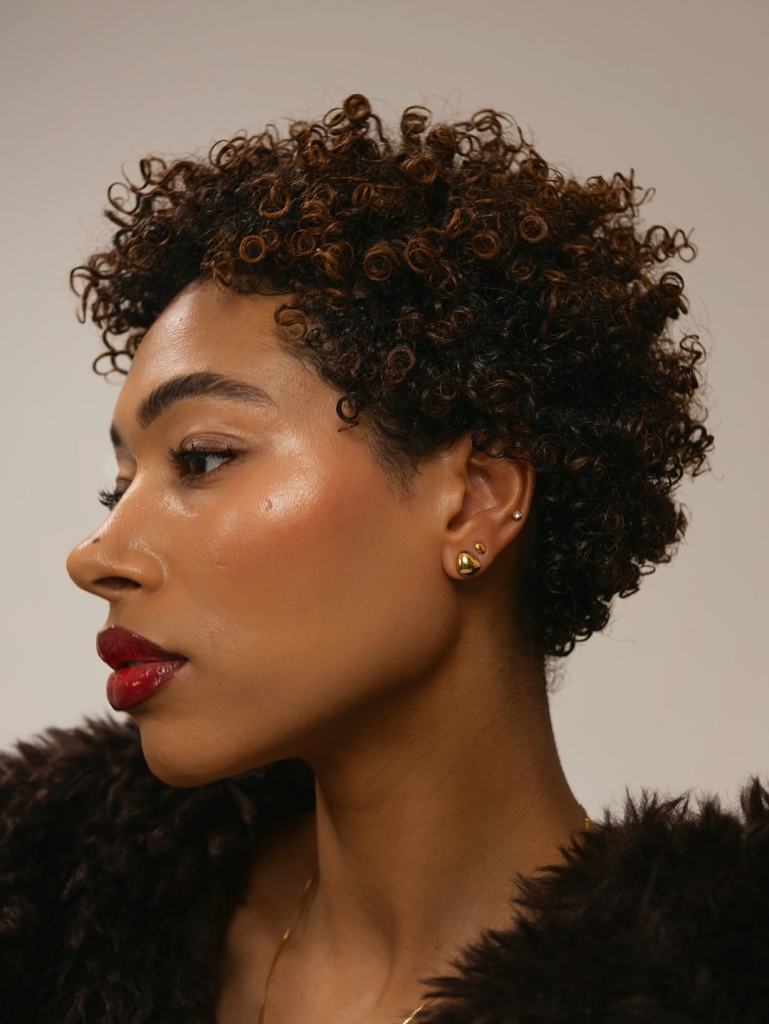
8. Soft Halo Curly Afro
Specifically tailored for tight, glorious type 4 natural coils that look stunning when shaped into a perfect, uniform sphere. The hair is cut into an even halo that frames the face equally from all angles, maximizing natural volume and projecting immense confidence. These curly hairstyles for older women celebrate natural texture completely.
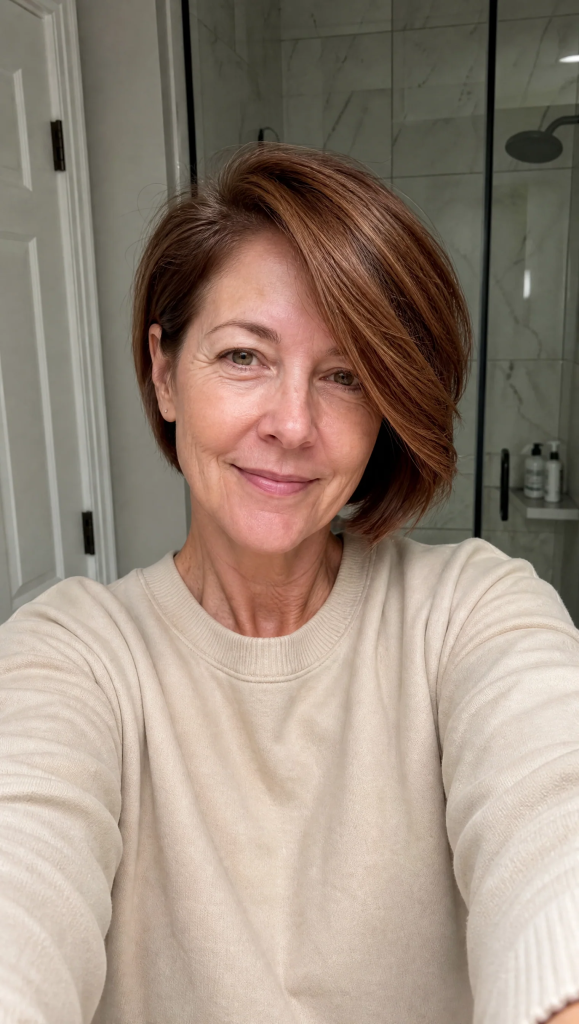
9. Textured Stacked Curly Bob
Combining the clean, sophisticated perimeter of a classic bob with the volume-boosting power of short, stacked layers at the crown. From every angle, this style injects direct fullness into fine, thinning textures, ensuring the hair never falls flat throughout the day. It is a highly recommended option for curly hairstyles for older women.
10. Deva-Cut Defined Spiral Lob
Cut entirely on dry hair, curl by curl, to respect how each individual ringlet naturally behaves and shrinks. This customized method guarantees there are no awkward gaps or surprise short pieces, resulting in a beautifully balanced, incredibly defined shape. It shines brightly within the curly hairstyles for older women lineup.
11. Soft Wave Crop with Open Forehead
Perfect for older women with soft, loose waves who prefer to keep their hair fully out of their eyes. The front layers are cut to naturally sweep backward and off to the side, creating an open, bright facial frame that highlights your smile. These curly hairstyles for older women look wonderful with minimal styling effort.
12. The Geometric Curly Bowl Cut
A highly fashion-forward, architectural design that maintains a heavy, blunt, and rounded line running smoothly from the fringe around to the back. It gives a very thick, dense appearance to the hair, making it a fantastic choice for women dealing with thinning crowns. It adds a premium edge to curly hairstyles for older women.
13. Feathery Tapered Silver Cascade
Featuring very light, sliced layers that allow the ends of the curls to look soft, airy, and feathery rather than blunt. The silhouette stays narrow at the bottom and full at the top, perfectly balancing mature features with a gentle touch. This remains an exceptional choice for elegant curly hairstyles for older women.
More Info: Styling Curly Hairstyles for Older Women
Styling mature curls successfully requires shifting your main objective from heavy control to deep, weightless hydration. As hair ages and loses its natural pigment, the sebaceous glands produce less oil, leaving silver and gray strands naturally prone to dry texture and frizz. When working with curly hairstyles for older women, always skip harsh, alcohol-laden gels that dry out the hair shaft. Instead, invest in a rich, water-soluble styling cream or a nourishing curl foam that pumps clean moisture directly into the cuticle, keeping individual ringlets soft and flexible.
The manner in which you dry your hair will determine how much youthful volume you can maintain throughout the week. After washing your hair, avoid rubbing it roughly with a traditional terry cloth towel, as the coarse fibers can disrupt your curl pattern and cause immediate breakage on fragile strands. Instead, gently blot the excess water out using a soft microfiber towel or an old cotton t-shirt. Use a diffuser on the lowest heat setting to dry your roots, pushing the hair gently upward toward the scalp to set your built-in layers into a voluminous shape.
To keep your mature curls looking bright, vibrant, and completely free of yellow discoloration, you must incorporate a targeted color-correcting routine. Gray and white hair textures are highly porous, meaning they easily absorb dull yellow tones from environmental factors, hard water minerals, and heat styling. Use a high-quality purple or violet-tinted shampoo once every two weeks to neutralize brassy spots, followed by a deep conditioning mask to maintain maximum elasticity. This simple step ensures your curly hairstyle always looks radiantly silver, fresh, and salon-polished.
Frequently Asked Questions
My gray hair is suddenly growing in with a much coarser, wire-like texture. Will a layered cut help tame it? Absolutely! Coarse gray hair often struggles to lay flat, which makes a blunt cut look stiff. Adding customized internal layers breaks up that stubborn weight, allowing the coarse fibers to soften up, bend naturally, and organize into beautiful, cohesive curl patterns.
What is the single best styling product to prevent fine, thinning mature curls from looking flat? Look for a lightweight volumizing curl mousse or root-lifting foam. Avoid heavy waxes, heavy raw oils, or thick pomades, as these dense products will quickly overload fine hair strands, pulling your crown layers downward and exposing the scalp.
Is it a good idea to get a curly fringe or bangs if I have a lot of wrinkles around my eyes? Yes, a soft, piecey, and curly fringe is actually one of the absolute best natural camouflages for forehead lines. By keeping the bangs light and wispy rather than heavy and solid, you soften the upper face beautifully without closing off your eyes.
How can I refresh my curls on the second and third day without washing my hair all over again? Never brush through your curls with a standard hairbrush when dry. Instead, mix a small amount of leave-in conditioner with warm water inside a spray bottle. Lightly mist your hair to reactivate the products already in your strands, and gently scrunch with your fingers.
Final Thoughts
Curly hairstyles for older women prove that transitioning through different hair eras is an incredible opportunity to embrace a vibrant, volume-filled look. By choosing a style that uses strategic layering to create a natural visual lift, you can instantly frame your face with a youthful, radiant softness. Remember to partner with a stylist who excels in cutting natural textures and understands the unique behavior of mature hair fibers. With a moisturizing product routine and a commitment to keeping your silver tones bright, you will enjoy a gorgeous, bounce-filled style that flatters your features beautifully every single day.
The true artistry of a short stacked bob is revealed entirely from the back profile, where the precise physics of hair engineering overrides natural flatness. Short stacked bob haircuts back view choices offer a strategic solution for anyone struggling with limp, lifeless strands that collapse under their own weight. By cutting the hair progressively shorter as it moves down toward the nape of the neck, a stylist creates a sturdy architectural ledge. This graduated foundation physically forces the top layers to stack over one another, building an immediate, permanent roundness right at the crown.
Understanding the mechanics of the back view is essential because it dictates how the entire silhouette performs throughout the day. When a haircut is left uniform or blunt all over, gravity pulls the hair flat against the curvature of the skull, exposing flat spots and thinning parting lines. Short stacked bob haircuts back view modifications eliminate this dragging weight, converting heavy lengths into light, airy overlapping sections. The tight, neat perimeter at the base of the neck accentuates the natural slope of your shoulders while creating an elegant vertical line that makes the neck appear beautifully elongated.
Beyond the instant volume injection, a perfectly sculpted back profile ensures your morning styling routine requires minimal effort. Because the structural fullness is literally built into the anatomy of the cut, the hair naturally falls into a bouncy dome shape right out of the shower. You no longer need to rely on aggressive backcombing, heavy texturizing waxes, or sticky holding sprays to maintain an all-day lift. Whether your straight strands require a sharp geometric wedge or your natural waves need a soft, piecey boost, exploring the back view will help you find the ultimate tailored shape. Let us dive into 13 incredible variations viewed from behind.
13 Short Stacked Bob Haircuts Back View
1. The Classic Geometric Precision Wedge
The foundational blueprint of the stacked look, showing a perfectly clean, horizontal line across the lowest point of the nape. The back view reveals a flawless, unbroken slope of tightly packed layers that graduate upward at a crisp forty-five-degree angle. Short stacked bob haircuts back view inspirations like this one look exceptionally striking, smooth, and polished on pin-straight hair textures.
2. Seamless Tapered Pixie Stack
An ultra-short variation where the hair at the lowest section of the neck is closely cropped and faded directly into the scalp. The back view highlights a dramatic transition from a sleek, closely sheared nape to a rich, voluminous explosion of piecey layers at the crown. It stands out among short stacked bob haircuts back view choices for its incredibly sporty, clean aesthetic.
3. Textured Razor-Shattered Nape
Cut entirely with a sharp styling razor rather than traditional shears to completely avoid harsh, solid blocks of hair at the baseline. The back view showcases a highly texturized, feathered perimeter where the ends overlay each other like delicate petals. These short stacked bob haircuts back view options provide a beautifully lived-in, casual movement that looks entirely effortless.
4. Sharp V-Shaped Inverted Incline
This high-drama cut features graduated layers that plunge sharply forward, forming a distinct, sharp “V” or “U” shape across the back of the neck. The back view emphasizes an aggressive slope, drawing the eyes upward toward the crown to maximize visual height and drama. It updates the short stacked bob haircuts back view category with an undeniable high-fashion edge.
5. Soft Rounded Bubble Contour
Utilizing a specialized under-cutting technique at the lowest perimeter to encourage the exterior hair strands to naturally roll inward toward the neck. The back view reveals a perfectly circular, smooth bubble silhouette that completely masks flat spots or irregular cowlicks. Short stacked bob haircuts back view profiles with a rounded shape look incredibly neat and professional.
6. Choppy Disconnected Wedge Layering
Featuring heavy, distinct blocks of multi-length layers that are point-cut deeply rather than seamlessly blended together. The back view highlights raw, chunky texture that provides an amazing structural lift for exceptionally thick hair that normally feels heavy. It remains a smart choice inside the realm of short stacked bob haircuts back view options.
7. Hidden Undercut Nape Clearance
For individuals with dense hair growth at the base of the neck that easily becomes hot, bulky, and difficult to manage. The back view shows the lower two inches of the nape cropped entirely close to the skin, allowing the upper stacked layers to drape smoothly over the top. This is an exceptional variation of short stacked bob haircuts back view styling.
8. Feathery Retro-Inspired Fanning Stack
The internal layers are cut with shallow slashes to allow the tips of the hair to flip and fan outward slightly around the ears. The back view offers a soft, airy, and romantic profile filled with plenty of depth and multi-directional movement. This cut updates the short stacked bob haircuts back view category with a gentle, graceful touch.
9. Heavy Crown Stack with Blunt Baseline
Combining a heavily layered, high-volume interior with a solid, straight-across perimeter line that rests heavily at the base of the neck. The back view delivers a powerful contrast between the crisp, graphic line of the bottom ends and the highly stacked fullness sitting just above it. These short stacked bob haircuts back view options make fine hair appear twice as thick.
10. Asymmetrical Sloping Perimeter
From the rear view, you can witness the precise architectural point where the symmetry shifts dynamically from left to right. The internal stacking remains perfectly balanced at the center of the nape, but the perimeter line slopes downward dramatically toward one side of the face. It is a fantastic option among short stacked bob haircuts back view lovers.
11. Soft Layered Nape with Wispy Tendrils
Perfect for individuals who dislike the look of a starkly exposed neck line and prefer a softer, more conservative perimeter. The back view shows the lowest layers left slightly longer, forming a series of wispy, delicate tendrils that hug the natural curve of the neck. These short stacked bob haircuts back view options look beautiful with multi-tonal highlights.
12. Volumizing Stack for Natural Waves
Specifically tailored to organize natural waves, preventing the hair from expanding into an unmanageable, bottom-heavy triangular shape. The back view reveals a beautifully organized system of graduated layers that allows each wave loop to stack neatly over the next. It is an exceptional selection inside the realm of short stacked bob haircuts back view configurations.
13. Smooth Concave Silhouette with Seamless Blend
A beautiful, gentle variation where the lines between the short nape and the long crown layers are kept incredibly subtle and seamless. The back view demonstrates a uniform, flowing surface that hugs the natural curvature of the head with total grace. These short stacked bob haircuts back view variations look best when treated with a high-shine spray.
More Info: Styling Short Stacked Bob Haircuts Back View
Achieving a flawless, all-day lift from the back profile requires a dedicated approach to styling from the roots upward. When styling short stacked bob haircuts back view options, you must focus your primary attention on the first two inches of hair sitting directly at your crown. Always start your routine on damp strands using a lightweight volumizing mousse or a specialized root-lifting spray. Tilt your head forward completely and apply the product directly to the under-layers at the back, ensuring even coverage before heat application to prevent the stack from collapsing.
The technique you use with your round brush at the back of your head determines the final sharp geometry of your profile. Use a medium-sized ceramic round brush, placing it directly beneath the stacked layers at the nape, and pull the sections upward at a ninety-degree angle from the scalp. Direct the airflow of your blow dryer downward from the roots to the ends to seal the cuticle while locking in massive structural height. Once the back is completely dry, use a cool-shot blast from your dryer to set the graduation line in place for the day.
Maintaining the pristine sharpness of your back view profile requires a strict schedule with your professional hairstylist. Because the lower layers are cut so tightly to the nape of the neck, even a half-inch of new hair growth can disrupt the balance of the weight distribution. Plan to visit your salon every four to five weeks for a quick maintenance trim to keep the rear stack clean, sharp, and off your collarbone. Regular maintenance prevents the internal layers from becoming bottom-heavy, keeping your crown volume at its absolute peak.
Frequently Asked Questions
Why does the back view of my stacked bob look flat or separate a few hours after styling? Separation or flatness at the back usually happens when too many heavy, oil-based styling products are applied to fine hair. Switch to lightweight water-based root mists and ensure you are lifting the hair completely away from the scalp with a round brush during your blowout.
Can an experienced stylist cut a stacked bob back view successfully if I have a strong cowlick at my nape? Yes, a precision cutter can easily customize the stacking by working with the natural direction of your cowlick. They will often leave the lowest section slightly longer or use a texturizing razor to blend the irregular growth pattern seamlessly into the stack.
How do I check the back view of my haircut at home to make sure it is perfectly styled? The easiest method is using a large handheld mirror while standing with your back facing a large bathroom wall mirror. Angle the handheld mirror slightly upward and from side to side to get a complete, clear look at your graduation line and crown volume.
What is the best way to sleep on a stacked bob to keep the back view from flattening overnight? To preserve your built-in lift while resting, switch your standard cotton pillowcases out for a high-quality silk or satin alternative. Satin eliminates friction against the short layers, allowing them to glide smoothly over the fabric without getting flattened, tangled, or frizzy while you sleep.
Final Thoughts
Short stacked bob haircuts back view profiles represent the absolute pinnacle of smart, geometry-driven styling for anyone tired of flat hair. By shifting the bulk of your hair weight to the crown and tapering the neck line, this cut delivers a stunning silhouette filled with natural bounce. Be sure to collaborate with a professional stylist who specializes in precision cutting techniques to customize the perfect angle for your features. With a weightless product routine and regular maintenance trims, you will enjoy a full, dense, and effortlessly chic style from every single angle. Say goodbye to flat hair days and embrace the instant lift of a precision stack.
The resurgence of the mullet has completely transformed modern hair design, particularly for women who embrace their natural bounce, curls, and waves. Short curly hairstyles for women mullet options—often affectionately dubbed the “shullet” or the “curly wolf cut”—offer a beautiful break from traditional, uniform haircuts. Historically, the classic mullet relied on sharp, flat, and severely disjointed lengths that felt stiff. Today’s modern adaptation flips the script by using natural curl patterns to blend the dramatic transition between short temples and a longer neckline into a soft, seamless cascade of touchable ringlets.
Choosing a short curly mullet is a fantastic strategy for women who struggle with heavy, dense curls that tend to expand outwards into a flat, triangular shape. Traditional long cuts often weigh down the roots, pulling the bounce completely out of the top sections. By strategically cropping the hair short around the frame of the face, above the ears, and across the crown, the hair instantly sheds its dragging weight. This weight reduction allows your natural ringlets to spring upward, creating an explosion of organic volume and movement right where you need it most while maintaining a playful length down the neck.
Beyond its striking visual edge, this texture-forward style is incredibly forgiving and low-maintenance for daily wear. Because the haircut inherently celebrates movement, uneven curl patterns, and raw texture, you no longer have to fight for a pristine, uniform look every morning. The short layers up top frame the cheekbones and eyes beautifully, while the longer curls at the back soften the collarbone line. Whether your hair consists of tight, springy coils or loose, casual beach waves, these 13 curly mullet variations will help you unlock a fresh, rebellious, yet thoroughly sophisticated silhouette.
13 Short Curly Hairstyles for Women Mullet
1. The Classic Soft Shullet Blend
The perfect entry point into the style, featuring a gentle, balanced transition between the cropped top and the longer back. The layers around the temples are softly piecey, allowing loose ringlets to frame the face without creating a stark or aggressive disconnection. These short curly hairstyles for women mullet choices look beautifully effortless on soft, medium-weight curl patterns.
2. Pixie-Mullet Crop with Tapered Sides
An ultra-short, energetic variation where the hair around the ears and temples is tightly cropped or gently tapered close to the scalp. The natural curl volume is concentrated entirely on the crown and down the nape, creating a bold, faux-hawk inspired shape. It stands out among short curly hairstyles for women mullet options for its daring, clean-cut energy.
3. The Voluminous 70s Rock Shag Mullet
Inspired by iconic rock legends, this cut uses deep interior layers to build massive, gravity-defying height right at the top of the head. The curls are heavily point-cut to encourage maximum fluff and separation, while the back lengths cascade loosely past the shoulders. These short curly hairstyles for women mullet configurations bring a brilliant vintage flair to tight coil textures.
4. Edge-Driven Undercut Curly Mullet
Featuring a hidden or fully exposed shaved section right above the ears or beneath the back crown. The remaining curls spill over the shaved boundaries, creating a stark, high-contrast look that highlights the natural pattern of your hair against a clean skin line. It adds a powerful modern twist to the short curly hairstyles for women mullet category.
5. Petite French-Girl Curly Shullet
A highly chic, romantic adaptation that pairs a short, curly eyebrow-skimming fringe with soft, face-hugging tendrils. The length at the back is kept modest and tidy, resting just above the collarbone to maintain a sweet, rounded, and classic European contour. This is a very elegant interpretation of short curly hairstyles for women mullet styling.
6. Messy Lived-In Choppy Wolf Cut
Relying on heavily fragmented, alternating long and short layers throughout the interior of the hair to maximize definition. The result is a beautifully disorganized, piecey look that thrives on dry-texture styling pastes and diffused air. It remains a top choice for women seeking effortless short curly hairstyles for women mullet aesthetics.
7. Coiled Micro-Fringe Mullet
Specifically designed for tight, high-shrinkage type 4 coils that naturally hold incredible structural shape. The front features a tiny, cropped curly fringe that sits high on the forehead, drawing all the attention down to the eyes, while the back coils fluff out into an elongated cloud shape. This is an exceptional variant of short curly hairstyles for women mullet styling.
8. Wispy Pastel-Toned Sunset Shullet
The layers in this cut are sliced thin to allow light to pass through the ends of the curls, making the silhouette feel airy and weightless. It pairs beautifully with multi-tonal dimensional highlights or creative pastel tones that accentuate every curve of the wave pattern. It softens the short curly hairstyles for women mullet profile beautifully.
9. Heavy-Crown Forward-Swept Mullet
The back and side layers are styled and cut to direct all the fullness forward over the brow line, creating a heavy, dramatic curly canopy. From the rear, the length thins out into delicate, hugging pieces that frame the nape of the neck neatly. These short curly hairstyles for women mullet variations offer a very contemporary, artistic look.
10. The Asymmetrical Curly Disconnection
A playful design where one temple side is cropped short and tight while the opposite side retains a longer, bouncy face-framing ringlet. The back view remains perfectly balanced, anchoring the eccentric, eye-catching asymmetry happening up front. It is a brilliant choice for adventurous short curly hairstyles for women mullet lovers.
11. Soft Layered Collar-Hugging Wave
Perfect for women with loose, lazy waves who want the mullet shape without an overly aggressive chop. The top layers are kept long enough to form complete, soft waves, while the back length rests gently against the neck to add a touch of length. These short curly hairstyles for women mullet options look incredible with minimal product.
12. The Botticelli Curly Shullet
Characterized by highly defined, glossy, and organized spiral curls that look as though they were painted on. The graduation from front to back is kept incredibly smooth, ensuring that every curl loop stacks perfectly over the next without creating frizzy puffiness. It is an exceptional selection for defined short curly hairstyles for women mullet shapes.
13. Brushed-Out Romantic Cloud Mullet
A specialized technique where the short top layers are gently picked out to create a soft, ethereal cloud of halo-like volume, while the back retains its distinct, defined drop of longer curls. The contrast between textures provides an incredible depth that turns heads immediately within the short curly hairstyles for women mullet landscape.
More Info: Styling Short Curly Hairstyles for Women Mullet
Unlocking the full potential of a short curly mullet requires a product application routine that respects the distinct needs of two completely different lengths. When managing short curly hairstyles for women mullet options, you must treat the top crown layers separately from the longer pieces at the back. Start by applying a moisturizing leave-in conditioner or a curl-defining cream onto soaking wet strands right out of the shower. Use your fingers to rake the product through the short top sections to encourage root lift, then switch to a pulsing scrunching motion on the back lengths to lock in individual curl definition.
The drying method you choose will completely dictate whether your shullet looks modern and deliberate or accidentally messy. Attach a large bowl diffuser to your blow dryer, set the heat to medium and the airflow to low, and tilt your head sideways. Allow the curls to rest gently inside the diffuser bowl without moving the dryer around excessively, as over-manipulating wet curls breaks up the natural bundles and introduces unwanted frizz. Focus the warmth heavily on the roots of your short top layers to maximize that signature rock-and-roll height before drying the back length.
Maintaining the deliberate shape of a curly mullet means you need to protect your texture even while you sleep. Because the top layers are cut short and frame the face, sleeping on a standard cotton pillowcase can crush the crown volume and cause the front fringe to wake up completely bent out of shape. Gather your longer back curls upward into a loose silk scrunchie at the top of your head, and sleep on a smooth satin surface to eliminate friction. In the morning, a simple mist of water mixed with a drop of curl refresher spray is all it takes to reactivate the shape.
Frequently Asked Questions
Will a short curly mullet make my round face shape appear wider or unbalanced? Not at all! In fact, because a curly mullet concentrates its volume vertically at the crown while keeping the sides around the ears cut short and flat, it actually elongates the face, making it incredibly flattering for round and square jawlines.
How often will I need to visit the salon to keep the curly mullet looking intentional? To maintain the proper proportions between the short front frame and the long back tail, you should schedule a trim every six to eight weeks. If you wait too long, the top layers will grow heavy and flatten out, losing that signature shullet shape.
Can I transition a standard short pixie cut into a modern curly mullet smoothly? Yes, a pixie cut is actually the absolute best foundation for growing out a mullet. Let the back neckline grow out completely untouched while your stylist occasionally trims only the front fringe and top layers to maintain the beautiful, intentional disconnection.
What should I do if my curls are completely flat on one side of my head but tight on the other? A skilled stylist will perform a dry cut on your curly mullet, cutting individual ringlets where they naturally rest. This custom-tailored method beautifully balances out mismatched curl patterns across your crown so the final silhouette looks totally symmetrical.
Final Thoughts
Short curly hairstyles for women mullet options are the ultimate celebration of texture, attitude, and visual balance. By pairing a light, face-framing crop with soft, cascading length at the back, this cut solves the age-old problem of heavy, flat curls while giving you an undeniable stylistic edge. Work closely with a curl specialist who understands how to cut hair in its dry, natural state to ensure your unique curl pattern shines. With the right moisture balance and a simple diffuser routine, your new shullet will deliver effortless volume and a bold, beautiful statement every single day.
Curly hair and pixie cuts are a perfect match. Short pixie haircuts for curly hair combine the edginess of a pixie with the volume and texture of natural curls. The result is hair that is full of life, movement, and personality. Short pixie haircuts for curly hair work on all curl types – from loose waves to tight coils. The key is cutting the curls dry to account for shrinkage and creating a shape that flatters your face.
What makes a great curly pixie is the balance between volume and shape. The crown needs lift to elongate your face. The sides should be tapered to prevent width. Short pixie haircuts for curly hair also benefit from soft layers that follow your curl pattern and bangs that frame your face. The goal is a pixie that is bouncy, defined, and effortlessly stylish.
The 12 styles below range from curly pixies with volume at the crown to tapered curly pixies to pixies with bangs. All are designed for curly hair. Let us explore these volume-boosting, flattering styles.
12 Short Pixie Haircuts for Curly Hair
1. Curly Pixie with Volume at Crown
A short curly pixie with the crown left longer and styled upward for height. The sides are tapered. Short pixie haircuts for curly hair with crown volume add vertical lines that elongate your face. The height balances the fullness. Best for type 3A to 4A curls.
2. Tapered Curly Pixie
The sides and nape are tapered. The top is left with 2-3 inches of natural curls. Short pixie haircuts for curly hair with a tapered shape remove bulk at the perimeter. The rounded top stays full and curly. Great for thick curly hair.
3. Curly Pixie with Side-Swept Bangs
A curly pixie with longer side-swept bangs that sweep across your forehead. Short pixie haircuts for curly hair with side-swept bangs hide forehead lines and soften features. The side bangs add asymmetry. Style with curl cream.
4. Curly Pixie with Curtain Bangs (Dry Cut)
A curly pixie with curtain bangs cut dry, curl by curl. Short pixie haircuts for curly hair with curtain bangs are romantic and face-framing. The bangs hit at your cheekbones when dry. Style with curl cream and diffuse.
5. Stacked Curly Pixie
A pixie where the back is stacked creating lift at the crown. The top has curly layers. Short pixie haircuts for curly hair with a stacked back add volume where curls often fall flat. The stacked shape is gentle, not aggressive.
6. Finger Coil Curly Pixie
A curly pixie where the curls are defined with finger coiling. The sides are tapered. Short pixie haircuts for curly hair with finger coils are polished and defined. The coils show off your curl pattern. Great for special occasions.
7. Asymmetrical Curly Pixie
One side of the curly pixie is longer than the other. Short pixie haircuts for curly hair with asymmetry are modern and interesting. The uneven lengths draw the eye diagonally. Best for type 3A to 3C curls.
8. Curly Pixie with Wispy Crown
A curly pixie where the crown pieces are cut extra wispy and feathered. Short pixie haircuts for curly hair with a wispy crown have height without weight. The wispy ends blend together, hiding any thin spots.
9. Silver Curly Pixie
For women embracing gray or silver curls. A curly pixie with point-cut texture and tapered sides. Short pixie haircuts for curly hair on silver curls look best when the cut has texture. Use purple shampoo to keep silver bright.
10. Messy Curly Pixie
A curly pixie designed to look effortlessly messy. The layers are cut to fall into place when air-dried. Short pixie haircuts for curly hair with a messy finish are the ultimate low-maintenance style. Wash, apply leave-in, shake with fingers, go.
11. Curly Pixie with Micro Bangs
A curly pixie with micro bangs cut above your eyebrows. Short pixie haircuts for curly hair with micro bangs are bold and edgy. The short bangs show off your eyes. The curly texture balances the short fringe.
12. Razored Curly Pixie
A curly pixie cut with a razor instead of scissors, creating soft, feathered ends. Short pixie haircuts for curly hair with razor cutting remove weight gently. The razor creates wispy ends that blend together. Best for fine to medium curly hair.
More Info: Styling Short Pixie Haircuts for Curly Hair
Moisture is essential for curly hair. Short pixie haircuts for curly hair need regular deep conditioning. Use a moisturizing shampoo and conditioner. Apply leave-in conditioner to damp hair. Seal with a light oil. Curly hair is drier – hydration is key.
Products for curly pixies must be lightweight. Look for curl cream, mousse, and water-based gel. Short pixie haircuts for curly hair cannot handle heavy butters or oils – they will weigh your curls down. Apply products to soaking wet hair. Scrunch gently.
Styling technique is simple. Use your fingers, not a brush or comb. Short pixie haircuts for curly hair look best when styled with fingers only – brushing flattens the curls and creates frizz. Flip your head upside down and shake at the roots for volume. Diffuse or air-dry.
Nighttime routine protects your curls. Sleep on a silk pillowcase or wear a satin bonnet. Short pixie haircuts for curly hair flatten easily overnight. In the morning, flip your head upside down and shake your roots with your fingers. Use a spray bottle with water to refresh.
What to tell your stylist: I have curly hair. I want a short pixie haircut. I want layers that add volume and follow my curl pattern. Please cut my hair dry, curl by curl. Show me how to style it.
Frequently Asked Questions
Will a pixie cut make my curls look bigger? Yes – that is the point. Short pixie haircuts for curly hair add volume at the crown and movement throughout. The shorter length removes weight that pulls curls flat.
How short should I go? Chin length or shorter. Short pixie haircuts for curly hair at chin length or above remove weight that pulls curls flat. Pixie cuts are even better for very thick curls.
How often do I need trims? Every 4-6 weeks. Short pixie haircuts for curly hair lose their shape quickly. The curls grow out and lose their definition. Regular trims keep the pixie looking fresh.
Final Thoughts
Short pixie haircuts for curly hair celebrate your natural texture while adding volume and shape. From curly pixies with crown volume to tapered pixies to pixies with bangs, there is a style for every curl type. The key is dry cutting, lightweight products, and fingers-only styling. Find a stylist who understands curly hair. Then enjoy the most voluminous, stylish pixie of your life.
Thick wavy hair is a gift. It is also a challenge. The density gives you volume, but it can also feel heavy and overwhelming. Short hairstyles for thick wavy hair solve the weight problem through strategic layering, tapering, and texturizing. The result is a cut that feels light, moves freely, and shows off your beautiful waves without feeling like a helmet. Short hairstyles for thick wavy hair work on all wave patterns – from loose waves to more defined waves.
What makes a great short cut for thick wavy hair is aggressive weight removal and shape creation. The nape should be tapered or undercut. The sides should be faded or layered. The crown needs internal carving to prevent bulk. Short hairstyles for thick wavy hair also benefit from point-cut ends that soften the perimeter. The goal is a cut that looks full but feels weightless – movement without the heaviness.
The 13 styles below range from pixies to bobs to textured crops. Some have stacked backs. Others have undercuts or razored ends. All are designed for thick wavy hair. Let us explore these bulk-busting, lightweight cuts.
13 Short Hairstyles for Thick Wavy Hair
1. Stacked Pixie
A pixie where the back is stacked creating lift at the crown. The top has textured layers. Short hairstyles for thick wavy hair with a stacked back add volume where thick hair often falls flat. The stacked shape removes bulk from the back.
2. Tapered Pixie with Longer Top
The sides and nape are tapered. The top is left longer and textured. Short hairstyles for thick wavy hair with a tapered shape remove bulk at the perimeter. The longer top gives you styling options. Sweep it forward, to the side, or mess it up.
3. Undercut Pixie
The sides and nape are undercut. The top is left longer and textured. Short hairstyles for thick wavy hair with an undercut remove up to 50 percent of your density. The undercut keeps you cool. The top shows off your waves.
4. Stacked Bob
A bob where the back is stacked creating lift at the crown. The front has soft layers. Short hairstyles for thick wavy hair with a stacked bob add volume at the crown. The stacked shape is dramatic. Great for thick hair that needs shape.
5. Inverted Bob
An inverted bob is shorter in back, longer in front with a dramatic angle. Short hairstyles for thick wavy hair with an inverted shape create lift at the nape. The longer front adds drama. Great for thick wavy hair.
6. Asymmetrical Bob
One side of the bob is longer than the other. Short hairstyles for thick wavy hair with asymmetry are modern and interesting. The uneven lengths draw the eye diagonally.
7. Textured Crop
A short crop with piece-y, choppy texture on top. The sides are tapered. Short hairstyles for thick wavy hair with a textured crop are low maintenance but full of personality. Style with a tiny amount of paste.
8. Wavy Pixie with Tapered Sides
A pixie with 2-3 inches of wavy texture on top and tapered sides. Short hairstyles for thick wavy hair with a wavy pixie remove the triangle shape. The tapered sides keep the silhouette rounded, not wide. Style with sea salt spray and diffuse.
9. Disconnected Pixie
The top layers are long and disconnected from the shorter sides and nape. Short hairstyles for thick wavy hair with disconnected layers are architectural and bold. The gap creates drama. The waves fill the gaps with texture.
10. Razored Pixie
A pixie cut with a razor instead of scissors, creating soft, feathered ends. Short hairstyles for thick wavy hair with razor cutting remove weight gently. The razor creates wispy ends that lighten the heavy look. Best for thick wavy hair that is also coarse.
11. Messy Crop with Height
A crop designed to look messy with volume at the crown. The layers are cut to fall into place when air-dried. Short hairstyles for thick wavy hair with a messy finish are the ultimate low-maintenance style. Wash, towel dry, shake with fingers, go.
12. Wavy Bob with Textured Ends
A chin-length or shoulder-length bob with point-cut, textured ends. Short hairstyles for thick wavy hair with textured ends keep density at the roots while removing weight at the perimeter. The wispy ends add movement.
13. Shaggy Wavy Crop
A short crop with shag-inspired texture and wispy ends. Short hairstyles for thick wavy hair with a shaggy crop are edgy and cool. The shag texture adds volume. The waves add natural movement. Style with texture spray and fingers.
More Info: Styling Short Hairstyles for Thick Wavy Hair
Regular trims are essential. Short hairstyles for thick wavy hair need trims every 4-6 weeks. Thick hair grows fast and the shape disappears quickly. A fresh shape makes the cut look intentional and polished.
Product application is different for thick hair. You need less product than you think. Short hairstyles for thick wavy hair can look greasy if you over-apply. Start with a pea-sized amount. Add more only if needed. Focus on the top, not the sides.
Styling technique for wavy hair is simple. Use your fingers, not a brush. Short hairstyles for thick wavy hair look best when styled with fingers only – brushing flattens the waves. Flip your head upside down and shake at the roots for volume. Air-dry or diffuse on low heat.
What to tell your stylist: I have thick wavy hair. I want a short haircut. I need weight removed – use internal layering, tapering, or an undercut. I want my waves to show. Show me how to style it.
Frequently Asked Questions
Will a short cut make my thick wavy hair look bigger? No – the opposite. Short hairstyles for thick wavy hair remove weight and bulk. Your hair will look more controlled and shaped, not bigger. The waves will have more definition.
How short should I go? That depends on your comfort level. Short hairstyles for thick wavy hair can go as short as 1 inch all over. Very short cuts require more frequent trims but less daily styling.
How do I enhance my waves on short hair? Use sea salt spray or texture spray on damp hair. Short hairstyles for thick wavy hair benefit from products that add grip and definition. Air-dry or diffuse for best results.
Final Thoughts
Short hairstyles for thick wavy hair are liberating. They remove the weight you have been carrying and celebrate your waves in a controlled, shaped way. From stacked pixies to undercut styles to textured crops, there is a short cut for every woman with thick wavy hair. The key is regular trims, strategic product use, and a stylist who understands weight removal. Enjoy the lightest, most defined waves of your life.