Author: admin

  • Summer Water Activities Kids Will Love

    Summer Water Activities Kids Will Love

    Introduction: Making a Splash All Season Long

    Summer is synonymous with sunshine, warmth, and the irresistible call of water. For children, water isn’t just a way to cool down—it’s a portal to adventure, sensory exploration, and pure, unadulterated joy. Whether you have access to a pool, a lake, the ocean, or just a backyard and a garden hose, the possibilities for aquatic fun are endless.

    In a world where screens often dominate leisure time, water activities offer a refreshing way to engage kids physically and creatively. They promote active play, build confidence, and create the kind of childhood memories that last a lifetime. This guide is packed with ideas for summer water activities that kids will love, organized by location and age group, along with essential safety tips to ensure the fun never stops.

    Safety First: Essential Rules for Water Fun

    Before we dive into the activities, it’s crucial to establish a foundation of safety. Water is wonderful, but it demands respect. These non-negotiable rules will keep everyone safe.

    • Active Supervision is a Must: This is the most important rule. Never leave children unattended near any body of water, including pools, bathtubs, and even large buckets. An adult should be within arm’s reach, providing constant, undistracted supervision.
    • Swim Lessons Are a Gift: Enrolling children in age-appropriate swim lessons builds confidence and teaches essential water survival skills. It’s one of the best investments you can make in their safety.
    • The Life Jacket Rule: Non-swimmers and young children should always wear a properly fitted, U.S. Coast Guard-approved life jacket when in or near natural bodies of water (lakes, rivers, oceans) or on boats. Inflatable toys and floaties are not safety devices.
    • Sun Protection is Key: Water reflects and intensifies the sun’s rays. Apply a broad-spectrum, water-resistant sunscreen liberally and often. Don’t forget hats, sunglasses, and protective swimwear.
    • Stay Hydrated: It’s easy to forget to drink water when you’re surrounded by it. Encourage regular water breaks to prevent dehydration and heat exhaustion.
    • Establish Clear Rules: Teach children to never run near a pool, to always ask permission before getting in the water, and to never pretend to drown.

    Backyard and Poolside Fun: Turning Your Home into a Water Park

    You don’t need a massive pool to have a water wonderland at home. These activities transform a simple backyard into a hub of aquatic entertainment.

    1. The Classic Sprinkler Run

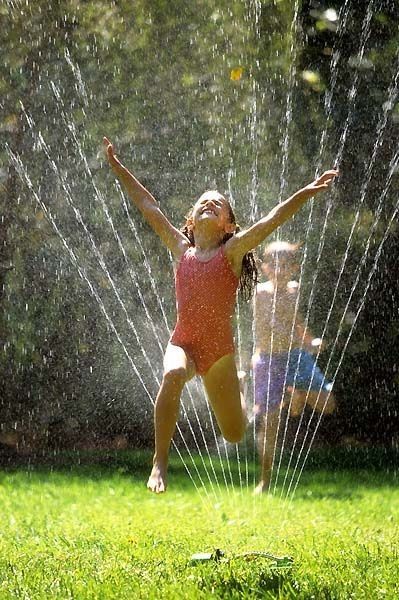
    The humble sprinkler is a rite of passage. It’s simple, effective, and endlessly fun. Kids will spend hours running, jumping, and dancing through the cool spray. For a twist, try a “limbo” contest under the sprinkler or set up an obstacle course that requires crawling through the water.

    2. DIY Slip ‘N Slide

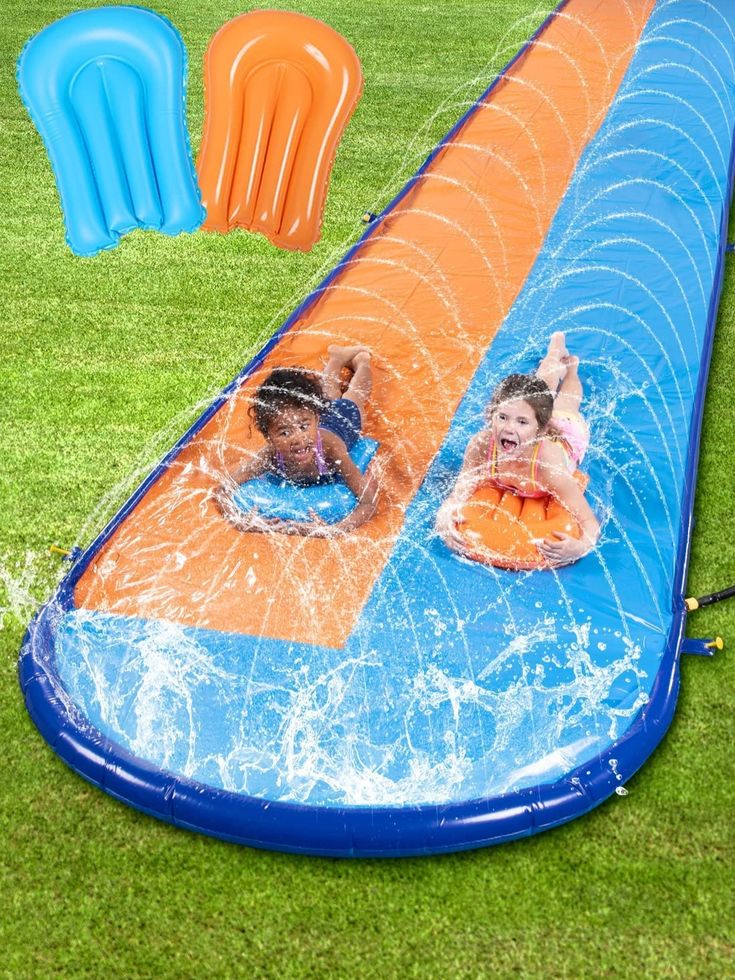
    This classic is easier to make than you think. Unroll a heavy-duty plastic tarp or a long sheet of plastic sheeting on a gentle slope in your yard. Secure the edges with landscape stakes or heavy rocks. Soak it with water from a hose and add a small amount of baby shampoo for extra slipperiness (optional). The result is hours of belly-flopping, giggling fun.

    3. Water Balloon Piñata and Games

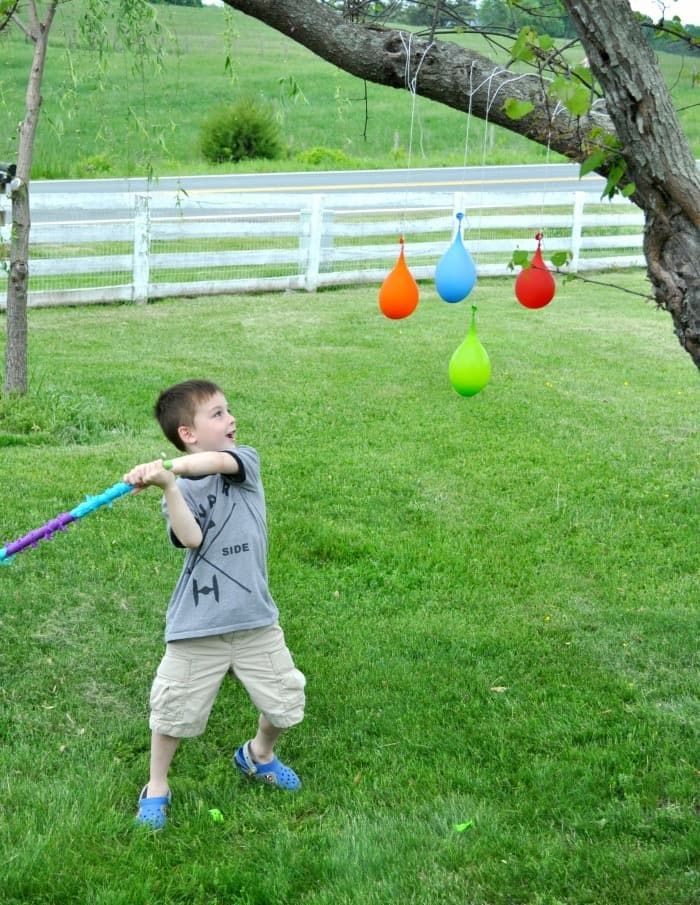
    Water balloons are a staple for a reason. Beyond the classic water balloon fight, try a water balloon piñata. Hang a bunch of filled balloons from a tree branch or clothesline and let kids take turns trying to break them with a plastic bat (while blindfolded, of course!). You can also play water balloon toss, where partners stand facing each other and take a step back after each successful catch until one balloon breaks.

    4. Sponge Bombs: The Reusable Alternative

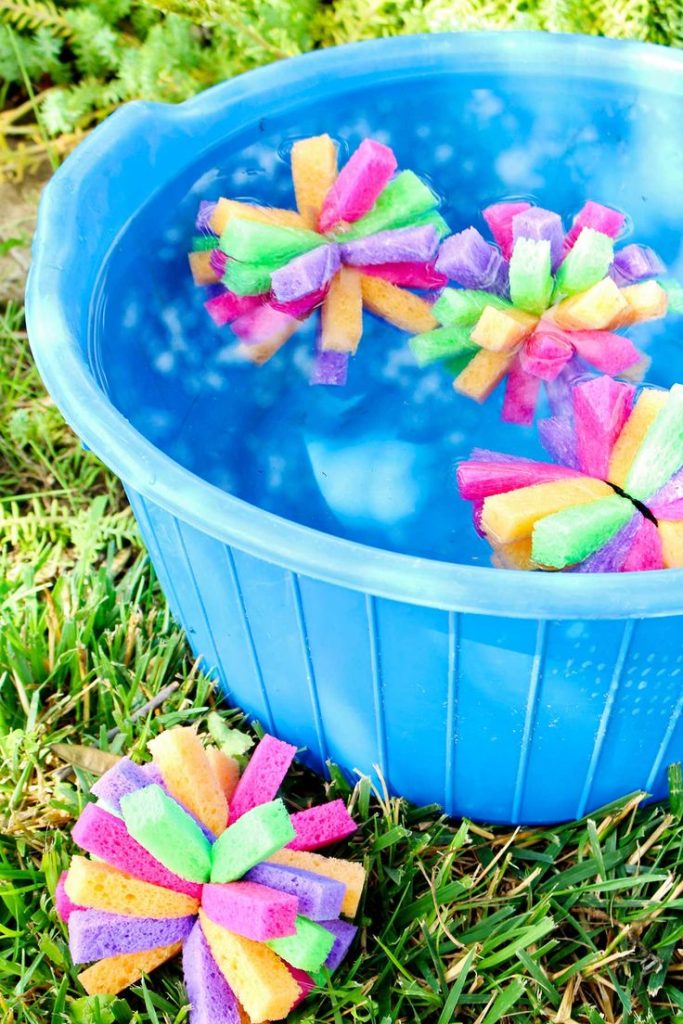
    Tired of cleaning up popped balloon pieces? Sponge bombs are the eco-friendly answer. Simply cut colorful kitchen sponges into strips, tie them together in the middle with a string or zip tie, and fan out the strips. They soak up tons of water, are soft when they hit, and can be used again and again.

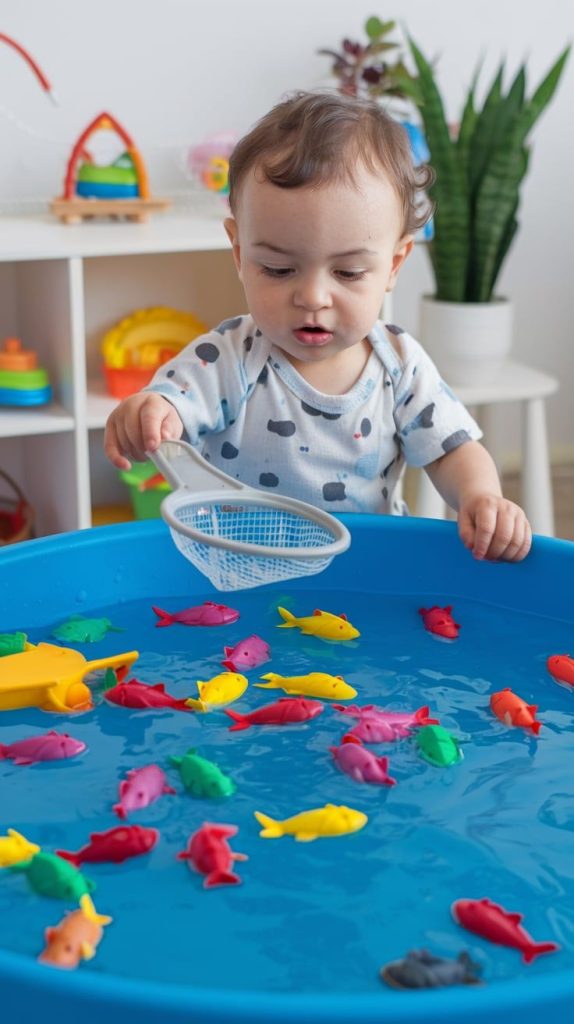
    5. Kiddie Pool Adventures

    A small, inflatable kiddie pool is a gateway to endless imaginative play. It can be a:

    • Mini Splash Park: Add cups, spoons, funnels, and small plastic toys.
    • Fishing Pond: Toss in some magnetic or plastic fish and let the kids “fish” with nets or magnetic poles.
    • Cooling-Off Station: Simply fill it with a few inches of cool water and let toddlers splash safely while you supervise from a nearby chair.

    6. The Great Sponge Relay

    A hilarious team game. You’ll need two buckets for each team, one filled with water and one empty, and a large natural sponge. Teams race to soak the sponge, run to their empty bucket, and wring it out. The first team to transfer all the water (or reach a fill line) wins. It’s simple, active, and perfect for parties.

    Aquatic Adventures at the Pool

    If you have access to a larger swimming pool, the fun multiplies exponentially.

    1. Marco Polo

    No pool day is complete without this classic game of blind man’s bluff in the water. One person closes their eyes and shouts “Marco,” and the others must respond “Polo,” trying to avoid being caught. It’s a fantastic game for building listening skills and spatial awareness in the water.

    2. Pool Noodle Fun

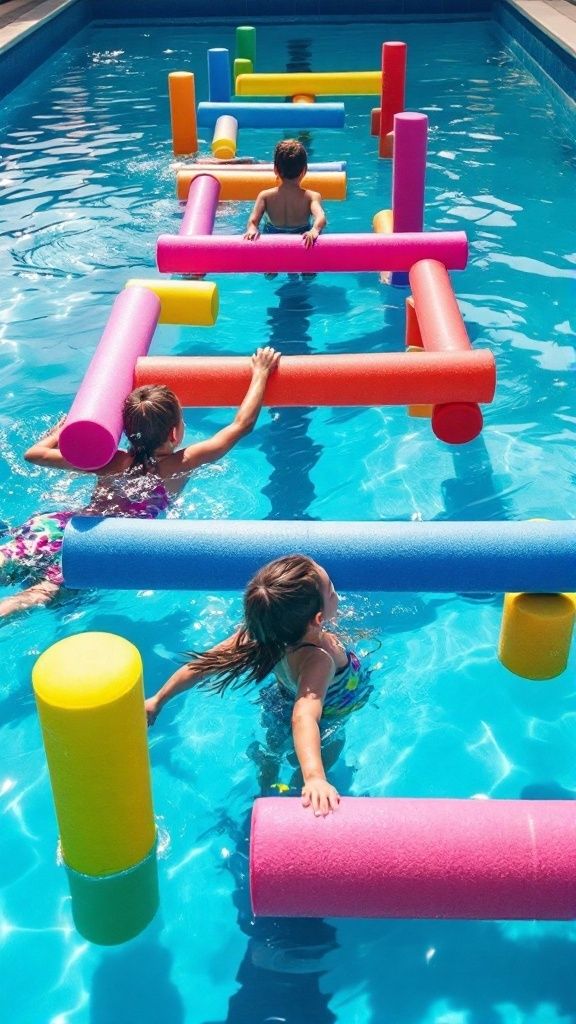
    Pool noodles are incredibly versatile. They can be used for:

    • Jousting: Two kids (or adults) on inflatable rafts try to knock each other off with noodles.
    • Obstacle Course: Create a weaving course by sticking noodles into the pool’s deck drains or weighting them down.
    • Noodle Horses: Simply sit and bounce around the pool like they’re riding a majestic steed.

    3. Treasure Hunts

    Toss a handful of dive rings, coins, or other sinking toys into the shallow or deep end (depending on swimming ability). Kids can compete to see who can collect the most “treasure.” For non-swimmers, use a net to scoop up floating toys.

    4. Volleyball and Basketball

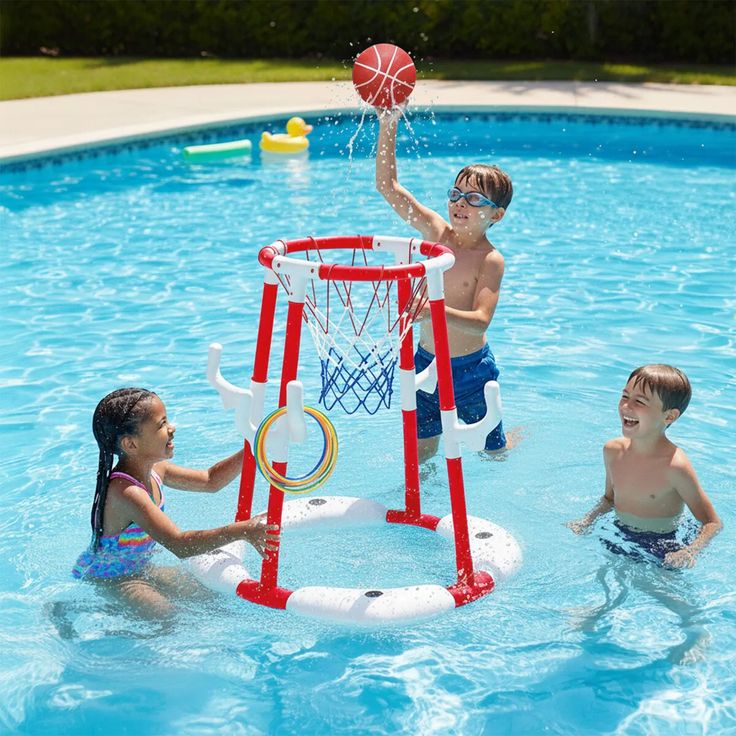
    Water volleyball and basketball are fantastic for groups. They adapt the rules of the land-based games for a more buoyant, splash-filled environment, encouraging teamwork and friendly competition.

    Lakeside and River Adventures

    Natural bodies of water offer a different kind of magic, connecting kids with nature in a profound way.

    1. Rock Skipping

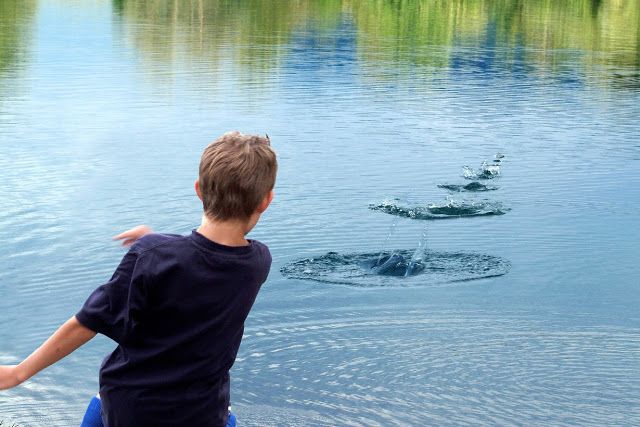
    A timeless skill that feels like magic. Show your child how to choose a flat, smooth rock and side-arm it across the water’s surface. The challenge of getting the most skips is surprisingly addictive for all ages.

    2. Catch and Release Fishing

    Fishing teaches patience, respect for nature, and the thrill of the catch. Focus on the experience rather than the keep. Let kids reel in small sunfish or perch, admire them, and gently release them back into the water.

    3. Building a Dam

    In a shallow, slow-moving stream or creek, kids can spend hours engineering a dam using rocks, sticks, and mud. It’s a hands-on lesson in physics and hydrology, and the sense of accomplishment when they successfully divert the water is immense.

    4. Kayaking or Canoeing

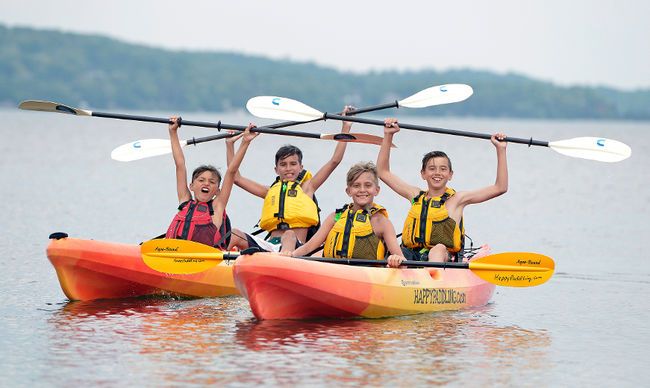
    Paddling across a calm lake is a peaceful and bonding experience. It gives kids a new perspective of the water and shoreline. With a parent in the boat, even young children can enjoy the ride and feel the thrill of skimming across the water’s surface.

    5. Mud Pie Kitchen

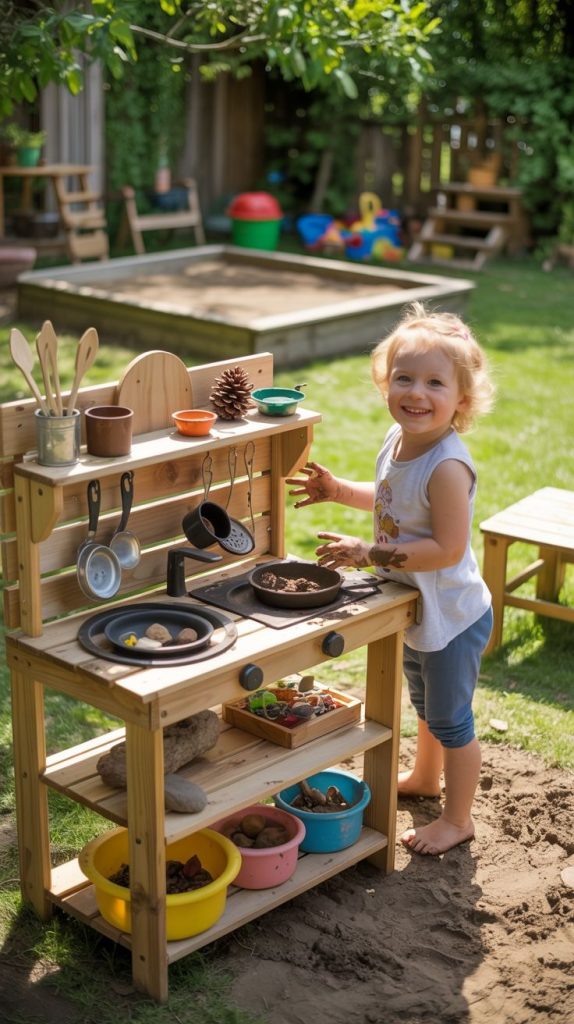
    Find a safe, muddy spot along the shore. Provide old pots, pans, spoons, and cups. Kids can spend hours concocting “soups,” “mud pies,” and other creations, mixing water, mud, leaves, and pebbles. It’s messy, sensory, and developmentally wonderful.

    Oceanfront Escapades

    The beach is the ultimate water playground, offering a sensory-rich environment like no other.

    1. Wave Jumping

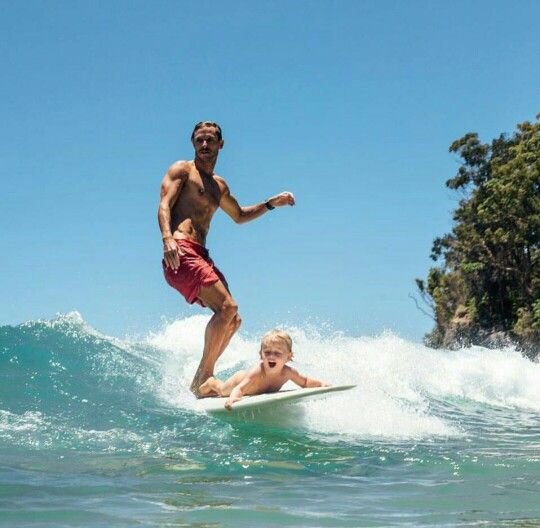
    This is pure, primal fun. Hold your child’s hand and jump over incoming waves together, or let older kids try to body surf one in. It’s a thrilling way to connect with the ocean’s energy.

    2. Sandcastle Engineering

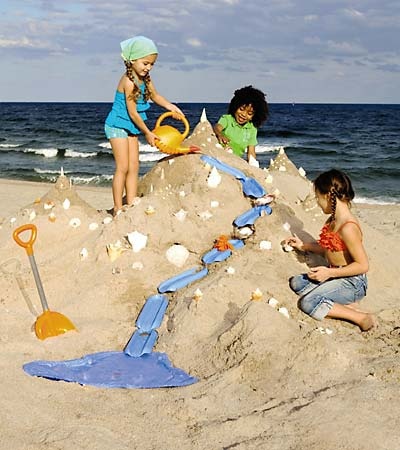
    The beach is a giant sandbox. Go beyond simple buckets and teach kids how to build elaborate sandcastles with moats and walls. Bring spoons for carving, straws for blowing away loose sand, and shells for decoration. The goal isn’t perfection; it’s the creative process.

    3. Tide Pooling

    If you’re on a rocky coast, exploring tide pools at low tide is like entering a hidden aquarium. Gently observe the fascinating creatures—anemones, hermit crabs, tiny fish—that live in these temporary habitats. Teach kids to look with their eyes and not touch, to protect these delicate ecosystems.

    4. Beach Scavenger Hunt

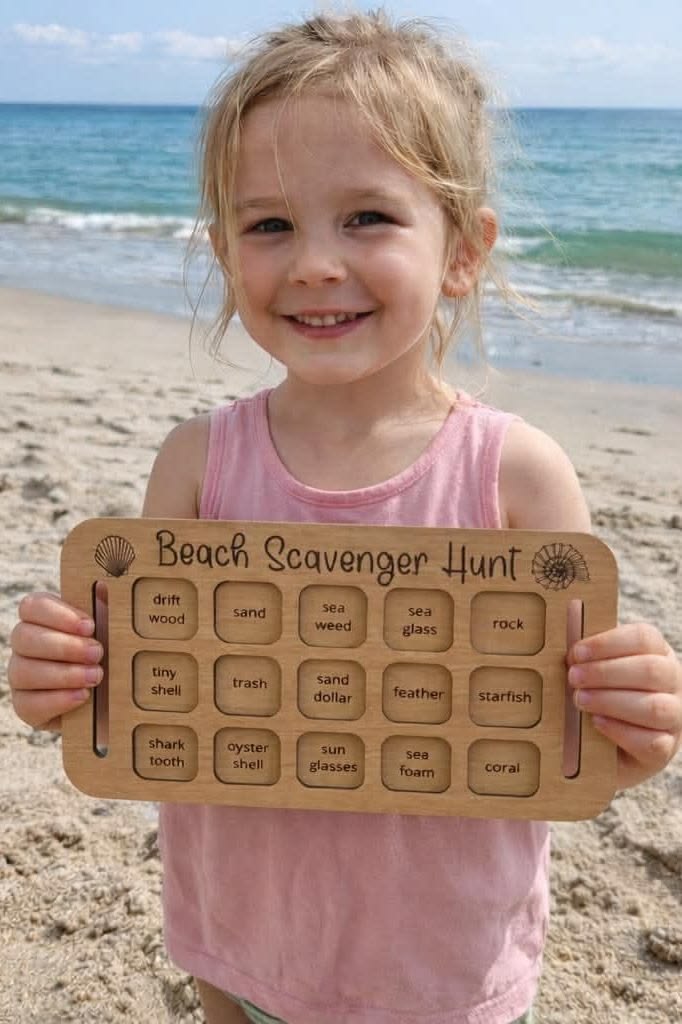
    Create a list of items to find: a smooth sea glass, a perfectly spiraled shell, a piece of driftwood, a feather, a crab claw. This activity turns a simple walk on the beach into an exciting quest.

    Fun for the Toddler and Preschool Set (Ages 1-4)

    For the littlest ones, water play is all about sensory exploration and fine motor skill development. Keep it simple and safe.

    • Water Table Wonderland: A water table is an investment in hours of entertainment. Fill it with cups, funnels, scoops, and floating toys. Add a few drops of food coloring for a “magic potion” effect.
    • Toy Washing Station: Fill a bin with soapy water and give toddlers a scrub brush and some of their plastic dinosaurs, cars, or farm animals. They’ll love the “work” of washing them clean.
    • Pouring Practice: In the kiddie pool or with a large tub on the ground, provide various containers—cups, bottles, watering cans—and let children practice pouring water from one to another. It’s a fantastic pre-math skill.
    • Splash Pads and Spray Grounds: These public spaces are specifically designed for young children. With no standing water, they offer a safe environment to run through fountains and geysers.

    Conclusion: A Summer to Remember

    Summer is fleeting, but the joy of water play creates memories that last a lifetime. Whether it’s the simple pleasure of a sprinkler on a hot day, the thrill of catching a wave, or the quiet focus of building a sandcastle, these activities offer more than just fun. They provide opportunities for connection, physical activity, and a deep appreciation for the natural world.

    So, slather on that sunscreen, fill up the water balloons, and dive in. The water is waiting, and a summer of splash-filled memories is just a splash away.

  • What’s in My Hospital Bag: The Ultimate Checklist for Delivery Day

    What’s in My Hospital Bag: The Ultimate Checklist for Delivery Day

    Packing your hospital bag is one of those milestone moments in pregnancy that makes everything feel real. The due date is approaching, the nursery is (mostly) ready, and now it’s time to gather everything you’ll need for the big day. But knowing exactly what to pack in your hospital bag can feel overwhelming—do you really need three different outfits? What about the baby? And what does your partner need?

    After consulting with experienced moms and medical professionals, we’ve created the ultimate hospital bag checklist to ensure you’re prepared, comfortable, and ready to focus on what truly matters: meeting your baby . Let’s dive into exactly what you need to pack, clever organization tips, and what to leave at home.

    When Should You Pack Your Hospital Bag?

    The general rule of thumb is to have your bag packed and ready by 36 weeks pregnant . Why? Because babies born after 37 weeks are considered full-term, and some may decide to make an early entrance. Having your bag ready eliminates last-minute scrambling and stress.

    Keep your bag in an easily accessible spot—by the front door or even in your car trunk—and make sure your partner knows exactly where it is . Trust us, when contractions start at 2 AM, you won’t want to be hunting for your toothbrush.

    The Smart Packing Strategy: The Three-Bag Method

    Before we dive into the items, let’s talk strategy. Many experienced moms swear by the “three-bag” method to stay organized :

    • Bag #1: Labor and Delivery Essentials – Your immediate-access bag for during active labor
    • Bag #2: Recovery and Stay Items – Everything you’ll need during your 1-3 day hospital stay
    • Bag #3: Going-Home Outfits – Discharge day essentials for you and baby

    This approach prevents you from digging through newborn diapers to find your phone charger while in early labor .

    Essential Documents: The Most Important Items

    Before you worry about cute outfits or snacks, gather all necessary paperwork. This is the one thing the hospital absolutely requires .

    Keep these documents in a separate, easy-to-access folder:

    • Photo ID (driver’s license or passport)
    • Health insurance card and any pre-registration forms
    • Your birth plan (if you have one)
    • Any medical records your doctor has given you
    • Emergency contact list
    • Hospital paperwork or pre-admission forms

    Pro tip: Make copies of everything and keep the originals safe at home. You’ll thank yourself later.

    For Mom: Labor and Delivery Comfort Items

    This section is all about your comfort during the intensity of labor. These items can make a significant difference in your experience .

    Clothing and Comfort Essentials

    • A lightweight robe – Perfect for walking the halls, skin-to-skin contact, and easy nursing access. Dark colors are smart in case of spills .
    • Non-slip socks or slippers – Hospital floors are cold, and grippy socks will keep you safe when walking around .
    • Comfortable nightgown or pajamas – Choose something loose, soft, and front-opening if you plan to breastfeed. Don’t pack your favorite—it might get messy .
    • Labor gown (optional) – Some moms prefer their own comfortable labor gowns designed for easy access .
    • Birthing ball or massage tools – A tennis ball or handheld massager can provide counter-pressure relief during back labor .

    Comfort During Labor

    • Lip balm – Hospital air is extremely dry, and lips can get chapped quickly during labor .
    • Hair ties and headbands – You’ll want to keep hair off your face during active labor .
    • Massage lotion or oil – Unscented options are best for sensitive situations .
    • Hard candy or lollipops – These help with dry mouth, especially if you’re not allowed to eat .
    • Your own pillow – Bring one with a colored pillowcase so it doesn’t get mixed up with hospital linens. The familiar scent can be incredibly comforting .

    Postpartum Recovery: Essentials for After Birth

    Once your baby arrives, your focus shifts to recovery. These items will help you feel more comfortable and human .

    Postpartum Must-Haves

    • Nursing bras – Pack 2-3 well-fitting, wireless nursing bras. Your breasts will be larger than usual, so consider adjustable options .
    • Nipple cream – Even if you don’t think you’ll need it, having quality nipple cream on hand can prevent small issues from becoming painful problems .
    • High-waisted underwear – Many moms prefer full-coverage cotton underwear that won’t irritate a C-section incision. The hospital provides mesh underwear, but having your own can feel more comfortable .
    • Maternity pads – While hospitals provide these, many women prefer the comfort and absorbency of their own brand of heavy-duty overnight pads. Pack about 24 super-absorbent pads .
    • Peri bottle – The hospital will provide one, but a peri bottle with an angled spout can be more effective for soothing and cleaning .

    Toiletries and Personal Care

    • Travel-sized shampoo, conditioner, and body wash 
    • Toothbrush, toothpaste, and floss 
    • Deodorant 
    • Face wipes and moisturizer – Hospital air dries skin out quickly 
    • Dry shampoo – A new mom’s best friend 
    • Glasses and/or contact lenses with solution 
    • Basic makeup – If it makes you feel more like yourself for photos 

    Going-Home Outfit for Mom

    Pack loose, comfortable clothing in your 6-month pregnancy size, not your pre-pregnancy size. Your body has just performed a miracle and needs time to recover .

    • Loose-fitting top or nursing-friendly shirt
    • Comfortable bottoms with elastic waistbands (yoga pants are perfect!)
    • Cardigan or light jacket for temperature control
    • Comfortable slip-on shoes (bending over to tie laces may be difficult) 

    For Baby: Welcoming Your Little One

    Your newborn needs very little in the hospital, but a few thoughtful items can make their first days more special .

    Clothing and Comfort

    • Onesies – Pack 2-3 side-snap kimono styles, which are best for avoiding the umbilical cord stump 
    • Footed sleepers – Choose ones with zippers for easier diaper changes 
    • Mittens – To prevent baby from scratching their face 
    • Soft hat – The hospital provides these, but you might want your own special one 
    • Swaddling blankets – Lightweight, breathable options work well for photos and keeping baby cozy 

    Diapering and Feeding

    Hospitals typically provide diapers, wipes, and basic care items during your stay . However, you may want:

    • Your own preferred brand of diapers if baby has sensitive skin
    • Burp cloths
    • Nursing pillow if you plan to breastfeed 
    • Formula starter pack if you’re not breastfeeding (check with your hospital about their policies) 

    Going-Home Outfit for Baby

    This is the photo-op moment! Pack:

    • A special outfit appropriate for the weather (newborn and 0-3 month sizes—babies can surprise you!) 
    • A warm blanket for the car ride home if it’s cold
    • Soft socks or booties

    Crucial Reminder: The car seat is non-negotiable and required by law. Install it in your car well before your due date and know how to use it correctly .

    For Partner: The Support Person’s Survival Kit

    Your partner needs sustenance and comfort too! Pack them a separate bag with :

    • Change of clothes and comfortable layers
    • Toiletries (toothbrush, deodorant)
    • Snacks and drinks – Hospital cafeterias have limited hours
    • Long phone charger
    • Pillow and blanket – Hospital chairs aren’t the most comfortable
    • Entertainment – Book, tablet, or downloaded movies
    • Cash for vending machines and parking
    • Camera or phone for capturing memories

    Electronics and Entertainment

    Don’t underestimate how much time you’ll spend waiting. Pack these tech essentials :

    • Long phone charger (10 feet) – This is the #1 most forgotten item! Outlets are often far from the bed 
    • Portable power bank – For charging when outlets aren’t accessible 
    • Headphones or earbuds – For listening to music, podcasts, or watching videos without disturbing others 
    • Tablet or e-reader – Loaded with books, movies, or shows
    • Portable speaker – For creating ambiance during labor (be mindful of roommates) 
    • Camera – Designate someone as the official photographer so you can focus on labor 

    Snacks and Hydration

    Hospital food isn’t always available when you need it. Pack :

    • Reusable water bottle with a straw (easier to drink from while lying down)
    • High-energy snacks: granola bars, nuts, dried fruit, crackers
    • Electrolyte drinks or sports drinks for energy
    • Hard candy for dry mouth
    • Don’t forget snacks for your partner!

    Always check with your care team before eating during labor, as policies vary .

    Special Considerations for C-Section

    If a Cesarean section is planned or possible, add these items :

    • High-waisted underwear and loose pants that sit above the incision
    • Slip-on shoes (bending to tie laces will be difficult)
    • A firm pillow to hold against your incision when coughing or laughing
    • Stool softeners (confirm with your doctor first)

    What to Leave at Home

    Hospitals aren’t responsible for personal belongings. Leave these items safely at home :

    • Expensive jewelry or valuables
    • Large amounts of cash
    • Strong perfumes or scented lotions (can bother newborns and other patients)
    • Multiple suitcases – Space is limited; stick to one or two small bags 
    • Your own breast pump – Hospitals have clinical-grade pumps available 

    Packing Timeline: When to Have Everything Ready

    • 36 Weeks: Have your bags 90% packed and easily accessible 
    • 38 Weeks: Bags completely packed, in the car, and everyone knows where they are 
    • 40+ Weeks: Double-check that you haven’t borrowed anything from your hospital bag for daily use 

    Pro Tips for a Smooth Hospital Stay

    • Label your items – Put your name and phone number on chargers and personal items in case they get misplaced 
    • Use clear bags – For toiletries so security can see contents easily 
    • Pack snacks in easy-to-reach pockets 
    • Pre-download entertainment – Hospital Wi-Fi can be spotty 
    • Take a hospital bag checklist – Use this article as your guide!

    The Bottom Line

    Packing your hospital bag is a tangible step toward meeting your baby. The goal isn’t perfection—it’s preparation. As one nurse reassures, “If you forget an item, don’t worry. We have everything you need at the hospital. The items you bring are just to keep you comfortable” .

    So take a deep breath, use this hospital bag essentials checklist, and pack with confidence. You’ve got this, mama. Soon you’ll be holding your baby, and none of the packing details will matter—just that beautiful moment when you finally meet face to face.

    What’s the one item you can’t imagine birthing without? Share in the comments below! 

  • The Ultimate Mom Hair Guide 2026: Styles That Work With Your Life

    The Ultimate Mom Hair Guide 2026: Styles That Work With Your Life

    Let’s be honest: as a mom, your hair routine needs to earn its place in your day.

    Between school runs, work deadlines, playdates, and the endless mental load of running a household, spending an hour on your hair is a luxury most of us simply don’t have. But here is the good news: 2026 is the year of haircuts that do the work for you .

    Whether you are a working mom racing to meetings, a stay-at-home mom chasing toddlers, or somewhere in between, the right haircut should make you look polished without demanding constant attention. Below, I have curated three standout options for short, medium, and long hair—each chosen specifically for busy moms who refuse to sacrifice style for sanity.

    Plus, I will walk you through home care vs. salon priorities, how to choose styles based on your face and body shape, and the quick styling tricks that make these cuts truly wash-and-wear.

    Before You Cut: Two Minutes That Save You Months of Regret

    Before we dive into specific styles, take two minutes to consider two factors that determine whether a haircut will actually work for your life:

    Your face shape matters. The right cut should frame your features and balance proportions, not fight against them . If you have a round face, look for styles with height and angles to create elongation. Square faces benefit from soft, wispy layers that soften strong jawlines. Oval faces can pull off almost anything—lucky you .

    Your lifestyle matters more. A cut that requires daily blow-drying is only practical if you actually have time for daily blow-drying. Be honest with yourself about how many minutes you can realistically dedicate to your hair .

    Short Hair: The Ultimate Time-Saver

    Short hair is having a major moment in 2026, and for moms, it is often the ultimate power move. The key is choosing a cut with enough texture and softness that it never looks severe or dated .

    1. Textured Pixie Bob (Pixie Bob)

    The Look: This hybrid cut combines the cropped back of a pixie with slightly longer, textured layers on top that blend into bob-length pieces around the face. It is playful, modern, and incredibly chic .

    Why Moms Love It:

    • Drying time: Under five minutes. Towel dry, add a dab of texturizing paste, and go .
    • Grows out gracefully: Unlike severe crops that look unkempt after two weeks, the layered texture means you can stretch salon visits to 6–8 weeks .
    • Works for: Fine hair that needs volume, or thick hair that needs taming. The layers remove bulk while maintaining shape .

    Face Shape Notes: Particularly flattering for oval and heart-shaped faces. If you have a round face, ask your stylist for extra height at the crown to create elongation .

    Styling Shortcut: When you have two minutes, rough-dry with fingers and pinch a pea-sized amount of molding paste through the ends for piece-y definition. When you have zero minutes, it still looks intentionally tousled.

    2. Soft Chin-Length Bob with Side Part

    The Look: A classic bob that sits right at the chin, softened with subtle internal layers that prevent the “helmet head” effect. The deep side part adds asymmetry and movement .

    Why Moms Love It:

    • One-move styling: A quick run-through with a flat brush while blow-drying is enough. The side part does the heavy lifting .
    • Professional polish: This cut reads as “put together” in work meetings but never looks overdrawn for the playground.
    • Versatility: Wear it sleek, tuck it behind ears, or add a quick wave with a straightener for date night .

    Face Shape Notes: Ideal for square and round faces. The side part breaks up symmetry, while the chin length draws attention to the jawline .

    Styling Shortcut: Sleep with your hair twisted into two loose pin curls at the sides. Morning shake-out gives you soft, undone waves without heat.

    Medium Length: The Sweet Spot of Versatility

    Medium length (shoulder-grazing to collarbone) remains the most popular choice for moms—and for good reason. It offers styling flexibility without the weight and maintenance of very long hair .

    1. Feathered Shoulder-Length Cut with Curtain Bangs

    The Look: Soft, feathered layers that curve inward around the face, paired with wispy curtain bangs that part naturally in the middle and blend seamlessly into the rest of the cut. The overall effect is light, airy, and incredibly flattering .

    Why Moms Love It:

    • Air-dry friendly: The layers are cut to work with your natural texture. Whether your hair dries straight or with a slight wave, it lands correctly .
    • Bangs without commitment: Curtain bangs grow out beautifully and can be pinned back on days you want them off your face.
    • Hides regrowth: The layered movement distracts the eye, meaning you can stretch color appointments .

    Face Shape Notes: A dream for round and square faces—the face-framing pieces soften angular features and create the illusion of length .

    Styling Shortcut: Spritz salt spray into damp hair, twist sections around your fingers, and let air dry. The feathered layers do the rest.

    2. Textured Lob with Face-Framing Layers

    The Look: A long bob (lob) that hits just above the shoulders, with choppy, textured ends and soft layers that start at chin level and blend downward .

    Why Moms Love It:

    • Ponytail compatibility: Unlike shorter cuts, this length can still be pulled back for gym sessions or hectic mornings .
    • Volume boost: The layers create natural fullness, making it ideal for fine or thinning hair .
    • Modern edge: The textured ends keep this from looking like a basic mom cut—it feels intentional and current .

    Face Shape Notes: Universally flattering, but especially good for heart-shaped faces as the volume around the jaw balances a wider forehead .

    Styling Shortcut: On day-two hair, add dry shampoo at the roots, tousle with fingers, and go. The texture actually improves with a little grit.

    Long Hair: Keep It, But Keep It Intentional

    You don’t have to cut your long hair to be a stylish mom. The key is cutting it with purpose so it looks intentional rather than “I haven’t had time for a haircut since 2019” .

    1. Long Layers with Soft Face Frame

    The Look: Length is preserved, but long layers are cut throughout to remove weight and add movement. The front pieces are slightly shorter, softly framing the face .

    Why Moms Love It:

    • Maximum versatility: Wear it down, in a high ponytail, in a messy bun, or braided. The layers mean every style looks deliberate .
    • Healthy appearance: Removing weight prevents the triangle shape that long hair can get, and the face frame draws attention upward .
    • Low-commitment: If you occasionally miss salon appointments, long layers grow out invisibly—no awkward phases.

    Face Shape Notes: Works for everyone, but the face-framing pieces can be customized to soften any face shape. For square faces, keep them wispy; for round faces, take them longer .

    Styling Shortcut: Master the 60-second messy bun. Flip head upside down, gather hair loosely, twist, and secure. Pull out face-framing pieces. Instant polish.

    2. Soft Layered Cut with Wispy Ends

    The Look: Long hair with gentle, invisible layers throughout and ends that are lightly textured rather than blunt. The overall effect is soft, romantic, and intentionally undone .

    Why Moms Love It:

    • Ponytail with purpose: Even in a simple ponytail, the wispy ends add softness and movement that reads as styled .
    • Heatless waves: Braid damp hair before bed; wake up to effortless waves that the layers enhance beautifully.
    • Forgiving grow-out: Because the ends are already textured, they never look raggedy between trims .

    Face Shape Notes: Best for oval and long face shapes—the softness prevents the face from appearing longer .

    Styling Shortcut: Sleep in a loose, high ponytail. Morning shake-out gives you instant volume and a gentle bend.

    Home Hair Care vs. Salon Priorities for Busy Moms

    The Reality: Most of us see our stylist every 8–12 weeks, but our hair needs attention weekly. Here is how to bridge that gap with minimal effort .

    At Home (10 Minutes Total)

    Washing (3 minutes): Use sulfate-free shampoo focused on the scalp only. Conditioner from mid-length to ends only—never the roots .

    Protecting (2 minutes): Leave-in conditioner with heat protection if you’ll style, or a lightweight hair oil if air-drying. This prevents breakage and keeps hair looking glossy between salon visits .

    Styling (5 minutes): Work with your natural texture rather than against it. If your hair is straight, sleek ponytails. If wavy, enhance with scrunching. Fighting your texture costs time you don’t have .

    Weekly mask (10 minutes): Once a week, swap conditioner for a deep conditioning mask. Even while you shower, let it sit for a few minutes. Avocado, honey, and olive oil make an excellent DIY version .

    Salon Priorities

    Communicate your life: Tell your stylist exactly how much time you have daily. A good stylist will cut accordingly .

    Ask for grow-out grace: Request cuts that look intentional at week 6, not just week 1. Textured ends and invisible layers are your friends .

    Schedule before you leave: Book your next appointment at the current one. Future-you will be grateful .

    Quick Styling Toolkit (Products That Earn Their Keep)

    For busy moms, every product must justify its place on the shelf. These three earn their keep daily:

    • Dry shampoo: Not just for oil—adds volume, texture, and extends styles by 24 hours .
    • Multi-purpose styling cream: Use on damp hair for air-dry definition, or on dry hair for smoothing flyaways.
    • Texturizing spray: Transforms basic ponytails into intentional styles in seconds .

    The Bottom Line

    The best mom haircut in 2026 isn’t about following trends blindly—it is about choosing a style that respects your time, enhances your features, and makes you feel like yourself .

    Whether you go for the ultra-efficient textured pixie bob, the versatile feathered lob, or intentionally layered long hair, the right cut should make you think, “I look good,” not “I spent hours on this.”

    Save this guide for your next salon visit—and bring photos. Your stylist will thank you, and your morning self will thank you even more.

  • Decoding Your Parenting Style: The 9 Communication Types (and Which One Actually Builds Resilience)

    Decoding Your Parenting Style: The 9 Communication Types (and Which One Actually Builds Resilience)

    We often think of parenting as a set of rules or a to-do list, but at its heart, parenting is a conversation. It is the invisible script that runs beneath every interaction, from the way we handle a spilled glass of milk to how we react to a teenage heartbreak. This “script” is what psychologists call our communication style.

    Most of us fall into specific patterns without even realizing it. These patterns are often inherited from our own upbringing—the way our parents spoke to us—or triggered by our current stress levels. By using the 9 Communication Types grid, we can move away from reactive parenting and toward a style that fosters true emotional safety and long-term resilience.


    Understanding the 9 Communication Types

    To identify where you lie, it helps to look at the two primary axes of parenting: Warmth/Responsiveness and Control/Demand. Where these two intersect determines how you communicate during moments of tension.

    1. The Emotion-Coacher (The Gold Standard)

    The Emotion-Coacher views a child’s “big feelings” as an opportunity for intimacy and teaching. You validate the emotion before addressing the behavior.

    • The Benefit: Children of emotion-coachers develop high “EQ” (Emotional Quotient), better social skills, and the ability to self-regulate because they feel understood.

    2. The Supportive Coach

    Similar to emotion-coaching, but focused on action. You provide a safe harbor while encouraging independence. You offer tools, not just answers.

    • The Benefit: Builds a “can-do” attitude. The child feels capable because they were guided, not carried.

    3. The Collaborative Partner

    You involve the child in the problem-solving process.

    • The Benefit: This builds critical thinking and agency. When a child helps create the solution, they are statistically more likely to follow through with it.

    4. The Empathetic Witness

    Sometimes, a child just needs to be heard. You don’t try to “fix” the problem; you sit with them in the discomfort.

    • The Benefit: Teaches the child that their internal world is valid and that “uncomfortable” feelings are not “bad” feelings.

    5. The Overprotective Shield

    Driven by anxiety, this parent tries to prevent any “productive struggle.”

    • The Lack of Benefit: Children may become risk-averse or feel incompetent, as the underlying message is: “I have to do this for you because you can’t.”

    6. The Dismissive Fixer

    You downplay feelings to move past discomfort quickly. “It’s not a big deal, don’t cry.”

    • The Lack of Benefit: The child learns to suppress emotions, leading to internalizing behaviors (anxiety) or externalizing “explosions” later on.

    7. The Controlling Director

    High on rules, low on empathy. “Because I said so” is the mantra.

    • The Lack of Benefit: While it gets immediate compliance, it often leads to rebellion in the teenage years or “learned helplessness.”

    8. The Inconsistent Reactor

    Your response depends more on your stress level than the child’s action.

    • The Lack of Benefit: Creates a “walking on eggshells” environment. The child remains in a state of hyper-vigilance, which is taxing on the nervous system.

    9. The Detached Spectator

    Physically present but emotionally checked out.

    • The Lack of Benefit: This can lead to attachment wounds, where the child feels their needs are a burden, often resulting in low self-esteem.

    How to Identify Where You Lie

    To find your “baseline” style, ask yourself these three diagnostic questions:

    1. The Spilled Milk Test: When your child makes a mess, is your first thought about the floor (Controlling), your own stress (Inconsistent), or the child’s feeling of embarrassment (Supportive)?
    2. The Tantrum Reaction: Do you want to stop the noise at all costs (Dismissive), or do you see it as a “nervous system fire” that needs a calm firefighter (Emotion-Coaching)?
    3. The Decision Process: Who picks the weekend activity? If it’s always you, you might be the Director. If it’s a discussion, you’re the Collaborative Partner.

    Psychological Tips for Better Communication (Starting Now)

    It is never too late to change the communication culture in your home. Whether you have a baby or a teenager, the brain is “neuroplastic”—it can re-wire for connection at any age.

    1. For the Small Baby (0-2): The “Serve and Return”

    Communication with babies is about contingent responsiveness. When they “serve” (a babble, a cry, a reach), you “return” the serve with eye contact or words. This builds the foundational architecture of the brain.

    • Tip: Narrate your day. “I’m picking you up now to change your diaper.” This creates a sense of predictability and safety.

    2. For the Toddler/Child (3-11): Name it to Tame it

    Coined by Dr. Dan Siegel, this technique involves labeling the emotion. When a child is in a “downstairs brain” (survival/emotional) state, their “upstairs brain” (logic) is offline.

    • Tip: Connect before you correct. If they hit a sibling, say: “You were feeling so frustrated that you wanted to hit. I hear you. But I won’t let you hurt anyone.”

    3. For the Teenager (12+): The “Consultant” Approach

    This is the hardest pivot. You must move from “Manager” to “Consultant.” If you try to control a teen, they will pull away to establish their own identity.

    • Tip: Use active listening. When they talk, your goal is to be a “non-anxious presence.” Instead of giving advice, ask: “Do you want me to just listen, or do you want me to help you brainstorm solutions?”

    4. The Power of the “Repair”

    This is the single most important tool in a “Sturdy Parent’s” kit. You will mess up. You will yell. You will be dismissive.

    • The Hack: Go back later. “I’m sorry I yelled earlier. I was feeling overwhelmed, and it wasn’t your fault. Can we try that conversation again?” This models accountability and shows the child that relationships can be broken and fixed.
  • Unlock Their World: 9 Proven, Low-Stress Steps to Teach Your Child to Read

    Unlock Their World: 9 Proven, Low-Stress Steps to Teach Your Child to Read

    The journey of teaching a child to read often feels like a high-stakes marathon. As parents, we feel the weight of every milestone, wondering if our little ones are “on track” or if we’re doing enough. But here is the secret that changed everything for me: reading isn’t a race to be won; it’s a world to be unlocked.

    By shifting our focus from high-pressure drills to a philosophy of “Consistency Over Intensity,” we can foster a genuine love for literacy that lasts a lifetime. This guide provides a 9-step blueprint to help your child find their footing in the world of words, built on patience, trust, and simple daily habits.


    The Science of the “Million Word Gap”

    Before we dive into the steps, it’s helpful to understand the “why.” Recent neuroimaging studies show that when we read aloud, the brain’s auditory and visual cortices are activated simultaneously, creating robust neural networks. Researchers at The Ohio State University found that children whose parents read to them five times a day enter kindergarten having heard nearly 1.5 million more words than those who weren’t read to. This “million-word gap” is a powerful predictor of later academic success, but the goal isn’t just a number—it’s about the rhythmic activity that “nudges” a child’s brain into detecting patterns in language.


    Phase 1: Setting the Foundation

    The first three steps are about building a positive relationship with books and sounds. We want to weave literacy into the fabric of your daily life without it feeling like “work.”

    1. Read for Every 10 Minutes: Consistency is your greatest tool. Dedicating just ten minutes a day to reading aloud creates a predictable, cozy routine that associates books with safety and connection. For the youngest learners, focus on “interactive reading”—ask them what they think is happening in the pictures or how a character feels.
    2. Teach 5 New Words Everyday: You don’t need flashcards. Introduce words through context—point out labels at the grocery store, read recipes together, or look at “print-rich” environments like cereal boxes and street signs. This shows children that reading has a practical purpose in the real world.
    3. Introduce One Letter Sound at a Time: Focus on phonemic awareness—the ability to hear individual sounds. Start with the most common sounds (like ‘m’ for mommy or ‘s’ for sun). Use a multi-sensory approach: have them trace letters in sand or use magnetic letters on the fridge to bridge the gap between sound and symbol.

    Phase 2: Playing with Language

    Once your child is comfortable with basic sounds, it’s time to bridge the gap between hearing a sound and seeing a word through play-based phonics.

    1. Play Simple Word Games: Turn learning into a “Silly Sound Safari.” Call out a sound (e.g., /b/) and hunt through the house for things that start with it. Rhyming games are also crucial; try “Rhyming Ball,” where you roll a ball back and forth only when you hear a rhyming pair (cat/hat).
    2. Help Them Blend Easy Words: This is where the magic happens. Start with simple CVC (Consonant-Vowel-Consonant) words. Use the “Stretching” technique: say the word slowly—/m/ /a/ /p/—and have them “catch” the word. This builds the auditory processing needed for decoding.
    3. Introduce Simple Phonic Rules: Start with the basics, like digraphs (two letters making one sound, like sh or ch). You can introduce “Tricky Words” or “Sight Words”—common words that don’t follow typical rules (like was or they)—gradually, so they don’t get stuck on the “un-phonetic” parts of English.

    Phase 3: Building Confidence and Trust

    The final phase is about the transition from learning to read to reading for pleasure.

    1. Use Decodable Readers: Success breeds confidence. Choose books that contain only the letter sounds your child has already mastered. When a child can successfully read every word on a page, their “self-efficacy” sky-rockets, making them eager for the next book.
    2. Consistency Over Intensity: It is better to practice for five minutes every single day than for an hour once a week. For busy parents, this might mean “reading” the back of a shampoo bottle during bath time or a quick poem before nap time.
    3. Be Patient and Trust the Process: Every child’s “reading spark” ignites at a different time. Some children are early explorers (ages 2-4), while others need more time for their cognitive infrastructure to settle. Avoid “toxic stress” by keeping the experience joyful.

    A Note for the “Productive Mom”

    It is easy to turn “teaching to read” into another item on your to-do list. But true literacy grows in the soil of Slow Motherhood. If your child wants to read the same book for the 100th time, let them. Re-reading is actually a neuro-developmental hack that builds familiarity and fluency.

    If you are feeling overwhelmed, remember that self-care is part of being a “sturdy parent.” Take five minutes for yourself—journal, breathe, or enjoy your coffee—so that when you sit down for those ten minutes of reading, you are fully present. Your child doesn’t need a perfect teacher; they need a connected guide who enjoys the story as much as they do.

  • Sturdy Parenting: How to Build Emotional Resilience in Kids

    Sturdy Parenting: How to Build Emotional Resilience in Kids

    Modern parenting often feels like a high-stakes race to keep our children happy and comfortable at all costs. As a parent, particularly if you identify as a “busy mom,” there is an immense pressure to fix every “everyday hurdle” and shield your children from the slightest discomfort. However, in our quest to be the “perfect” provider, we might be missing the most critical skill for the next generation: Emotional Resilience.

    This is where the concept of Sturdy Parenting comes in. It is a strategic move away from a style that can sometimes feel permissive or over-functioning, and toward a psychology-informed approach where the parent acts as the “calm pilot” in a child’s emotional storm. By focusing on sturdy parenting and emotional regulation, we aren’t just raising “nice” kids; we are raising an emotionally sturdy generation capable of navigating a complex world with grit and confidence.


    The Core Philosophy: Being the “Pilot in the Storm”

    Emotional sturdiness begins with the parent, not the child. When a child is spiraling into a meltdown, they don’t need us to spiral with them. They need a “comforting presence during tough times” who remains grounded and unshakeable.

    Think of the “Pilot” analogy: during heavy turbulence, you don’t want the pilot to come over the intercom screaming; you want them to stay calm and fly the plane. When we practice sturdy parenting, we acknowledge the child’s “big feelings” without letting those feelings dictate the boundaries or safety of the home. This creates a sense of safety for the child and a pathway to burnout recovery for the parent, as you no longer feel it is your job to “fix” every uncomfortable emotion. You are there to witness the emotion, not to be consumed by it.

    The Wise Teacher: Modeling Resilience in Real Time

    We often think of teaching as a lecture or a planned activity, but children learn most by watching us navigate our own lives. Your child sees you as a “wise teacher of life’s important lessons” through your daily actions. Resilience is caught, not taught.

    When you hit a “stressful Tuesday”—perhaps a work deadline is looming or a project is failing—how do you react? By modeling healthy emotional regulation out loud, you provide the blueprint for their own resilience. You might say, “I’m feeling very frustrated right now because this didn’t go as planned, so I’m going to take a deep breath before I try again.” In this moment, you become the “role model for kindness and compassion” by showing them how to treat themselves when things go wrong. You are teaching them that it is okay to be human, and it is possible to be sturdy even when things are hard.

    The Understanding Heart: Radical Acceptance and Validation

    The image of a mother with an “understanding heart that accepts them as they are” is the foundation of long-term mental health. In psychological terms, this is known as Radical Acceptance. It is the act of seeing your child’s struggle without judgment.

    Sturdy parenting teaches us to validate the feeling while holding the boundary on the behavior. You can be a “gentle guide” who says, “I see you are really angry that play-time is over, and it’s okay to feel that way,” while still moving forward with the transition. This validation builds emotional intelligence because the child learns that their internal world is valid and manageable. When we accept them “as they are” in their messiest moments, we give them the internal security to eventually accept themselves.

    The Creative Problem-Solver: Building Grit through Collaboration

    Instead of removing every obstacle in their path, a sturdy parent acts as a “creative problem-solver for everyday hurdles” alongside the child. Resilience grows in the “struggle,” not in the ease.

    When a child struggles with a difficult task, our instinct as busy parents is often to do it for them to save time or avoid a tantrum. However, by being a “playful companion” who asks, “That looks really tough, what’s one way we could try to fix this?”, you empower them to build grit. You shift from being the “fixer” to being a mentor. This collaborative approach teaches them that they have the agency to change their situation. It transforms a moment of defeat into a moment of mastery.

    Moving Toward the “Memory-Maker” Role

    As we move away from the stress of over-parenting, we find more energy to be the “memory-maker who creates special moments”. When we aren’t constantly managing our children’s emotions, we have the emotional bandwidth to actually enjoy them.

    Sturdy parenting isn’t about being cold or distant; it’s about being so secure in your role as the leader of the home that you can afford to be playful. You can be the “source of comfort food and warm hugs” because your “understanding heart” isn’t drained by the daily battle of wills. You are raising children who know that no matter how big their feelings get, their parent is bigger, sturdier, and always ready to listen.

    Conclusion: A Legacy of Emotional Grit

    The world our children are entering is increasingly complex, and the “nice” child may struggle where the “sturdy” child thrives. By embracing these pillars—regulation, modeling, acceptance, and collaborative problem-solving—you are providing them with an internal compass that will last a lifetime. You are being exactly the kind of mom they need: a “patient listener” who hears their stories and a “gentle guide” who helps them find their own strength.

  • Why I Stopped Being a “Productive” Mom: The Power of Slow Motherhood

    Why I Stopped Being a “Productive” Mom: The Power of Slow Motherhood

    We’ve all seen the “Supermom” aesthetic: the perfectly color-coded pantry, the toddler with the advanced sensory bin, and the mother who somehow manages a 5-step skincare routine before 7:00 AM. In the world of modern digital publishing, we call this “hustle culture for parents.” But for most of us, it’s just a one-way ticket to burnout.

    If you are feeling perpetually behind and emotionally exhausted, it’s time for a radical shift. It’s time to move from “perfect parenting” to purposeful presence. This is the essence of Slow Motherhood, and it is the ultimate burnout recovery for the modern woman.

    The Science of “Good Enough”

    Slow Motherhood isn’t about being lazy; it’s a psychology-informed approach to intentional parenting. We’ve been conditioned to believe our children need a “professional” childhood filled with structured activities. However, developmental psychology suggests otherwise.

    Donald Winnicott, a famed pediatrician, introduced the concept of the “Good Enough Mother.” His research proved that children don’t need a perfect parent; they need a regulated one. When we embrace slow living for moms, we prioritize coregulation—the ability to stay calm so our children can learn to do the same.

    Pillar 1: Rejecting “Extracurricular Overkill”

    The first secret to a peaceful home? A ruthless audit of your calendar. We often sign our kids up for everything out of a fear of them “falling behind.” In reality, this “over-parenting” creates a frantic pace that prevents deep connection.

    By choosing rhythm over routine, you stop fighting the clock. Instead of a rigid schedule, follow a natural flow: play, nourish, rest. When you stop rushing to the next “class,” you find the white space where memories actually happen.

    Pillar 2: The Magic of the “Yes Space”

    One of the biggest stressors for a busy mom is the constant “no.” “No, don’t touch that,” “No, that’s messy,” “No, stay away from the stairs.” Creating a “Yes Space”—a 100% child-safe, curated environment—is the ultimate hack for independent play. It allows you to step back and breathe while your child explores safely. This minimalist approach to your home decor doesn’t just look better on Pinterest; it reduces the sensory “noise” that leads to toddler meltdowns.

    Pillar 3: Turning “Chore Time” into “Connection Time”

    We often try to “get through” the housework so we can finally play with our kids. Slow Motherhood flips the script. By involving your children in practical life skills—like “helping” with the laundry or washing plastic dishes—you turn a chore into a bonding activity. It’s slow, it’s messy, and it’s exactly what your child needs to feel seen and capable.

    Pillar 4: The Power of Boredom

    In a world of “iPad kids,” boredom has become a dirty word. But boredom is actually the birthplace of creativity. When we stop providing constant entertainment, children are forced to look inward. This triggers slow play, where a cardboard box becomes a rocket ship and a pile of sticks becomes a forest.

    Your Permission to Slow Down

    The “Supermom” myth is a lie. Your children won’t remember the organic bento boxes or the perfectly curated playroom. They will remember the way you felt when you looked at them.

    Today, I’m giving you permission to do less. Cancel the extra appointment. Sit on the floor. Breathe. The antidote to over-parenting isn’t a new toy or a better schedule—it’s you, fully present.

  • Simple and Balanced Toddler Lunch Ideas (Picky Eater Approved)

    Simple and Balanced Toddler Lunch Ideas (Picky Eater Approved)

    Hey mama! Let’s be real for a second—lunchtime with a toddler can feel like you’re negotiating a peace treaty with a tiny, unpredictable world leader. One day they devour everything on their plate, the next day they act like you’ve served them poison. Sound familiar?

    I’ve put together a collection of simple, balanced toddler lunch ideas that take the stress out of midday meals. These aren’t fancy gourmet recipes—they’re real, practical meals that work for busy moms and picky toddlers alike.

    The goal? Nutritious food that actually gets eaten, minimal cleanup, and maybe—just maybe—a peaceful lunch break for you too.


    Why “Simple and Balanced” Matters

    Before we dive into the ideas, let’s talk about what “balanced” actually means for a 2-3 year-old. Toddlers have small tummies but big energy needs. A well-balanced lunch should include :

    • Protein for growth and development
    • Healthy fats for brain development
    • Fruits and veggies for vitamins and fiber
    • Complex carbs for steady energy

    But here’s the secret: balance doesn’t have to be complicated. You don’t need to prepare five separate things. Sometimes a single well-rounded dish—like egg muffins or a quesadilla—hits all the food groups in one go .


    10 Simple & Balanced Toddler Lunch Ideas

    1. Turkey & Cheese Roll-Ups

    This is my go-to when I need something fast but satisfying.

    How to make it: Spread a thin layer of cream cheese on a soft tortilla. Layer turkey and cheese, roll tightly, and slice into bite-sized pinwheels. Serve with cucumber sticks or berries on the side .

    Why it works: Toddlers love finger foods, and the pinwheel shape makes it feel special. Plus, you can make the roll the night before and just slice it at lunchtime .

    Make-ahead tip: Roll the night before but slice at lunch so they don’t dry out .

    2. Mini Quesadilla Dippers

    Quesadillas are the unsung heroes of toddler feeding—they’re quick, flexible, and perfect for little hands .

    How to make it: Sprinkle shredded cheese between two small tortillas (add finely chopped spinach if you’re feeling brave). Warm in a pan until melty, then slice into thin strips perfect for dipping .

    Serve with: Guacamole, mild salsa, or yogurt-ranch for dipping.

    Why it works: When sliced into triangles, quesadillas are easy for toddlers to hold, supporting independence at mealtimes .

    3. Hummus & Veggies Snack Box

    Sometimes the simplest lunches are the biggest hits.

    How to build it: Spoon hummus into a small cup. Surround with toddler-soft veggies: cucumber half-moons, thinly sliced bell pepper strips, cherry tomatoes (quartered lengthwise), and soft pita triangles for dipping .

    Why it works: Dips make vegetables magically disappear. Seriously—it’s like toddler sorcery .

    Prep tip: Portion hummus and pre-cut veggies into containers for 2-3 days; keep pita separate so it stays crisp .

    4. Egg Muffins (Protein-Packed Bites)

    These are my absolute favorite make-ahead lunch solution.

    How to make them: Whisk 4 eggs with a splash of milk. Add finely chopped spinach, bell peppers, and a sprinkle of cheese. Pour into greased muffin tins and bake at 350°F for 15-20 minutes .

    Why it works: Egg muffins are soft in texture, easy to hold, and work brilliantly for babies, toddlers, and the rest of the family too . Make a batch on Sunday and grab them all week .

    Storage: Freeze flat and reheat for 25-30 seconds when needed .

    5. Pasta, Peas & Parmesan

    Comfort food that actually delivers nutrition.

    How to make it: Toss small pasta shapes with olive oil, sweet peas (frozen and thawed work great), and a sprinkle of Parmesan. Add a spoonful of yogurt for extra creaminess if you like .

    Why it works: The small pasta shapes are easy for little mouths, and peas add a pop of sweetness toddlers often love .

    Make-ahead: Keeps for 3 days in the fridge; add a splash of water before reheating .

    6. DIY Bagel Bar

    Give them choices—it works wonders for picky eaters.

    How to set it up: Offer a mini bagel (toasted, cut in half), a small bowl of cream cheese or mashed avocado, and tiny bowls of “sprinkles” like finely chopped strawberries or cucumber .

    Why it works: Letting toddlers choose gives them a sense of control, making them more likely to actually eat .

    7. PB & Banana Sushi (Nut-Free Options Available)

    This one feels like a treat but delivers protein and energy.

    How to make it: Spread nut or seed butter on a tortilla, place a whole banana on one edge, roll tightly, and slice into coins. For extra fun, roll the edges in puffed rice cereal .

    Allergy swap: Use sunflower seed butter (SunButter) or Wow Butter for nut-free settings .

    Why it works: It’s handheld, fun-shaped, and naturally sweet—basically toddler catnip.

    8. Cottage Cheese Snack Plate

    Don’t underestimate the power of a simple snack plate.

    How to build it: Spoon cottage cheese into a small bowl. Add soft peach slices (canned in juice works great) and whole-grain crackers on the side .

    Why it works: Cottage cheese packs protein and calcium, and the combination of creamy and crunchy keeps things interesting.

    Prep tip: Portion cottage cheese into lidded cups for grab-and-go convenience .

    9. Mini “Lunchable” Bento

    Skip the processed store-bought kits and make your own.

    How to build it: In a bento box or divided plate, arrange:

    • Whole-grain crackers
    • Sliced cheese or cheese cubes
    • Turkey or ham roll-ups
    • Cucumber rounds and halved berries 

    Why it works: Toddlers love having separate little compartments and controlling what they eat next .

    10. Savory Pancakes (Leftover Remix)

    Got leftover veggies from last night’s dinner? This is your solution.

    How to make them: Finely chop leftover cooked vegetables and mix them into a simple pancake batter (made from whole wheat flour and an egg). Cook like silver-dollar pancakes.

    Why it works: It gives leftovers new life and hides textures that might otherwise be rejected .


    Quick Tips for Stress-Free Toddler Lunches

    Before you start meal planning, here are some sanity-saving tips from moms who’ve been there:

    The 10-15 Rule

    It can take 10 to 15 exposures to a new food before a toddler accepts it. Don’t give up after the first “no!” Just keep offering a tiny taste alongside familiar favorites .

    Portion Sizes Matter

    A toddler’s portion is about 1/4 of an adult’s—roughly 2-3 tablespoons per food group . A huge plate of food can be overwhelming. Start small .

    Cut Smart for Safety

    Always cut round foods like grapes and cherry tomatoes lengthwise into quarters to prevent choking . Steam firm veggies like carrots until they’re soft enough to squish with your fingers .

    One Safe Food, One New Food

    When introducing something new, always include one familiar “safe food” they already love. This reduces mealtime anxiety and keeps them eating .

    Make One Anchor Ahead

    Keep one prepped protein in the fridge—meatballs, egg muffins, or shredded chicken. Having this ready makes assembling lunches a 60-second job .


    Sample Balanced Meal Plan for a 2-Year-Old

    Here’s a simple guide to building a balanced plate. Remember, you don’t need to include everything at every meal—aim for variety over the course of the day.

    Food GroupPurposeEasy Examples
    ProteinGrowth & developmentMeatballs, tuna, eggs, beans, tofu, Greek yogurt 
    VeggiesVitamins & fiberSteamed broccoli, cucumber rounds, peas, roasted sweet potato 
    FruitsNatural energyBerries, banana coins, clementine segments, diced mango 
    GrainsFuel for playWhole-grain crackers, mini pitas, small pasta, brown rice 
    Healthy FatsBrain healthAvocado slices, nut/seed butters, cheese 

    How much to offer: Think 2-3 tablespoons per food group. Watch your child’s hunger and fullness cues—they’ll let you know if they need more or are done .


    Handling Picky Eaters: What Actually Works

    If your toddler rejects everything some days, you’re not alone. Here’s what experienced moms and nutritionists recommend:

    Don’t pressure. Encouragement works better than pressure. Stay neutral about what they eat .

    Keep it colorful. Toddlers eat with their eyes first. Bright colors naturally draw them in .

    Offer choices. “Do you want cucumber or bell pepper?” gives them control without extra work for you .

    Rotate dips. Same food + new dip = “different” meal. Hummus, guacamole, yogurt, and mild salsa are all winners .

    Eat together. When you sit down and enjoy the same foods, they’re far more likely to join in .


    Make-Ahead Strategies for Sanity

    Meal prepping doesn’t have to mean spending your entire Sunday in the kitchen. These small steps make a big difference:

    • Sunday prep: Cook a batch of egg muffins, wash and cut sturdy veggies (carrots, cucumbers), and portion dips into small containers .
    • Night before: Roll pinwheels, pack dry items in lunch containers, and pre-portion yogurt or cottage cheese .
    • Morning of: Add fresh fruit, pack an ice pack, and you’re done .

    Which Lunch Will You Try First?

    I’d love to hear from you! Drop a comment below and let me know which of these simple lunch ideas your toddler enjoyed—or share your own go-to meal that always works. We moms have to stick together!

    Love this guide? Save it to your favorite “Toddler Meals” board on Pinterest so you always have it handy when lunchtime rolls around. And if you know another mom who’s struggling with picky eaters, forward this to her—she’ll thank you!


    Your Turn!

    What’s your toddler’s current favorite lunch? Share in the comments—I’m always looking for new ideas to try!

    This post contains affiliate links. If you make a purchase through these links, I may earn a small commission at no extra cost to you.

  • 10 Easy & Balanced Toddler Lunch Ideas (For Ages 2+)

    10 Easy & Balanced Toddler Lunch Ideas (For Ages 2+)

    Hey mama! If you’re staring into the fridge at 11 a.m. wondering what on earth to feed your little human again, I’ve got you. Feeding a two-year-old can feel like preparing a gourmet meal for a tiny food critic who changes their mind faster than the weather. One day they love cheese, the next day it’s “toxic.” Sound familiar?

    We’re diving into the world of balanced meal plates for 2 year olds that are healthy, fun, and—most importantly—easy enough for busy parents. Let’s turn those mealtime battles into happy (or at least peaceful) eating adventures!

    Why Balanced Meals Matter for Toddlers

    Before we get to the ideas, let’s talk about the “balanced” part. Toddlers have small stomachs but big energy needs. A great rule of thumb is to aim for a mix of:

    • Protein (for growth)
    • Healthy Fats (for brain development)
    • Fruits & Veggies (for vitamins)
    • Complex Carbs (for energy).

    But let’s be real—sometimes getting them to eat anything green feels like a major win. The trick isn’t pressure; it’s presentation and variety.


    10 Toddler-Approved Lunch Ideas

    Here are 10 nutritious, visually appealing lunch ideas that are perfect for your 2-year-old.

    1. The Deconstructed “Lunchable”


    Skip the processed store-bought kits. On a plate, arrange:

    • Protein: Slices of roasted turkey or chicken
    • Carb: Whole grain crackers
    • Produce: Cucumber slices and a few berries
    • Dairy: A cheese stick or small cheese cubes
      Why it works: Toddlers love finger foods and having control over what they grab.

    2. Veggie-Forward Mini Quesadillas


    How-to: Spread refried beans on a small whole wheat tortilla. Sprinkle with shredded cheese and finely chopped spinach or bell peppers. Fold and pan-fry until golden. Cut into dippable wedges.
    Dip: Serve with a side of mild salsa or guacamole for dipping.
    Why it works: The cheese masks the taste of veggies, and dips make everything more fun.

    3. The “Everything” Pasta Salad


    Base: Small pasta shells (easy for little mouths)
    Mix-ins: Canned tuna (in water), peas (frozen and thawed are sweet), and cherry tomato halves.
    Finish: Toss with a light olive oil or a dollop of pesto.
    Why it works: Pasta is a safe food for most kids, and this packs in protein and veggies effortlessly.

    4. DIY Bagel Bar


    Set out:

    • A mini bagel (toasted, cut in half)
    • A small bowl of cream cheese or mashed avocado
    • A tiny bowl of “sprinkles” like finely chopped strawberries or cucumber.
      Why it works: Giving choices (even small ones) gives toddlers a sense of independence, making them more likely to eat.

    5. Rainbow Yogurt Bowl


    Base: Full-fat plain Greek yogurt
    Color: Top with blueberry “eyes,” strawberry slice “mouth,” and use shredded coconut or granola for hair.
    Sweetener: A light drizzle of maple syrup or mashed banana for natural sweetness.
    Why it works: It’s a visual treat and packed with calcium and probiotics.

    6. Protein-Packed Muffins


    Make a batch of egg muffins ahead of time.
    Recipe: Whisk eggs with a splash of milk. Pour into a greased muffin tin. Add fillings like chopped broccoli, cheese, and diced ham.
    Bake at 375°F until set.
    Serve: One or two muffins with a side of fruit.
    Why it works: These are perfect for meal prep and can be eaten warm or cold.

    7. Fun with Faces


    Sometimes, the simplest meals become exciting with a little art.
    Base: Half a whole grain bagel or rice cake spread with hummus.
    Face: Use thin carrot strips for a smile, cucumber rounds for eyes, and a cherry tomato half for a nose.
    Why it works: It encourages kids to interact with their food, making them more open to trying new textures.

    8. Simple “Sushi” Rolls


    No raw fish here!
    How-to: Spread cream cheese on a whole wheat tortilla or flattened bread slice. Lay down thin strips of cucumber and turkey. Roll it up tightly and slice into bite-sized pinwheels.
    Why it works: It’s a novel shape that’s easy to hold and packed with nutrients.

    9. Leftover Remix: Savory Pancakes


    Got leftover veggies or chicken from last night’s dinner? Chop them finely and mix them into a simple pancake batter (made from whole wheat flour and an egg). Cook them like silver-dollar pancakes.
    Why it works: It gives leftovers a whole new life and hides textures that might otherwise be rejected.

    10. The “Safe Food” Plate


    Never underestimate the power of a safe meal.
    The Plate: A hard-boiled egg (sliced), a handful of goldfish crackers, apple slices with a thin layer of peanut butter, and a few steamed carrot coins.
    Why it works: Including one “safe” food they recognize next to new options reduces mealtime anxiety.


    Quick Tips for Surviving the Picky Eater Phase

    Before you scroll down to save this for later (go ahead, I know you want to!), here are some game-changing tips from experts that saved my sanity:

    • The 10-15 Rule: It can take 10 to 15 exposures to a new food before a toddler accepts it. Don’t give up after the first “no!”
    • Portion Sizes Matter: A toddler’s portion is about 1/4 of an adult’s. A huge plate of food can be overwhelming. Start small.
    • Watch the Milk: Too much milk or juice can spoil their appetite. Stick to about 16-24 oz of milk a day and offer water for thirst.
    • Cut Smart: Always cut round foods like grapes and cherry tomatoes lengthwise into quarters to prevent choking.

    Sample Balanced Meal Plan for a 2-Year-Old

    To make your life easier, here is a quick guide to building a plate that covers all the bases:

    • Protein (Growth & Development): Meatballs, tuna, eggs, beans, tofu, yogurt
    • Veggies (Vitamins & Fiber): Steamed broccoli, bell pepper strips, peas
    • Fruits (Natural Energy): Berries, banana slices, mandarin oranges
    • Grains (Fuel for Play): Whole grain crackers, brown rice, pasta
    • Healthy Fat (Brain Health): Avocado, nut/seed butter, cheese

    “You decide the what, when, and where. Your child decides how much and whether to eat.” — Ellyn Satter’s Division of Responsibility.


    Which of these lunch ideas are you trying first? Drop a comment below and let me know—I’d love to hear how it goes!

    Love this guide? Save it to your favorite “Toddler Meals” board on Pinterest so you always have it handy during the lunch rush!

  • Beyond the Tablet: Mom’s Guide to Building Independent Play Stamina

    The modern “busy mom” exists in a state of constant task-switching. You are often trying to answer a work email while a toddler asks for a snack, or attempting to fold a mountain of laundry while a tablet blares repetitive cartoons in the background. We often reach for the screen as a “digital babysitter” because it feels like the only way to guarantee a moment of quiet. However, many parents notice a frustrating pattern: the second the screen turns off, a “post-tablet meltdown” begins. This happens because a child’s nervous system is often passively overstimulated by fast-paced digital content, rather than being actively regulated through engagement.

    To get things done without the “screen-time guilt,” we have to shift our perspective. We aren’t just “entertaining” our kids; we are helping them build independent play stamina. This is a cognitive skill, much like reading or riding a bike. By using sensory-rich “stations”—focused on tactile, real-world engagement—we invite the child into a state of “flow.” In this state, their brain is deeply engaged, their nervous system is calm, and their need for constant maternal input drops. This is how you reclaim your morning without a power struggle over an iPad.

    The secret to a productive morning isn’t finding a “magic toy”; it’s about Co-Regulation. In the world of gentle parenting, there is a powerful mantra: Regulate first, react later. If you are feeling frantic and rushed to finish your chores, your child picks up on that “speedy” energy and often clings to you for safety or attention. By taking five minutes to set up a high-concentration station and taking a moment to ground yourself, you create a “Yes Space” where the child feels secure enough to play independently. When they are anchored in a sensory task, you are finally free to tackle your to-do list with a clear head.

    The “Prep-Ahead” Strategy for Maximum Focus

    The key to a successful “Independent Play” block is the setup. Busy moms don’t have time for elaborate crafts that take 20 minutes to prep and only 2 minutes to play with. Instead, focus on “Open-Ended Sensory Bins.” The goal is to provide a task that has no “right” way to play, allowing the child’s imagination to take over. By having 2-3 of these “high-focus” rotations ready to go, you can swap them out the moment you see their concentration start to flicker, buying yourself another 20 minutes of productivity.


    6 High-Concentration Stations to Swap for Screen Time

    • 1. The Deep-Dive Water Station Water is a natural tranquilizer for a child’s nervous system. Fill a shallow bin or a large bowl with water and add “treasures” like plastic fish, colorful stones, or even frozen ice cubes to catch with a net or tongs. The tactile sensation of the water lowers the child’s heart rate and keeps them physically anchored in one spot. This is the perfect activity to set up on a towel on the kitchen floor while you prep dinner or tackle the dishes.
    • 2. The “3-Minute” Scribble Journal Children love to mimic the “serious work” their parents do. If you need to sit down and write a to-do list or answer an email, give your child their own “special” notebook and some high-quality crayons. Tell them, “Mommy is writing her important list, and you are writing your story.” This mirrors your behavior and encourages a habit of “quiet work” time. It’s an excellent way to keep them occupied at the table while you get your digital tasks done.
    • 3. The Sensory Scavenger Hunt If you have access to a backyard or even a safe porch area, use the “5-4-3-2-1” grounding method. Give your child a small basket and ask them to find 5 brown leaves, 4 smooth stones, and 3 sticks. This sensory-seeking mission turns “running around” into a focused, goal-oriented task. The physical contact with the earth and the focus required to find specific items helps regulate their system, preventing the “wired” feeling that often leads to tantrums.
    • 4. “Focus Bubbles” for Self-Regulation If your child is starting to get restless or “whiny” while you’re in the middle of a chore, don’t reach for the tablet. Reach for bubbles. Ask them to blow the “slowest, biggest bubble ever.” This forces them to practice deep, rhythmic breathing. It calms their nervous system instantly, resetting their mood so they can return to independent play while you finish your task.
    • 5. The “Heavy Work” Sorting Bin “Heavy work” refers to activities that push or pull against the body, which is incredibly calming for a busy toddler’s brain. Fill a bin with dried beans, rice, or pasta and hide small toys inside for them to find. The resistance of pushing their hands through the grains provides “proprioceptive input,” which helps ground them. It’s the sensory equivalent of a weighted blanket and can keep a child focused for surprisingly long stretches.
    • 6. The “One-Minute” Energy Discharge Sometimes, independent play fails because a child has built up too much restless energy. Before you start a big chore, do a “one-minute shaking contest” or a quick dance party. Physically “shaking off” the tension helps discharge the energy of a stress response. Satisfying their need for physical connection and movement first makes them much more likely to play happily on their own for the next 30 minutes.

    Why “Regulated Play” Beats the “Digital Pacifier”

    When a child plays with a tablet, they are in a passive state; their brain is receiving hits of dopamine without any physical output. When they play with water, sand, or crayons, they are in an active, creative state. The “Independent Play Blueprint” isn’t just about getting chores done; it’s about child development. You are teaching them how to be comfortable in their own company, how to problem-solve, and how to self-soothe.

    As a busy mom, your time is your most valuable resource. By investing five minutes in a “Regulated Setup,” you aren’t just buying yourself time—you’re raising a child who doesn’t need a screen to feel calm or occupied. You are becoming a “cycle breaker,” choosing to foster engagement and regulation over passive distraction.

    Conclusion

    Reclaiming your productivity doesn’t require a screen, and it doesn’t require you to be a “Super Mom” who entertains her kids 24/7. It simply requires a shift in the environment. By utilizing sensory stations that anchor a child in the “now,” you provide the internal stability they need to stay focused and calm. Start small tomorrow. Pick one chore, set up one sensory station, and practice the “regulate first” approach. You’ll be surprised how much you can get done when your child is engaged with the world around them instead of a digital display.