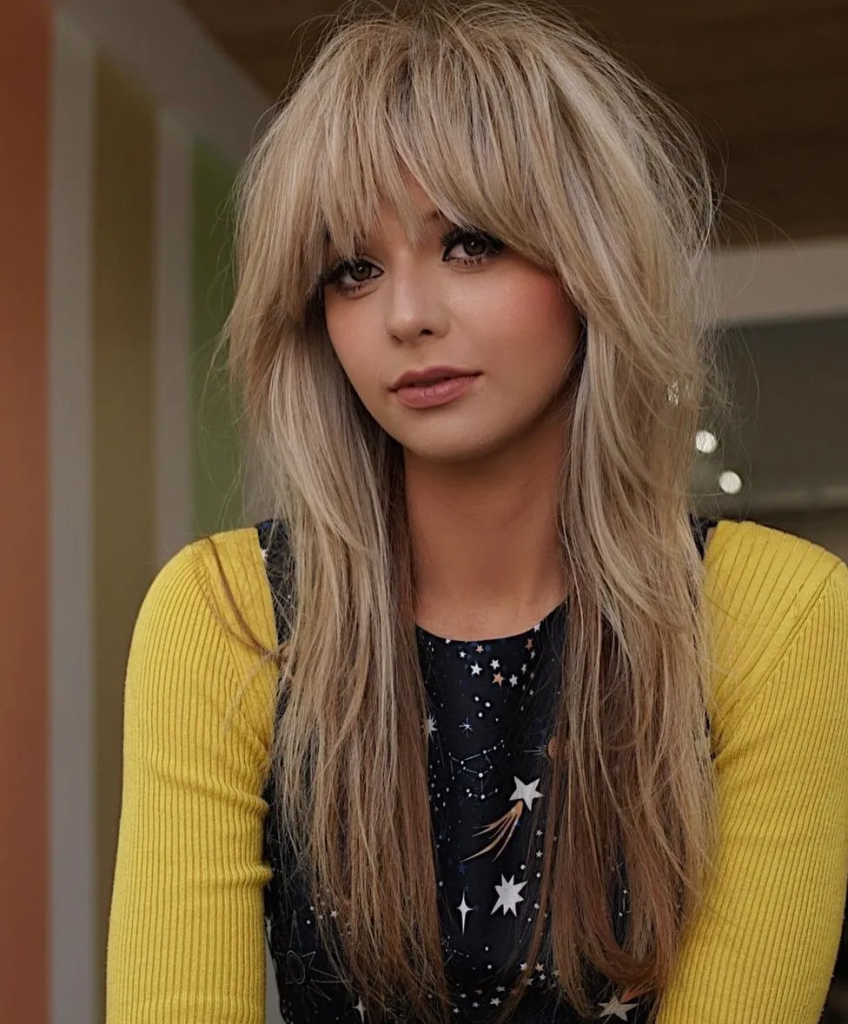
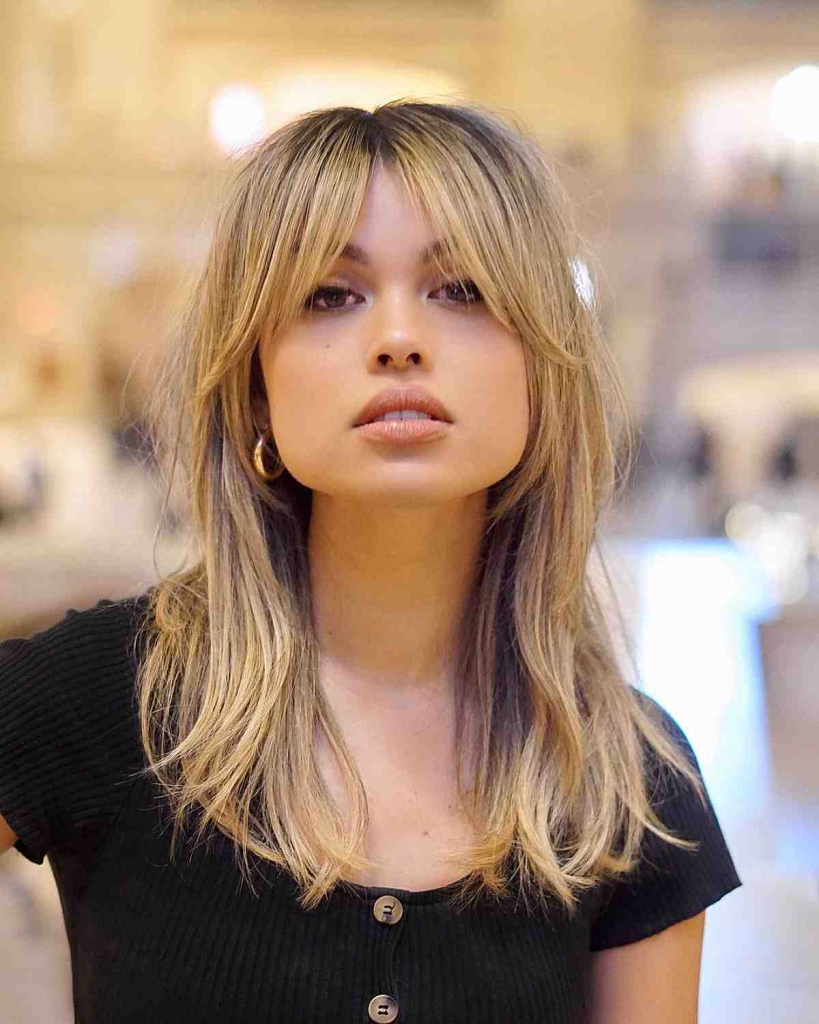
Long hair is beautiful. But it can also be one-dimensional. Curtain bangs hairstyles long add the perfect face-framing touch to waist-length or longer hair. Curtain bangs part in the middle and sweep to each side, like opening a curtain. Curtain bangs hairstyles long soften your features, hide forehead lines, and make your long hair look intentional and styled – even when it’s just down.
Here’s what I love about curtain bangs hairstyles long. They work with your length instead of fighting it. Unlike blunt bangs that need constant trimming, curtain bangs blend into your long hair as they grow. Curtain bangs hairstyles long also give you styling options – wear your hair straight with curtain bangs, wavy, in a braid, or in a ponytail. The bangs always frame your face.
The 12 styles I’m sharing today are all for long hair with curtain bangs. Curtain bangs hairstyles long include straight styles, wavy looks, braided updos, ponytails, and half-up styles. Let’s get into it.
12 Curtain Bangs Hairstyles Long Styles
1. Long Straight Hair With Curtain Bangs
Pin-straight waist-length or longer hair. Curtain bangs hit at your cheekbones or brows. Curtain bangs hairstyles long with straight hair are sleek and modern. The bangs add softness to the severe length. Style with a flat iron for smoothness.
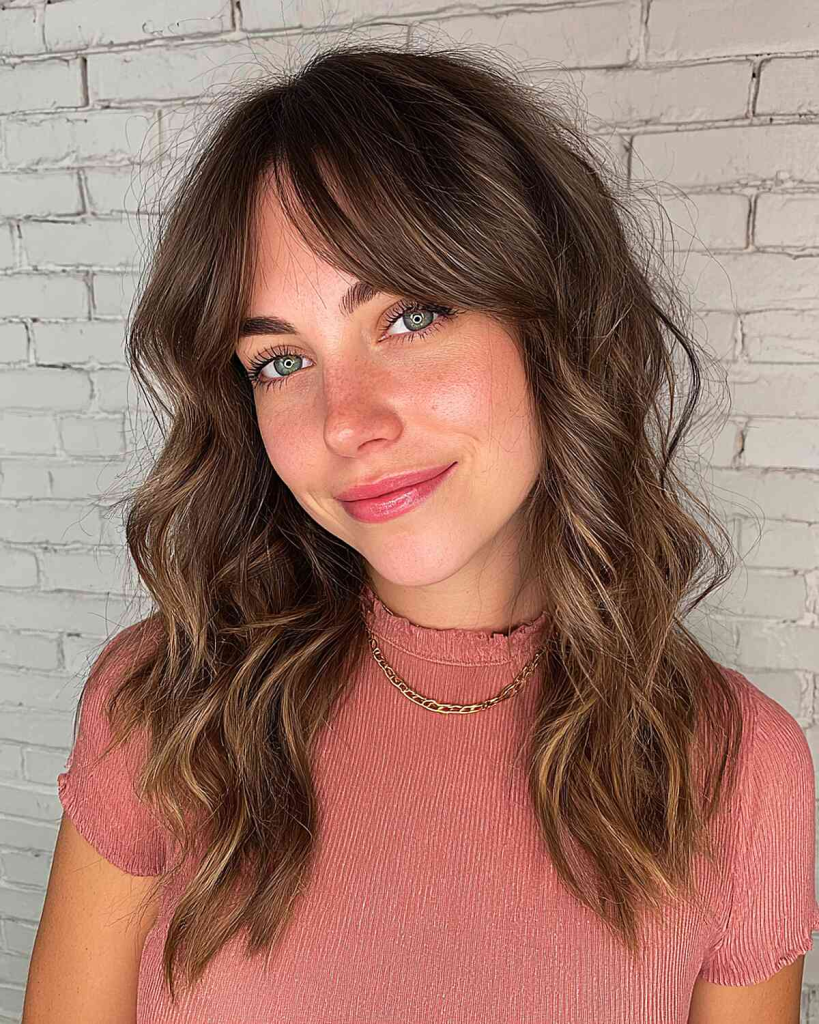
2. Beachy Waves With Curtain Bangs
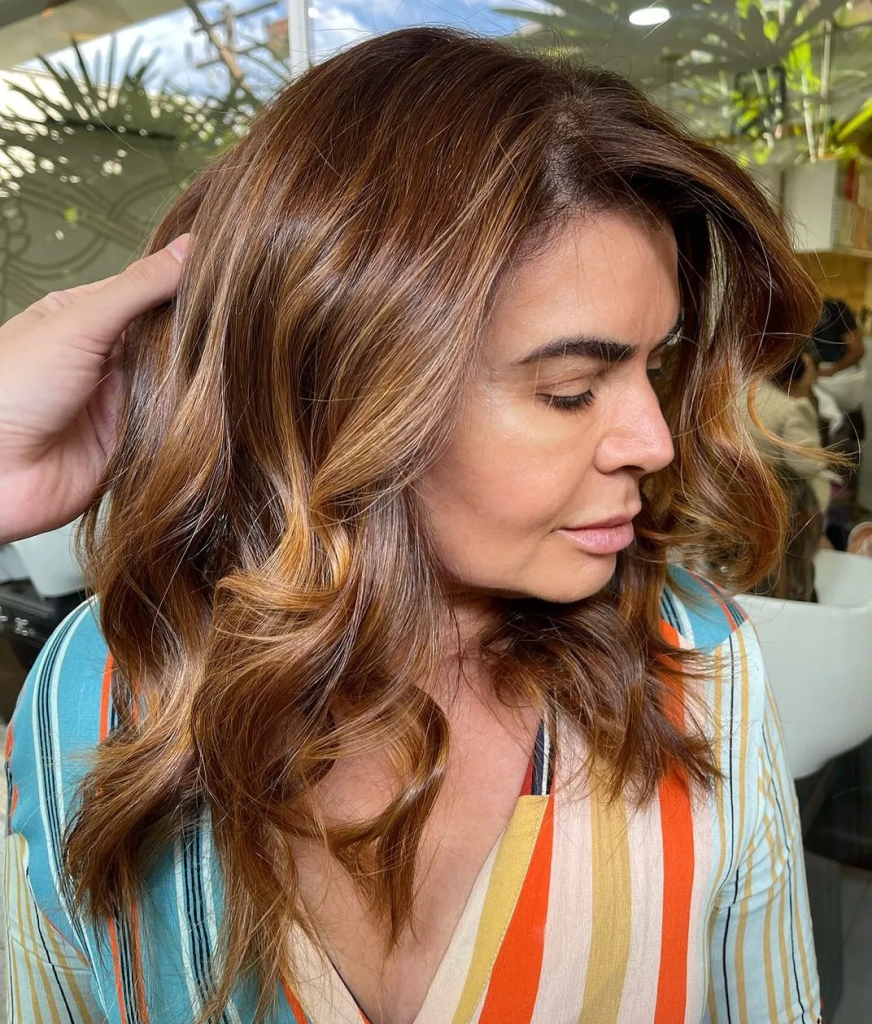
Loose, beachy waves throughout your long hair. Curtain bangs blend into the waves. Curtain bangs hairstyles long with waves are effortless and romantic. The bangs frame your face while the waves add movement. Style with sea salt spray and air-dry or diffuse.
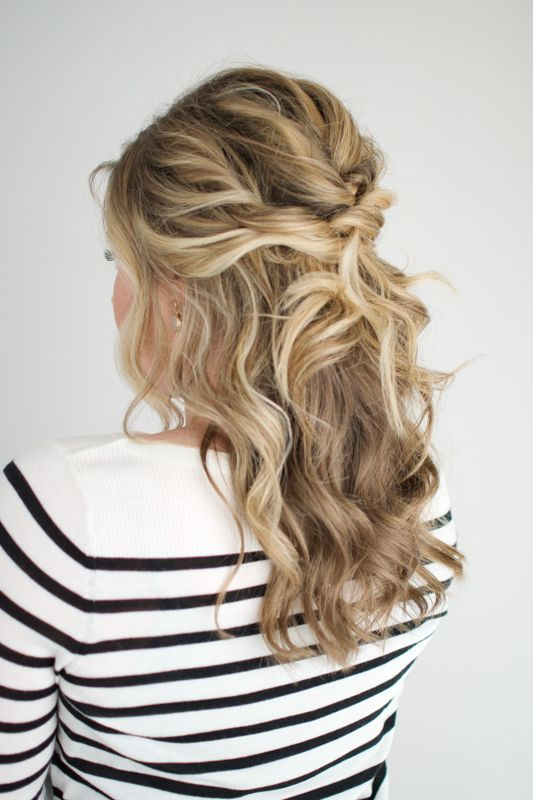
3. Half-Up Half-Down With Curtain Bangs
Pull the top half of your long hair back into a clip or ponytail. Leave the curtain bangs and bottom half down. Curtain bangs hairstyles long with a half-up style keep hair off your face while showing off your length. The bangs stay forward.
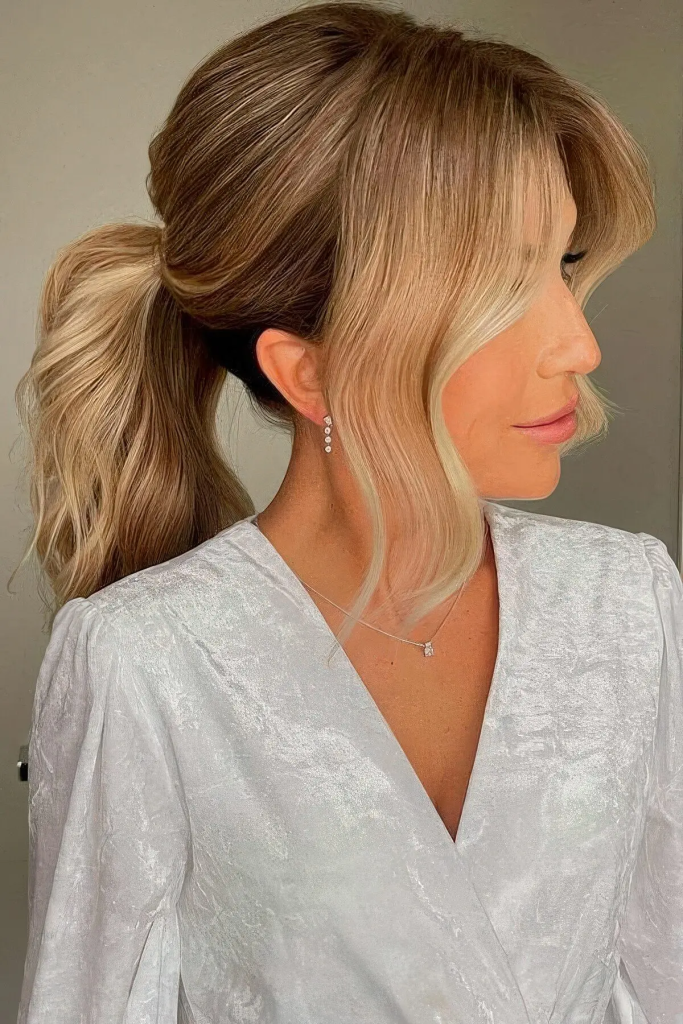
4. Low Ponytail With Curtain Bangs
Gather long hair into a low ponytail at your nape. Curtain bangs hang forward, framing your face. Curtain bangs hairstyles long with a low pony are elegant and polished. The bangs add softness to the sleek ponytail. Perfect for work or events.
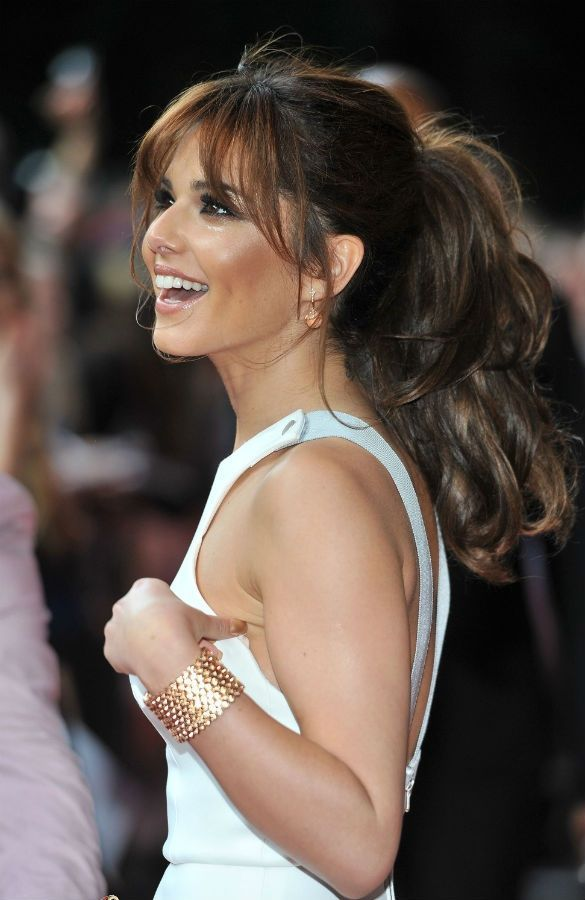
5. High Ponytail With Curtain Bangs
A high ponytail at your crown. Curtain bangs are left out, sweeping to each side. Curtain bangs hairstyles long with a high pony are sporty and cute. The bangs balance the height of the ponytail. Great for second-day hair.
6. Long Layers With Curtain Bangs
Long, soft layers throughout your length. Curtain bangs are the shortest point. Curtain bangs hairstyles long with layers add movement and volume. The layers start below your chin so they don’t compete with the bangs. Best for medium to thick hair.
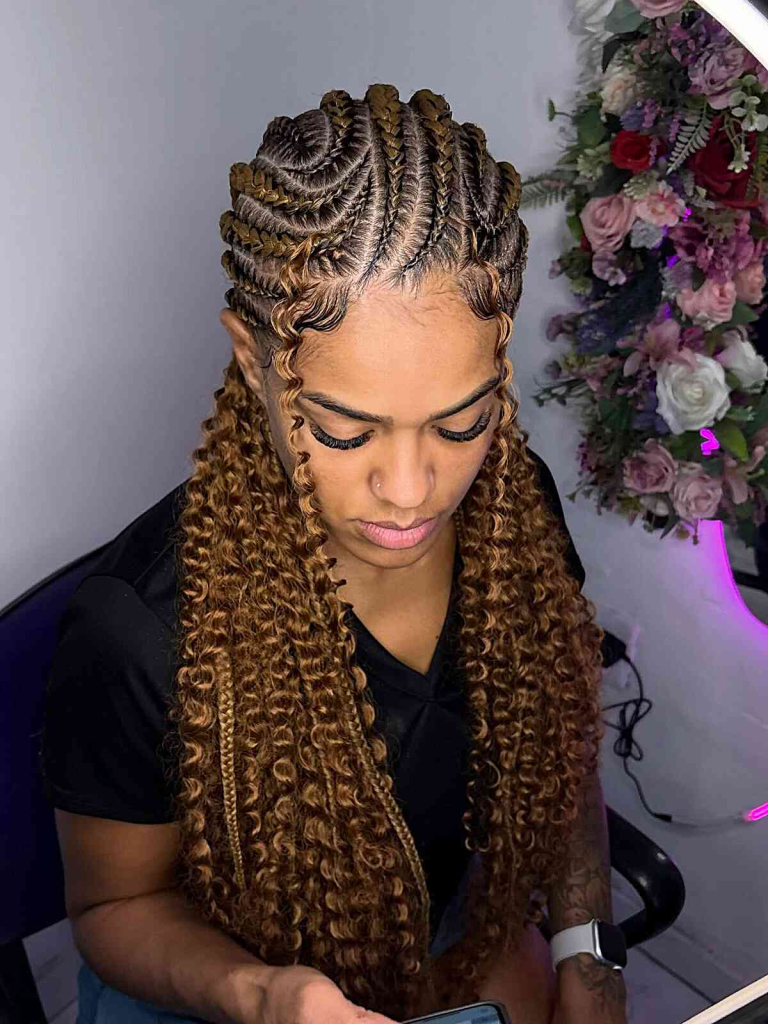
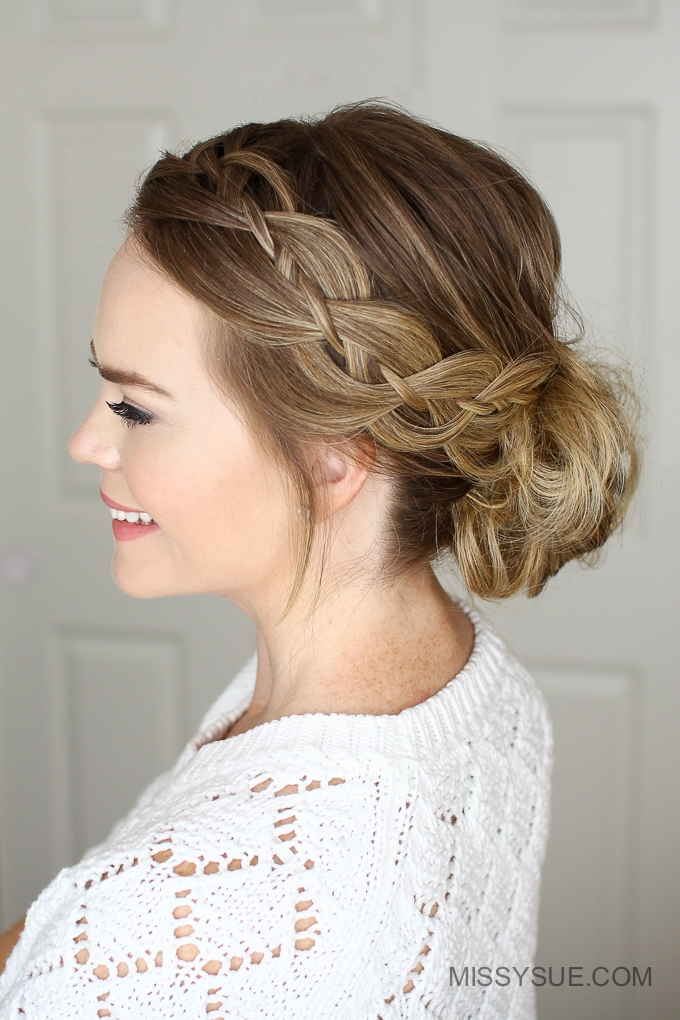
7. Braided Crown With Curtain Bangs
Create a braid (Dutch or French) along your hairline from ear to ear, forming a crown. Leave curtain bangs out in front. Curtain bangs hairstyles long with a braided crown are boho and romantic. The braid keeps hair off your face.
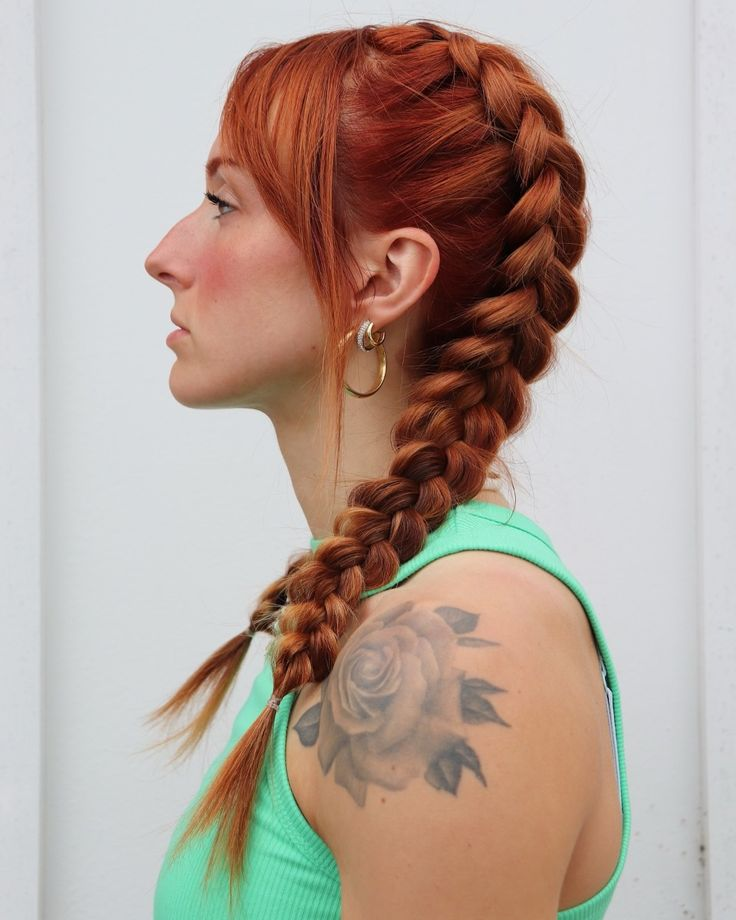
8. Side Braid With Curtain Bangs
A loose side braid (fishtail or regular) over one shoulder. Curtain bangs sweep to the opposite side. Curtain bangs hairstyles long with a side braid are asymmetrical and interesting. The bangs balance the braid.
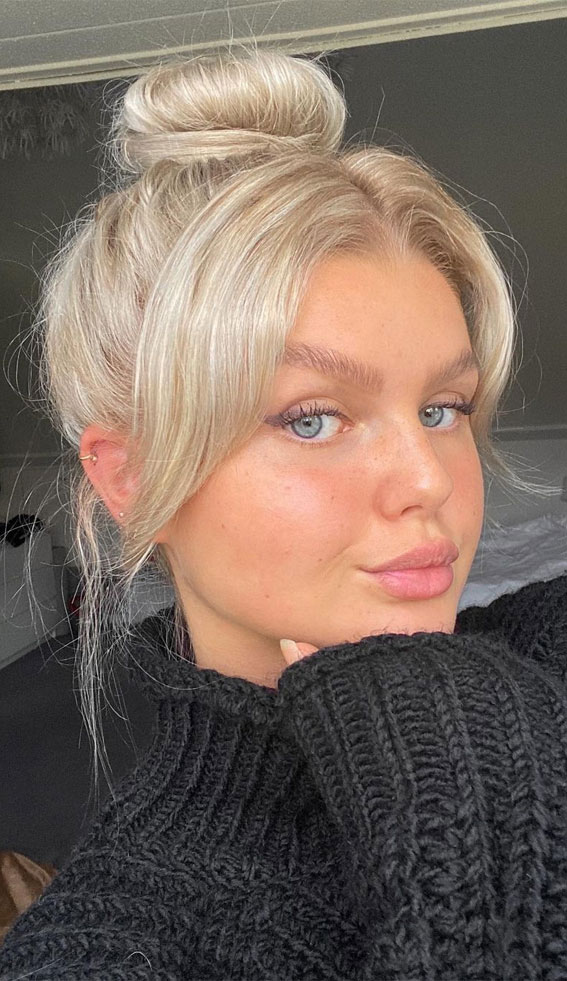
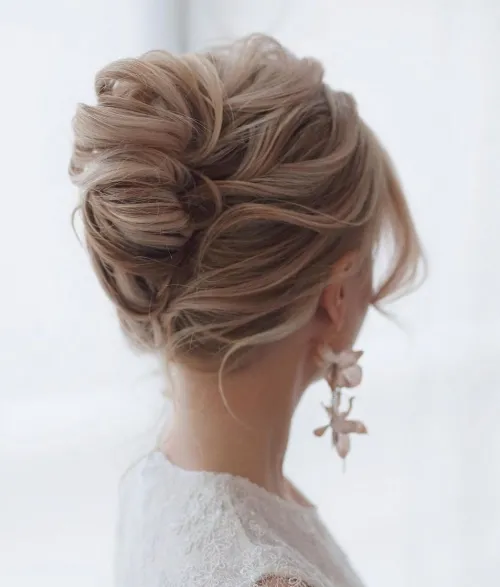
9. Messy Bun With Curtain Bangs
A high or low messy bun. Curtain bangs hang forward, framing your face. Curtain bangs hairstyles long with a messy bun are casual and chic. The bangs make the messy bun look intentional. Perfect for everyday.
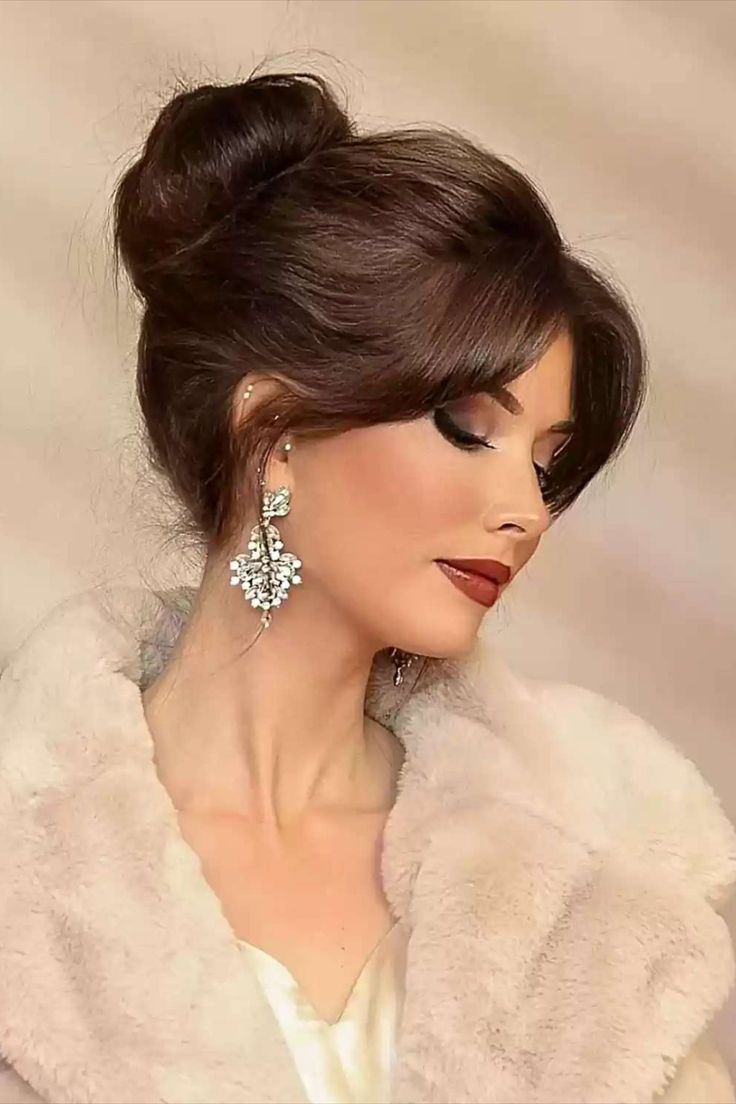
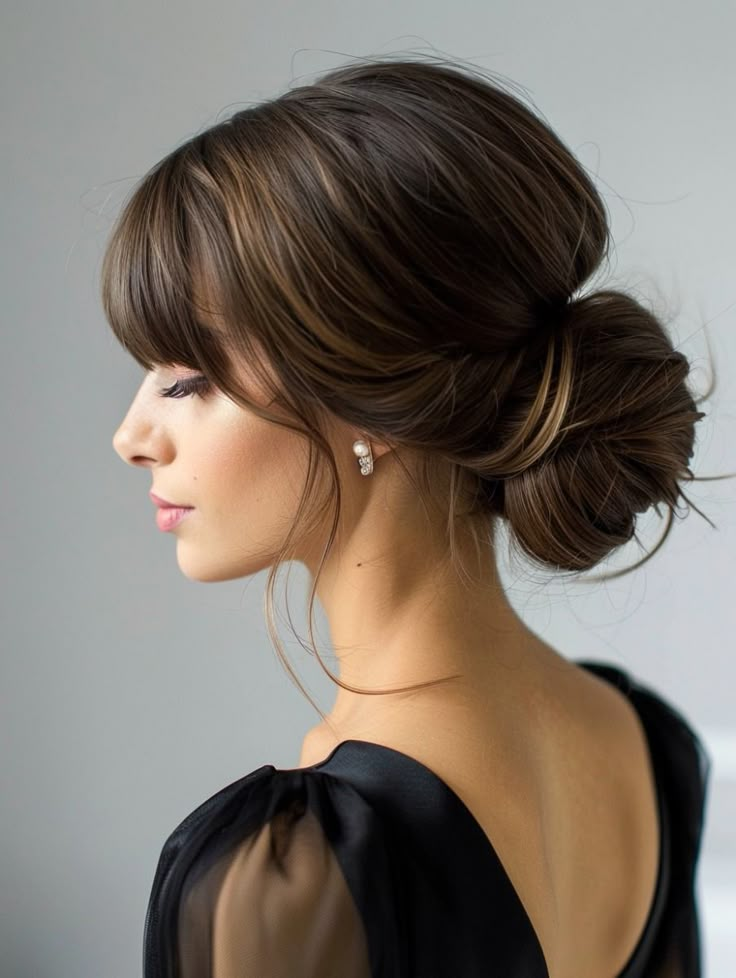
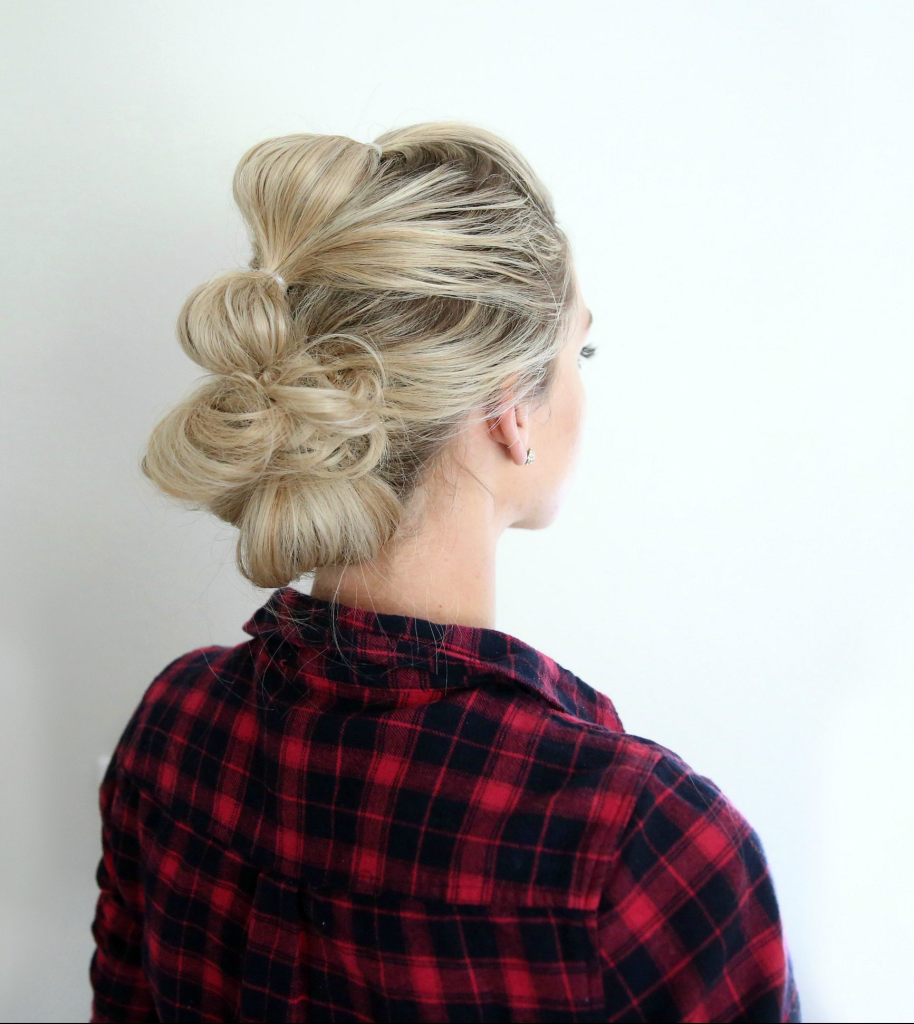
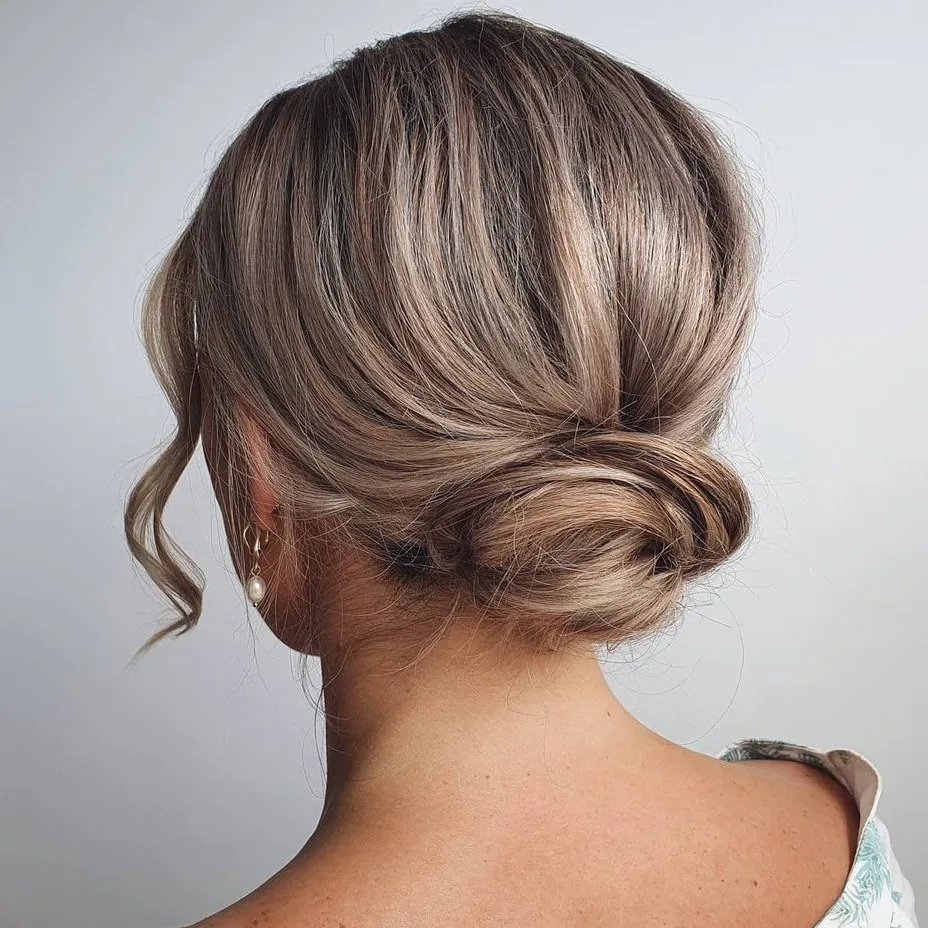
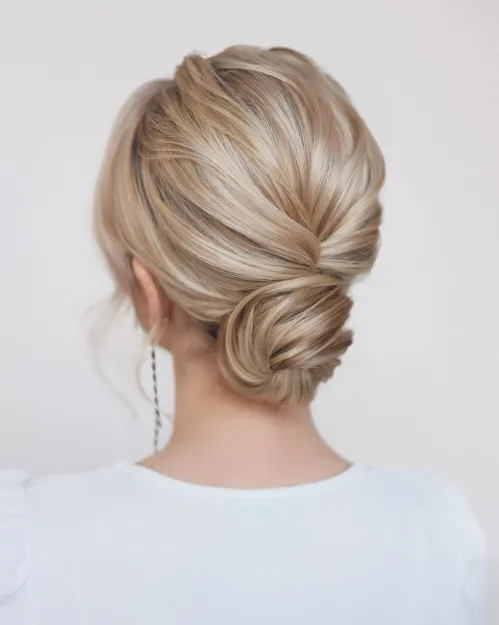
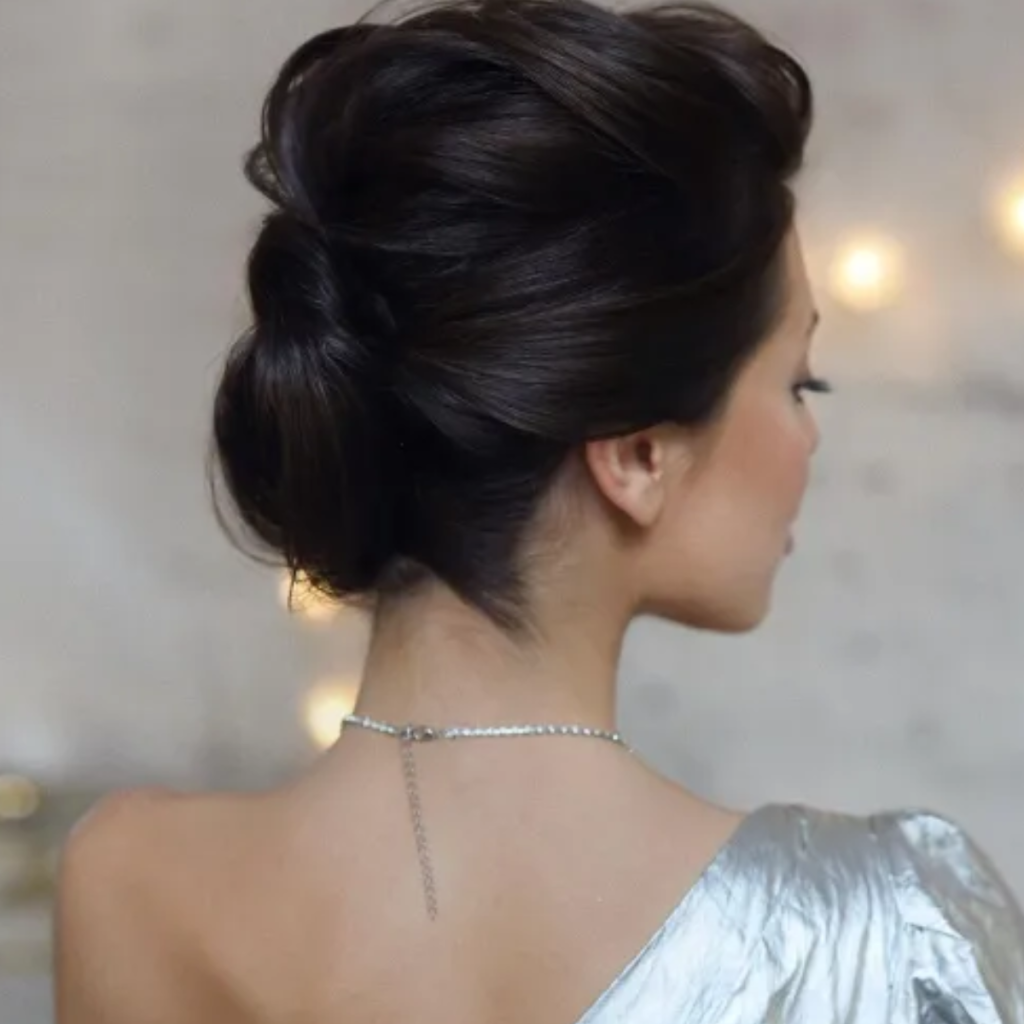
10. Sleek Low Bun With Curtain Bangs
A smooth, polished low bun at your nape. Curtain bangs are blown out smoothly to each side. Curtain bangs hairstyles long with a sleek bun are sophisticated and elegant. The bangs add softness to the severe bun. Great for black tie.
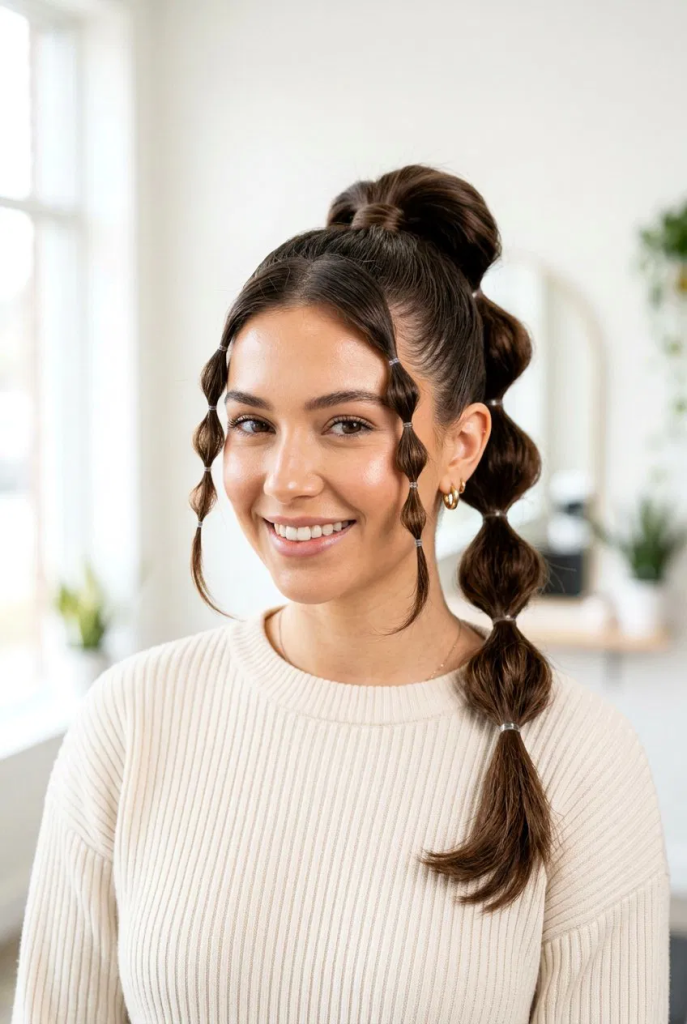
11. Bubble Ponytail With Curtain Bangs
A high or low ponytail with elastics every 2-3 inches, gently pulled to create “bubbles.” Curtain bangs left out. Curtain bangs hairstyles long with a bubble pony are playful and trendy. The bangs balance the playful ponytail.
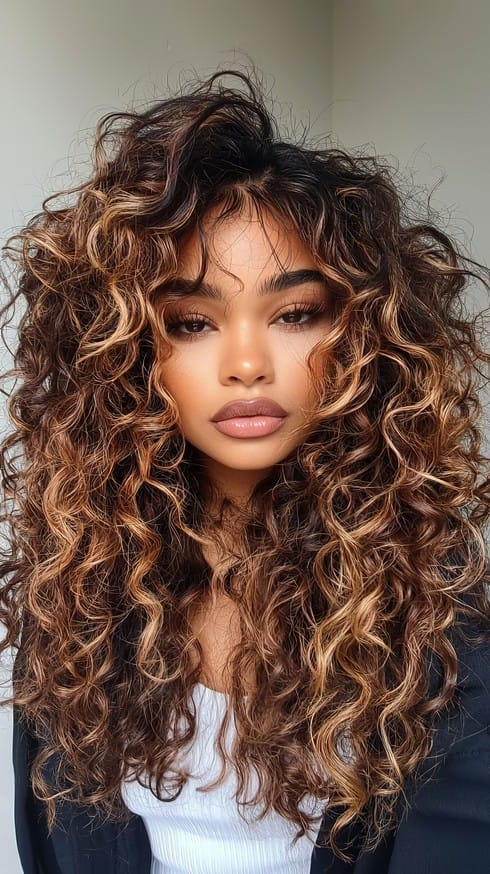
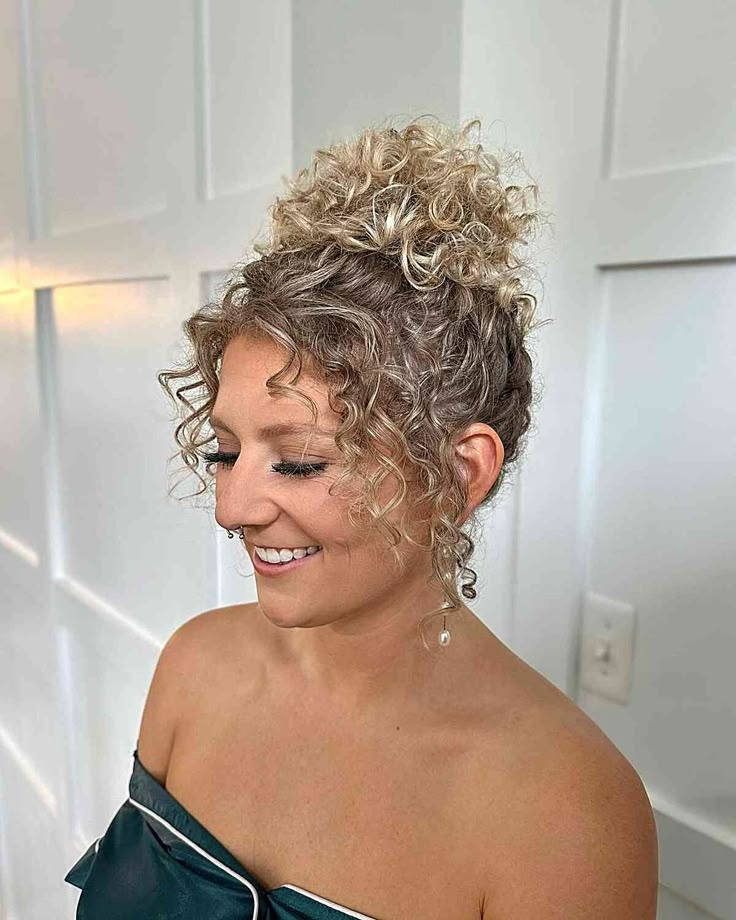
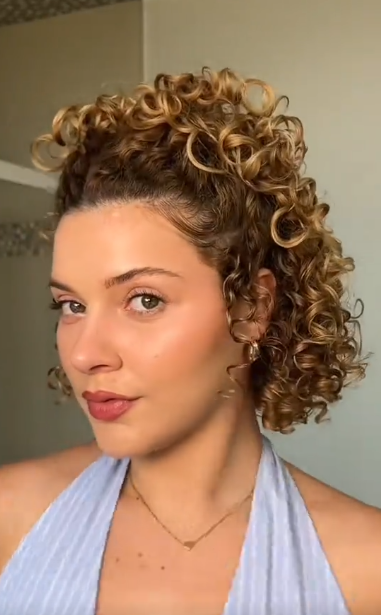
12. Long Curly Hair With Curtain Bangs
For natural curls. Long curls (type 3A to 4A) with curtain bangs cut dry, curl by curl. Curtain bangs hairstyles long on curly hair need longer bangs because of shrinkage. The bangs should hit at your cheekbones when dry.
More Info: Styling Curtain Bangs on Long Hair
Blow-drying technique. Use a small round brush (1 inch). Blow-dry each bang section away from your face, following the natural curve of your curtain part. Curtain bangs hairstyles long need the bangs to be directed outward, not forward.
Air-drying curtain bangs. On wavy or curly hair, curtain bangs can air-dry. Part them in the middle while wet. Let them dry in place. Curtain bangs hairstyles long on textured hair look great air-dried.
Products for curtain bangs. Light-hold hairspray. A tiny bit of texture spray for grip. Dry shampoo for oily bangs. Curtain bangs hairstyles long need products that don’t weigh the bangs down.
What to tell your stylist. “I have long hair. I want curtain bangs that hit at my [cheekbones/brows/chin]. I want them to blend into my length. Show me how to style them.”
Frequently Asked Questions
Do curtain bangs work on very long hair? Yes – beautifully. Curtain bangs hairstyles long add face-framing interest to extra-long hair. The bangs should be proportional – longer bangs for longer hair.
How often do curtain bangs need trimming? Every 6-8 weeks. Curtain bangs hairstyles long grow out more gracefully than blunt bangs but still need maintenance.
Can I have curtain bangs with curly long hair? Yes – but cut them dry. Curtain bangs hairstyles long on curls should be cut longer than you think because of shrinkage.
Final Thoughts
Curtain bangs hairstyles long are the perfect update for your extra-long hair. From sleek and straight to beachy waves to messy buns, curtain bangs add softness and style. Find a stylist who understands bangs. Then enjoy the most flattering fringe for your long locks.
Shoulder length is the most versatile hair length. But shoulder length hairstyles updos can be tricky – too short for a full bun, too long for some pin styles. I’ve been there. You want an elegant updo, but your hair keeps falling out or won’t stay twisted. Shoulder length hairstyles updos just need the right techniques – think low buns, twisted half-ups, and pinned curls.
Here’s the secret to shoulder length hairstyles updos. Embrace that your hair isn’t long enough for a traditional ballerina bun. Shoulder length updos work best when they’re loose, messy, or twisted. Shoulder length hairstyles updos also benefit from texture – second-day hair holds better. A few bobby pins and some texturizing spray are your best friends.
The 13 updos I’m sharing today are specifically for shoulder length hair. Shoulder length hairstyles updos include low twists, pinned half-ups, braided styles, and faux buns. All designed for that in-between length. Let’s get into it.
13 Shoulder Length Hairstyles Updos
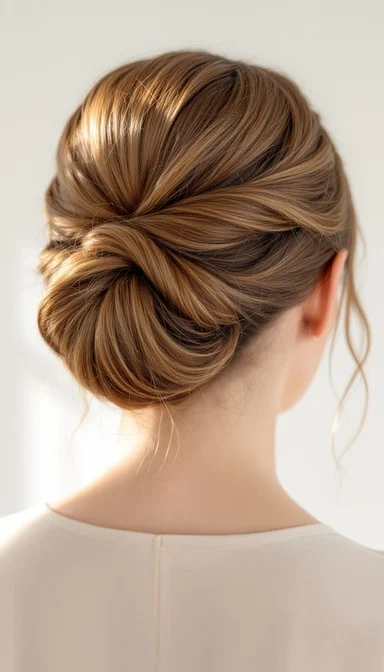
1. Low Twisted Bun
Gather hair at your nape. Twist into a rope. Wrap the rope around itself to form a bun. Shoulder length hairstyles updos with a low twisted bun are elegant and secure. The twist adds texture that holds better than a plain bun. Secure with crossed bobby pins.
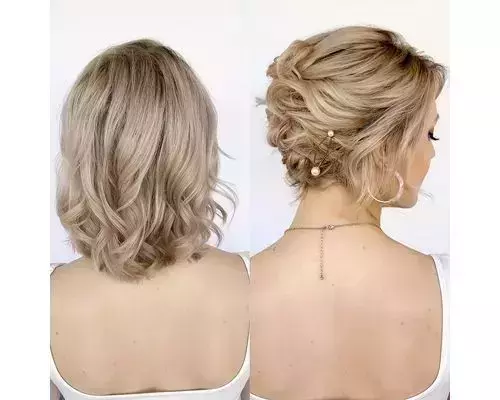
2. Half-Up Twisted Crown
Take sections from each temple. Twist them toward the back of your head. Pin them together at the crown. Shoulder length hairstyles updos with a half-up crown keep hair off your face. The down section shows off your length. Perfect for second-day hair.
3. Pinned Back Curls
Curl your hair with a 1-inch curling iron. Pin sections at the back of your head in a cluster. Shoulder length hairstyles updos with pinned curls look like a full updo from the front but are easy to create. The curls add volume. Great for events.
4. Braided Low Bun
Create a loose braid (regular or fishtail) starting at your nape. Wrap the braid into a bun. Shoulder length hairstyles updos with a braided bun add texture and interest. The braid hides any uneven ends. Secure with pins and hairspray.
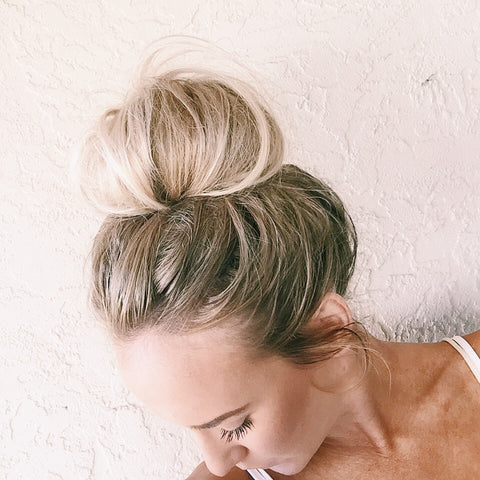
5. Messy Top Knot
Gather hair into a high ponytail. Wrap the ponytail around itself into a messy bun. Shoulder length hairstyles updos with a messy top knot are casual and cute. Shoulder length hair makes a smaller, intentional-looking knot. Pull out face-framing pieces for softness.
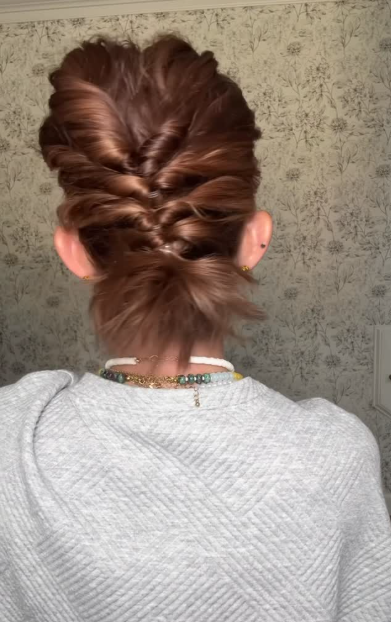
6. Double Twist Pin-Up
Part your hair down the middle. Twist each side toward the back. Pin the twists together at your crown. Shoulder length hairstyles updos with double twists create a faux crown braid. The twists lie flat, so length doesn’t matter. Great for straight or wavy hair.
7. Low Ponytail Tuck
Gather hair into a low ponytail. Create a gap above the elastic. Tuck the ponytail up and through the gap. Shoulder length hairstyles updos with a tuck create a faux bun look. The tucked ends hide inside. Secure with pins. Elegant and polished.
8. Rope Braid Updo
Divide hair into two sections. Twist each section into a rope. Wrap the ropes around each other. Pin at the back. Shoulder length hairstyles updos with rope braids are textured and secure. The rope technique works better on shoulder length than traditional braiding.
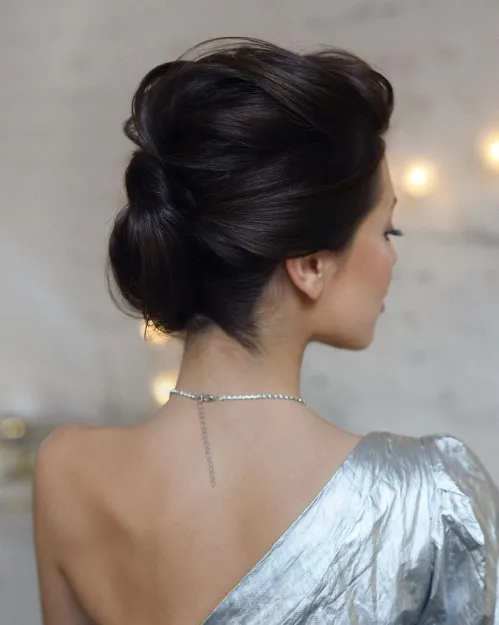
9. Pinned French Twist (Short Version)
Gather hair to one side at your nape. Fold it upward and inward. Pin along the fold. Shoulder length hairstyles updos with a mini French twist are sophisticated. The twist doesn’t need to reach the top of your head – a small version is beautiful. Works on shoulder length.
10. Bubble Pony Updo
Create a low ponytail. Add elastics every 2 inches down the length. Gently pull each section to create “bubbles.” Pin the end bubble up under the others. Shoulder length hairstyles updos with bubbles are playful and modern. The bubbles add volume.
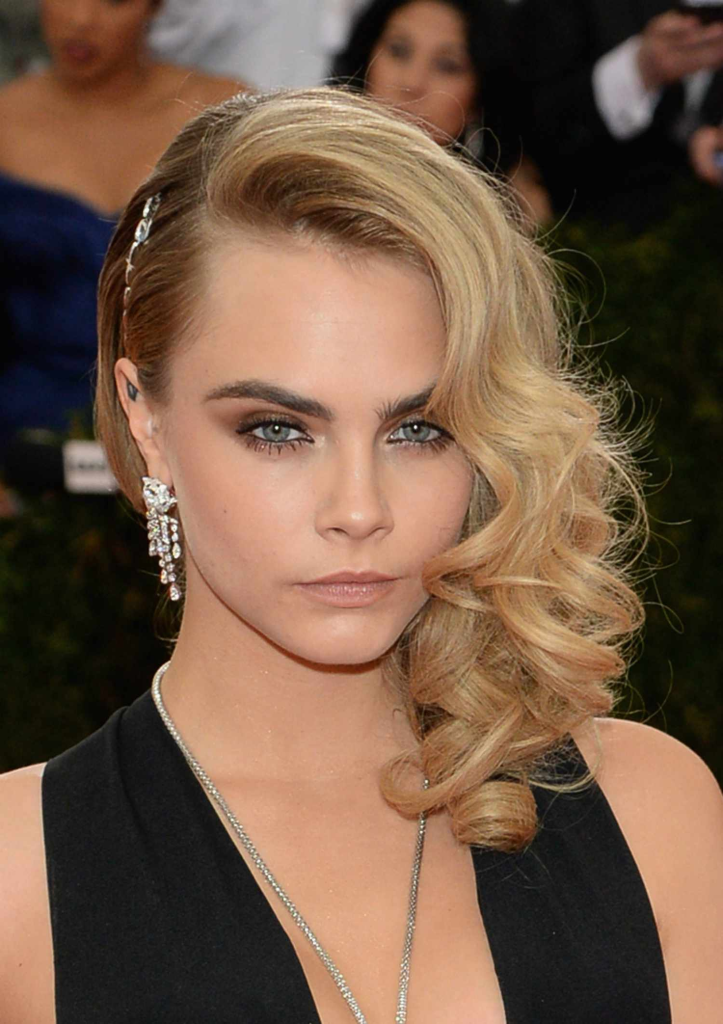
11. Side-Swept Pin Curl Set
Brush all hair to one side. Create small pin curls along the side of your head. Shoulder length hairstyles updos with side-swept pin curls are Old Hollywood glam. The pin curls lie flat, so length isn’t an issue. Works on shoulder length to lob.
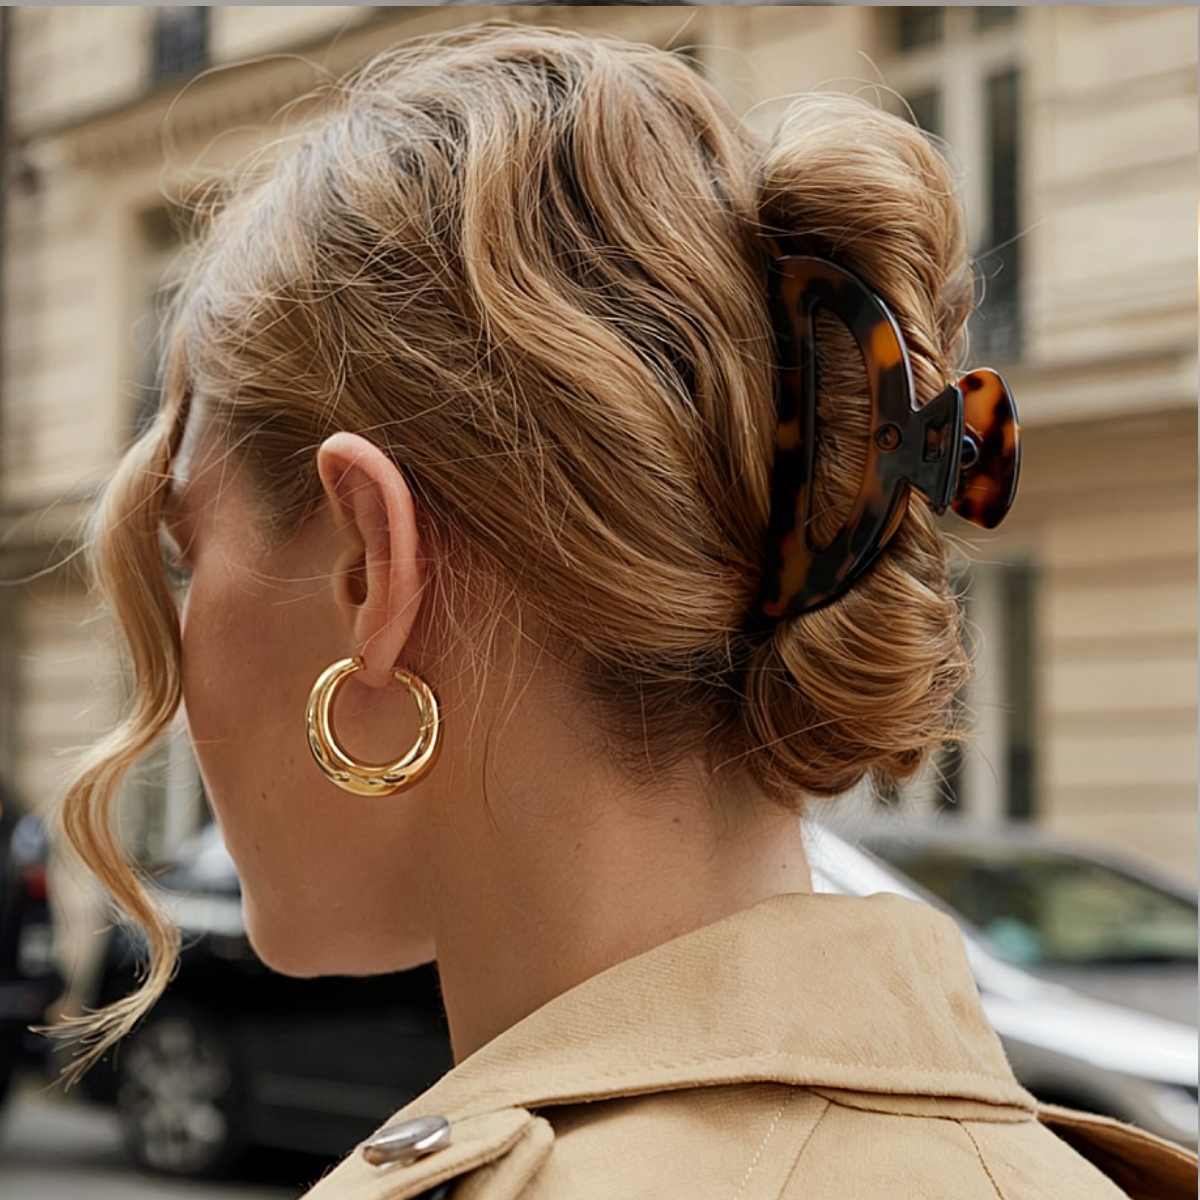
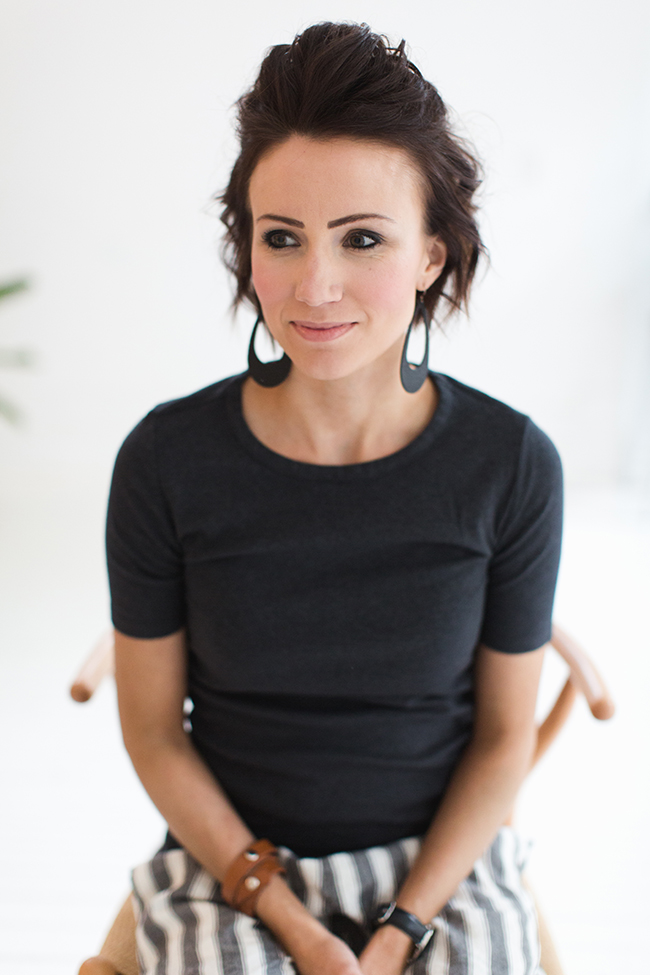
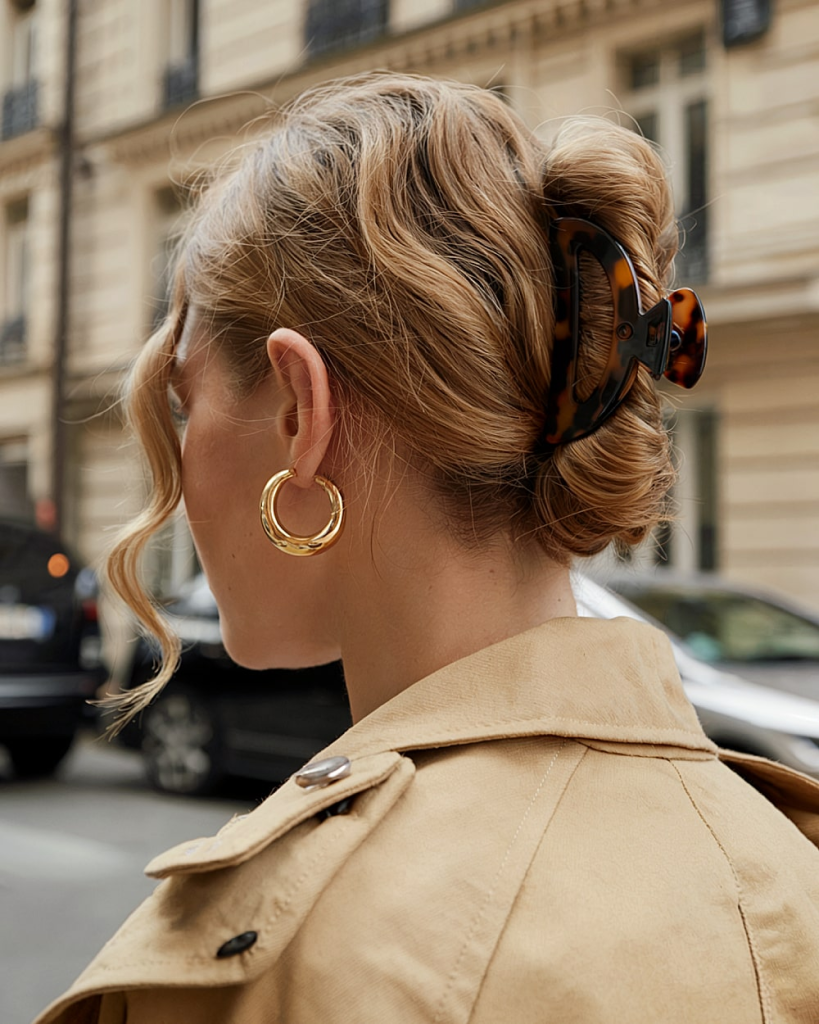
12. Claw Clip Updo
Twist hair loosely. Secure with a medium or large claw clip. Shoulder length hairstyles updos with a claw clip take 30 seconds. The clip does the work. Pull out a few face-framing pieces. Perfect for casual days or Zoom calls.
13. Faux Bob Pin Tuck
Tuck the ends of your shoulder length hair under and pin. Shoulder length hairstyles updos with a faux bob create the look of a short bob from the front. The tucked ends are hidden underneath. Secure with pins along the tuck line. Great for special occasions.
More Info: Making Shoulder Length Updos Work
Texture is key.Shoulder length hairstyles updos hold better on day-old hair. Use dry shampoo or texturizing spray on clean hair for grip. Avoid slippery conditioners on updo days.
Pin technique. Cross bobby pins in an X. Insert pins at an angle, not straight in. Shoulder length hairstyles updos need more pins than you think – especially if your hair is fine.
Accessories help. Decorative clips, combs, and pins can hold hair while adding style. Shoulder length hairstyles updos with accessories look intentional and polished.
Practice before events.Shoulder length hairstyles updos often take 2-3 tries to perfect. Practice a few days ahead. Time yourself. Have a backup style.
Frequently Asked Questions
What’s the easiest shoulder length updo? Claw clip twist. Shoulder length hairstyles updos don’t get simpler. Twist, clip, go.
How do I keep my updo from falling out? Use texturizing spray. Cross your bobby pins. Shoulder length hairstyles updos need grip and proper pin technique.
Can I do an updo with layers? Yes. Shoulder length hairstyles updos with layers work best when you embrace messiness. Pin the shorter layers separately or let them frame your face.
How long will my updo last? With proper products and pins, 8-10 hours. Shoulder length hairstyles updos for all-day events need a touch-up mid-day.
Final Thoughts
Shoulder length hairstyles updos are not a compromise – they’re their own beautiful category. From low twisted buns to braided crowns to claw clip twists, there’s an updo for every occasion. Texture, pins, and practice are your best friends. Now go style that shoulder length hair.
You have short, thin, fine hair. You have an event. You want an updo. Short thin fine hair updo styles exist – you just need the right techniques. Fine hair slips. Short hair doesn’t stay pinned. Thin hair shows scalp. But with the right products, tools, and tricks, short thin fine hair updo styles can be just as beautiful as updos on thick hair.
Here’s the secret to short thin fine hair updo. Texture is your friend. Day-old hair (not freshly washed) has more grip. Dry shampoo, texturizing spray, and backcombing create volume and hold. Bobby pins need to be crossed or doubled. Short thin fine hair updo styles also work better when you accept that “messy” is beautiful – perfect, slick updos are for thick hair. Yours will be soft, romantic, and intentional.
The 13 updos I’m sharing today are specifically for short, thin, fine hair. Short thin fine hair updo styles include twisted pin curls, low bunlets, faux bobs, and pinned half-ups. All designed to stay put and hide thinning. Let’s get into it.
13 Short Thin Fine Hair Updo Styles
1. Twisted Pin Curls
Section your hair into small pieces. Twist each piece and pin it flat against your head in a spiral. Short thin fine hair updo with twisted pin curls creates the illusion of thickness. The twisted texture hides thin spots. Use crossed bobby pins for hold. Great for black tie events.
2. Low Bunlet (Mini Bun)
Gather all your hair at your nape. Twist it into a tiny bun. Secure with crossed bobby pins. Short thin fine hair updo with a low bunlet is elegant and simple. The small size looks intentional, not sparse. Add a decorative pin or clip to draw attention.
3. Faux Bob (Tucking Under)
If your hair is shoulder-length, tuck the ends under and pin. Short thin fine hair updo with a faux bob creates the look of a short bob from the front and back. Fine hair holds the tuck well because it’s lightweight. Secure with pins hidden underneath. Perfect for medium-length fine hair.
4. Half-Up Pin Curl Set
Take the top half of your hair. Pin it into small pin curls or flat twists. Leave the bottom half down. Short thin fine hair updo with a half-up style adds volume to the crown. The pinned section creates texture. The down section shows your length. Great for weddings.
5. Textured Pompadour
Tease (backcomb) the front section of your hair at the crown. Smooth the top layer over the teasing. Pin the ends at the back of your crown. Short thin fine hair updo with a pompadour adds height and drama. The teasing creates volume that fine hair lacks. Use strong-hold hairspray.
6. Side-Swept Pinned Wave
Brush all your hair to one side. Pin it flat against your head in a wave pattern (S-shape). Short thin fine hair updo with a side-swept pinned wave is Old Hollywood glamour. The wave pattern adds movement and hides thinness. Use bobby pins following the wave curve.
7. Braided Crown (Short Hair Version)
Create two small braids (Dutch or French) along your hairline. Pin them at the back of your head. Short thin fine hair updo with a braided crown works even on pixie-length hair. The braids add texture and fullness. Use a texturizing spray before braiding for grip.
8. Messy Finger Waves
Use gel or mousse on damp hair. Create finger waves (S-shapes pressed flat against your head). Short thin fine hair updo with finger waves is vintage and chic. The waves lie flat, so length doesn’t matter – works on very short hair. Air-dry or sit under a hooded dryer.
9. Knotted Half-Up
Take two small sections from your temples. Tie each into a loose knot. Pin the knots together at the back of your crown. Short thin fine hair updo with knotted pieces adds interest without needing length. The knots work on hair as short as chin length.
10. Pinned Twist Bun
Twist sections of hair from each side of your head. Bring the twists to the back and pin them into a small bun or loop. Short thin fine hair updo with pinned twists works on hair that barely reaches your shoulders. The twists add bulk. Use a donut bun shaper for more volume.
11. Criss-Cross Pinned Back
Section your hair into small pieces. Pin each piece across your head, crossing over the previous pin. Short thin fine hair updo with criss-cross pinning creates a lattice pattern. The pattern hides any thin spots. Works on pixie to bob length. Use colored pins for a decorative look.
12. Voluminous Teased Crown
Tease the crown section aggressively. Smooth the top layer. Pin the ends under. Short thin fine hair updo with a teased crown adds height without needing length. The rest of your hair can stay down or be pinned. Great for fine hair that falls flat.
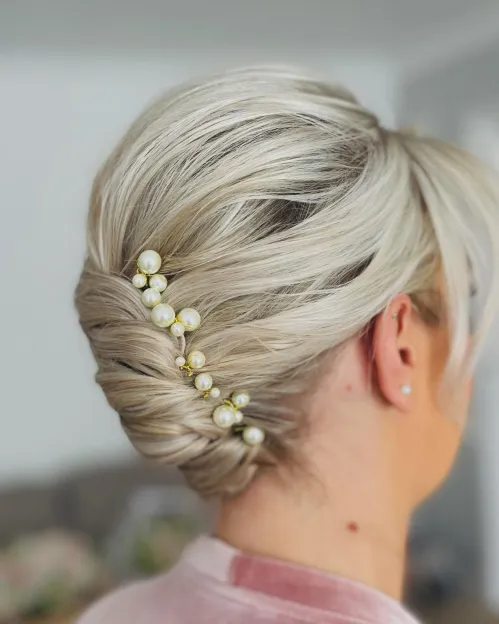
13. Accessory-Focused Updo
Pin your hair into any simple style (low bun, pin curls, twisted back). Add a statement hair accessory – jeweled clip, floral pin, decorative comb. Short thin fine hair updo with an accessory draws attention away from thinness. The accessory does the heavy lifting.
More Info: Making Updos Stick on Fine Hair
Products for grip. Day-old hair (not freshly washed) holds better. Dry shampoo adds texture and grip. Texturizing spray (sea salt spray) adds roughness for pins to grab. Short thin fine hair updo styles need grip to stay put.
Bobby pin technique. Cross bobby pins in an X shape for hold. Use the wavy side down against your scalp. Insert pins at an angle, not straight in. Short thin fine hair updo styles need proper pin technique more than thick hair does.
Hairspray strategy. Spray each section before pinning. Spray again after finishing. Short thin fine hair updo styles need hold from start to finish. Use a flexible-hold hairspray – too stiff and fine hair will crack.
Practice first.Short thin fine hair updo styles often don’t work on the first try. Practice a few days before your event. Time yourself. Adjust your technique. Have a backup style ready.
Frequently Asked Questions
How do I hide thin spots in an updo? Use criss-cross pinning, finger waves, or twisted pin curls. Short thin fine hair updo styles with texture cover thinning better than smooth styles.
What if my hair slips out of pins? Use more pins than you think you need. Short thin fine hair updo styles on fine hair need 2-3x more pins than thick hair.
Can I use hair extensions? Yes. Clip-in extensions add volume and length for updos. Short thin fine hair updo styles work beautifully with a few well-placed extensions.
How long will my updo last? With proper products and pinning, 6-8 hours. Short thin fine hair updo styles for all-day events need touch-ups. Bring extra pins and hairspray.
Final Thoughts
Short thin fine hair updo styles are not impossible – they just need the right approach. Texture, grip, and strategic pinning are your best friends. Practice before your event. Use the right products. And remember: messy, soft updos look intentional and romantic on fine hair. You’ve got this.
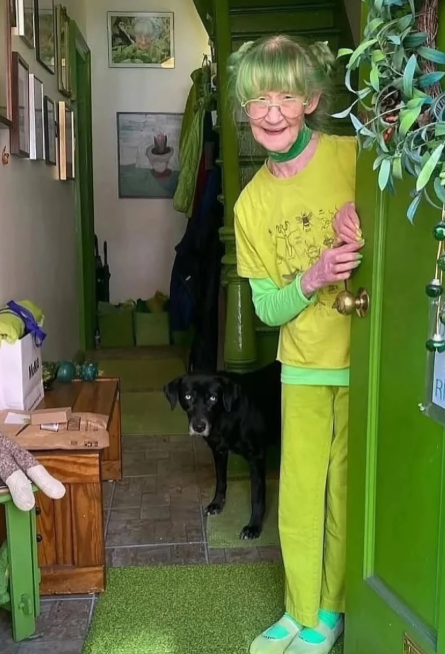
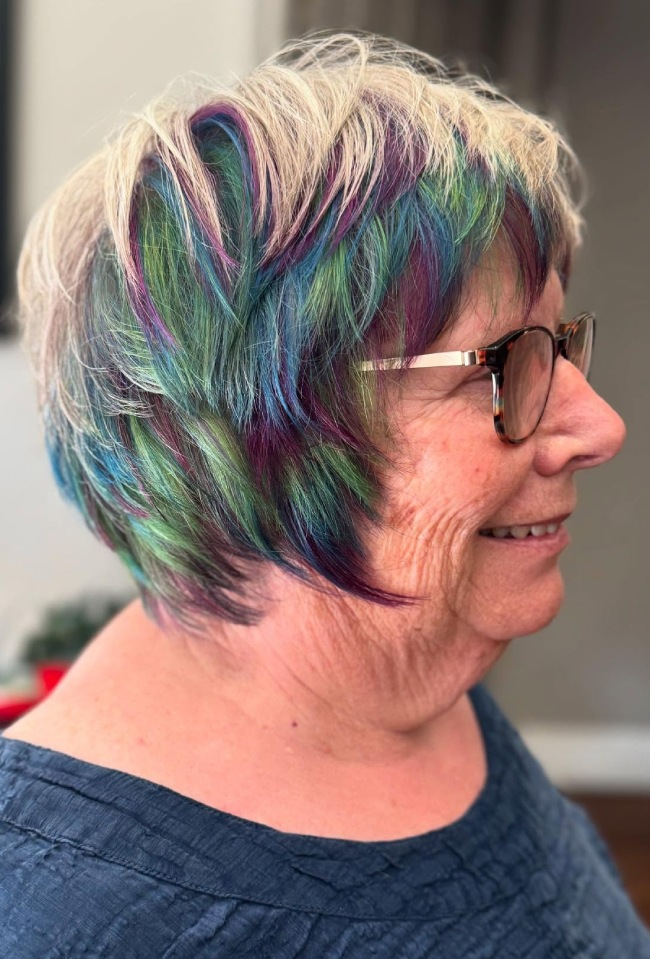
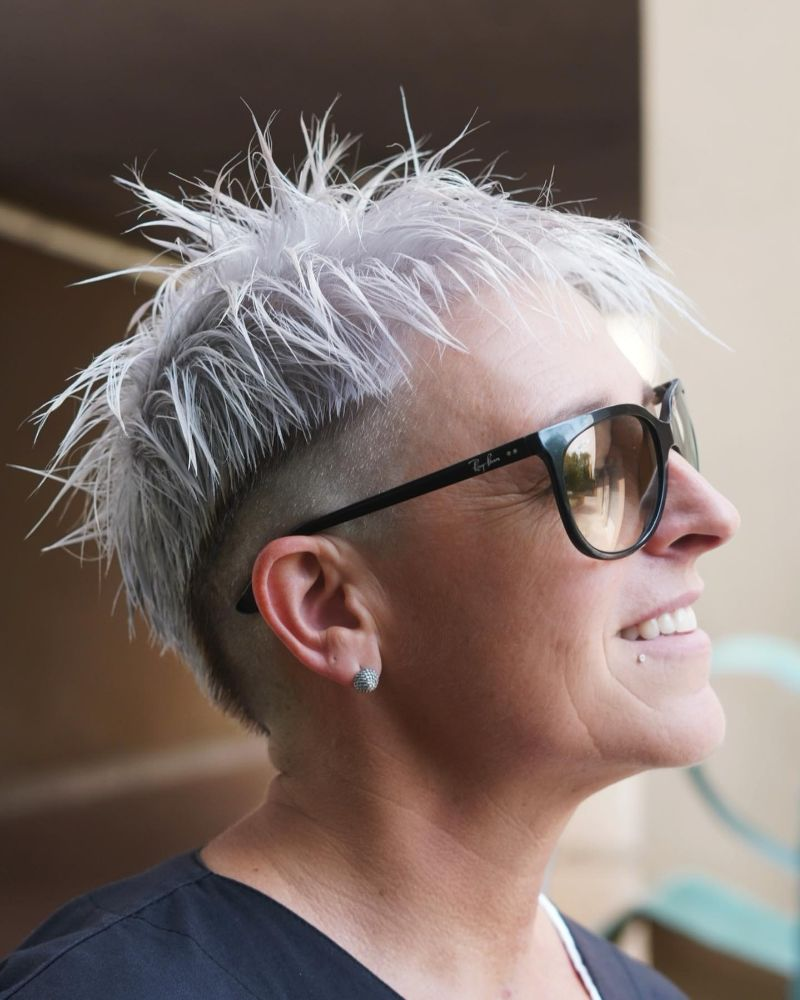
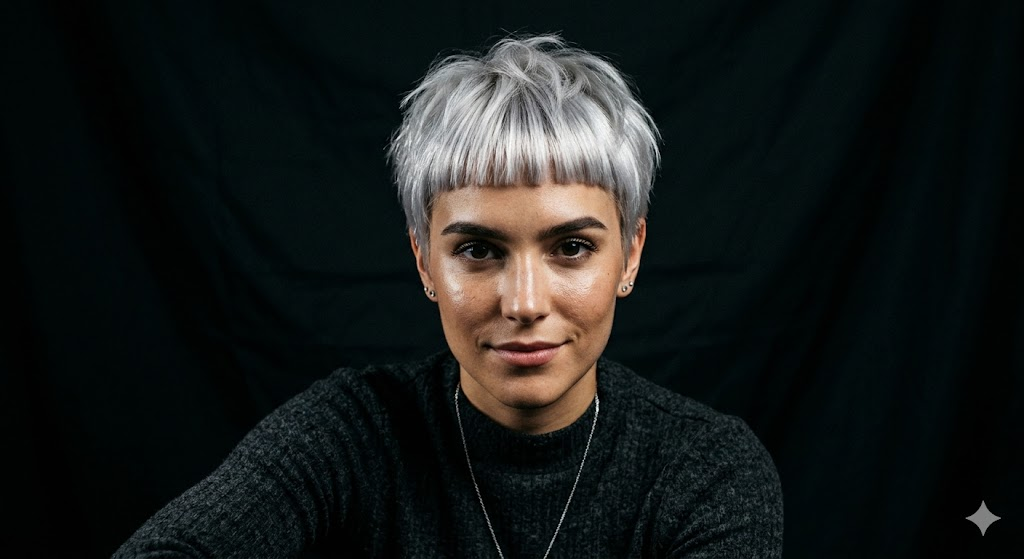
You want funky hair. But you also have a job, a family, or just a personality that doesn’t scream for attention every second. Subtle funky short hair over 50 hidden color is your answer. Hidden color means the bold stuff lives underneath, peekaboo style – visible when you move, hidden when you’re still. Subtle funky short hair over 50 hidden color lets you be edgy on your own terms. No one at your book club has to know you have hot pink under your silver bob. But you’ll know. And that’s the point.
Here’s what I love about hidden color for my over-50 clients. It lasts longer than all-over color because the hidden parts don’t get washed or sun-faded as quickly. It grows out gracefully – no harsh root lines. And it’s fun. Subtle funky short hair over 50 hidden color can be a bright underlayer, a few face-framing streaks, or a shaved design that only shows when you put your hair up. You control how much people see.
The 13 styles I’m sharing today range from barely-there to bold-if-you-look-closely. Subtle funky short hair over 50 hidden color includes under-dye, money pieces, hidden rainbow, and temporary chalk. All work on short hair. All are age-appropriate (whatever that means). Let’s get subtly funky.
13 Subtle Funky Short Hair Over 50 Hidden Color Styles
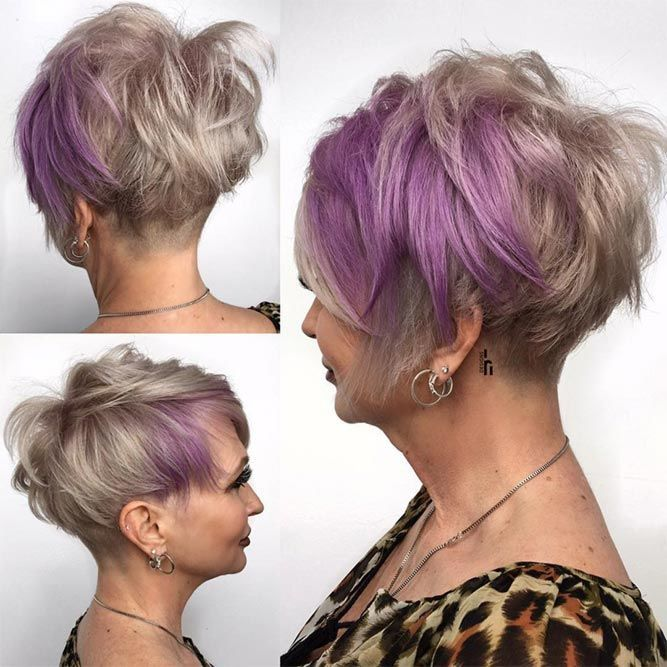
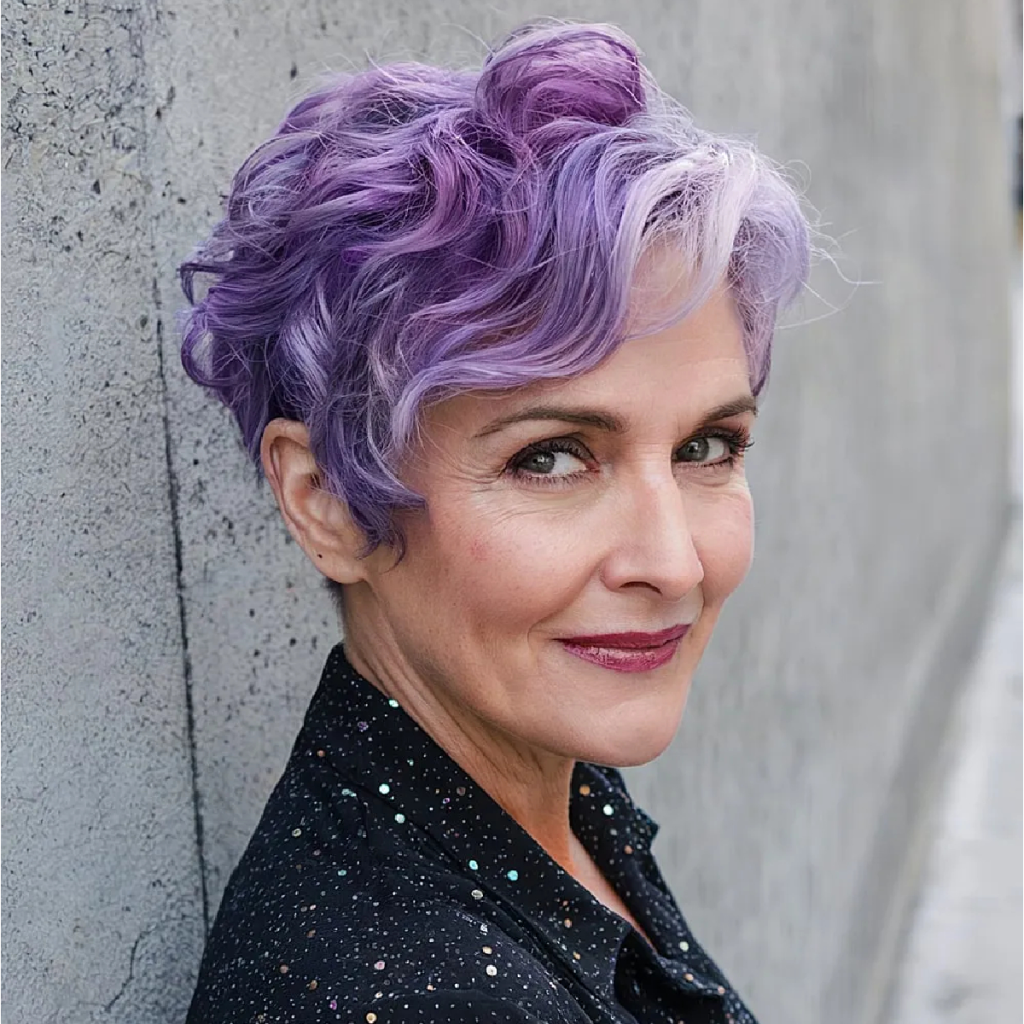
1. Peekaboo Purple Undercut
An undercut (shaved underneath) dyed deep purple. The top layer is your natural silver or brown. Subtle funky short hair over 50 hidden color with a purple undercut shows only when you flip your hair up or tuck it behind your ear. The purple fades to a pretty lavender. Lasts 6-8 weeks.
2. Hot Pink Money Pieces
Money pieces are the two face-framing sections at your front hairline. Dye them hot pink. Subtle funky short hair over 50 hidden color with pink money pieces peeks out when you move. Pin them back for conservative moments. Let them hang for fun ones. Best on short bobs or crops.
3. Neon Green Nape Strip
Dye just the bottom inch of your nape neon green. Your top hair covers it completely when down. Subtle funky short hair over 50 hidden color in a nape strip is invisible 90% of the time. When you put your hair up in a tiny ponytail or clip, surprise green. Perfect for summer.
4. Cobalt Blue Hidden Rainbow
Paint a small rainbow (red, orange, yellow, green, blue, purple) on the underlayer of your crown. Only visible when you lift your top hair. Subtle funky short hair over 50 hidden color with a hidden rainbow is pure joy. No one sees it unless you show them. You become the fun person with a secret.
5. Rose Gold Temple Peaks
Dye just the tiny triangles of hair at your temples (above your ears) rose gold. Subtle funky short hair over 50 hidden color with rose gold peaks catches light when you turn your head. Otherwise, they blend with your natural color. Elegant and unexpected. Best on pixies and crops.
6. Lavender Ear Tuck Sections
Dye the small sections of hair that naturally tuck behind your ears lavender. Subtle funky short hair over 50 hidden color in ear tuck sections appears only when you tuck your hair. Most of the time, invisible. Lavender is soft enough for any setting. Grows out as a pretty pastel.
7. Electric Yellow Crown Ring
Dye a 1-inch ring around your crown (hidden under the top layer) electric yellow. Subtle funky short hair over 50 hidden color with a crown ring creates a halo of bright color when wind blows your hair. Or when you purposefully mess it up. Cheerful and surprising.
8. Coral Face-Framing Streaks (Two Only)
Add just two thin streaks of coral on one side of your face. Not both sides – one. Subtle funky short hair over 50 hidden color with asymmetrical streaks is artistic. The single-side placement feels intentional and cool. Best on short bobs or shags with side parts.
9. Deep Burgundy Underlayer
Dye the entire underlayer (bottom half of your hair) deep burgundy. The top layer stays natural. Subtle funky short hair over 50 hidden color with burgundy underlayer looks rich and dimensional. Burgundy reads as “natural” in low light, “funky” in bright sun. Lower maintenance than bright colors.
10. Mint Green Temple Dip
Dip just the ends of your temple hair into mint green. The color is concentrated on the last inch. Subtle funky short hair over 50 hidden color with temple dips looks like you caught the light. Mint green is pastel and soft. Works beautifully on silver or white hair.
11. Orange Peel-Away Highlights
Temporary orange highlights using color wax or spray. Apply only on days you want to be funky. Wash out in one shampoo. Subtle funky short hair over 50 hidden color with temporary products lets you change your mind weekly. Great for weekends, vacations, or concerts. No commitment.
12. Shaved Zigzag with Clear (No Color)
A shaved zigzag design on one side of your undercut. No color – just the shaved pattern. Subtle funky short hair over 50 hidden color with a shaved design is texture, not color. The design appears when you lift your top hair. Edgy without any dye. Perfect for women with sensitive scalps.
13. Pearl White Painted Ends
Paint just the very ends of your top layer pearl white. Your base stays natural. Subtle funky short hair over 50 hidden color with painted ends looks like frost. The white catches light and adds dimension. Grows out as a soft ombre. Best on short layered cuts.
More Info: Maintaining Subtle Funky Hidden Color
How hidden color lasts longer: Because hidden color isn’t exposed to sun, shampoo, and friction as much as top-layer color, it lasts 2-3 times longer. Subtle funky short hair over 50 hidden color can go 8-12 weeks between touch-ups. Wash in cold water. Use sulfate-free shampoo. Your hidden color will thank you.
Products for hidden color: Color-depositing conditioner is your best friend. Use it once a week on just the hidden sections. Purple shampoo for silver hair with hidden color. Dry shampoo to stretch washes. Avoid heavy oils on colored sections – they strip color faster.
Transitioning from all-over to hidden color: If you currently have all-over funky color, let it grow out 2 inches. Then ask your stylist to color just the regrowth on the underlayer. Subtle funky short hair over 50 hidden color can be a transition strategy while you grow out damage.
What to tell your stylist: “I want subtle hidden color. Think peekaboo, underlayer, or just a few pieces. I want to be able to hide it for work and show it off when I want. Please use semi-permanent color so it fades gracefully.”
Frequently Asked Questions
Does hidden color damage my hair less than all-over color? Yes. Because you’re only coloring a small section, less bleach and dye touch your hair. Subtle funky short hair over 50 hidden color is gentler on your length and scalp.
Can I have hidden color if I’m fully gray? Absolutely. Gray hair takes color beautifully – it’s more porous, so color grabs fast. Use a filler before pastels. Subtle funky short hair over 50 hidden color on gray hair is stunning.
How do I show off my hidden color on purpose? Flip your head upside down and shake. Tuck one side behind your ear. Put your hair in a tiny ponytail or top knot. Use a claw clip to lift the top layer. Subtle funky short hair over 50 hidden color is yours to reveal or conceal.
What if I hate it? Semi-permanent color fades in 4-8 weeks. Or wash with hot water and clarifying shampoo to fade it faster. You can also color over it with your natural shade. Low risk, high reward.
Final Thoughts
Subtle funky short hair over 50 hidden color is for the woman who wants edge without the side-eye. Pick one style from this list. Start small – a nape strip or a few money pieces. See how it feels. You can always add more. Life is too short for boring hair, but it’s also too short for hair drama you don’t want. Hidden color gives you both worlds.
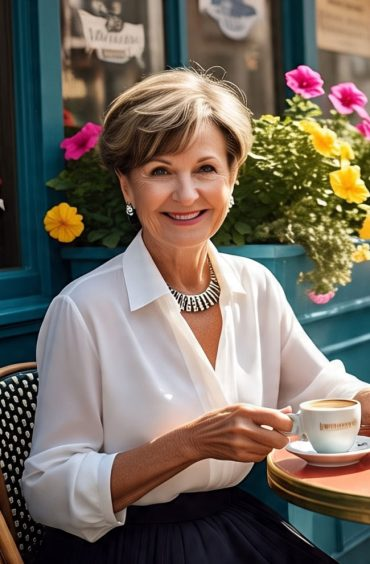
Hey friend. You want bangs. But you’re scared. Medium length hairstyles with bangs for face shapes are the answer to that fear. The wrong bangs can make a round face look rounder, a square face look boxier, a long face look longer. But the right bangs? They balance everything. Medium length hairstyles with bangs for face shapes are about customization. Curtain bangs for round faces. Side-swept for square. Blunt for oval. Wispy for heart. I’ve been fitting bangs to faces for years, and I can tell you: there is a perfect bang for every single face shape. Medium length hairstyles with bangs for face shapes also consider your hair texture, your lifestyle, and how much time you want to spend styling.
Here’s what most stylists won’t tell you. Bangs are not one-size-fits-all. Medium length hairstyles with bangs for face shapes require a consultation where your stylist actually looks at your face – not just your inspiration photos. A curtain bang that looks amazing on an oval face might make a round face look wider. A blunt bang that’s edgy on a long face might overwhelm a petite heart-shaped face. Medium length hairstyles with bangs for face shapes also depend on your forehead size, your cheekbones, and even your nose shape. I’m going to give you the roadmap.
The 13 styles I’m sharing today are organized by face shape. Medium length hairstyles with bangs for face shapes includes 3-4 options for round, square, heart, oval, and long faces. Find your shape. Read your options. Then take the specific recommendations to your stylist. Let’s find your perfect face-framing fringe.
13 Medium Length Hairstyles with Bangs for Face Shapes
For Round Faces (Soft, Elongating Bangs)
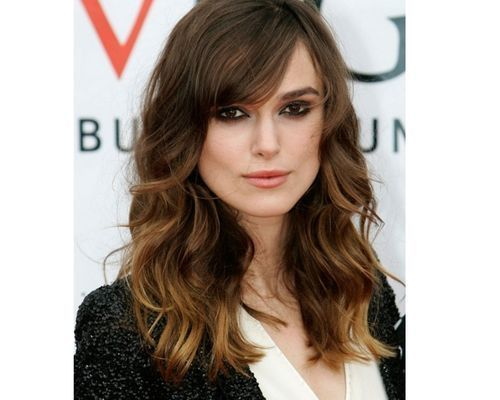
1. Curtain Bangs with Center Part
Curtain bangs part in the middle and sweep to each side. The length hits at your cheekbones. Medium length hairstyles with bangs for face shapes like curtain bangs elongate a round face by creating vertical lines. The center part also adds length visually. Style by blowing the bangs to each side with a round brush. Best with a lob or shag.
2. Long Side-Swept Bangs
Side-swept bangs that start deep at your part and sweep across your forehead, ending at your ear. Medium length hairstyles with bangs for face shapes with long side bangs create an asymmetrical line that breaks up the roundness. The length (past your eyebrow) is key – short side bangs make round faces look wider. Style by blowing to one side.
3. Wispy Bottleneck Bangs
Bottleneck bangs are shorter in the middle (above brows) and longer at the sides (to your cheekbones). Medium length hairstyles with bangs for face shapes with wispy bottleneck bangs add height at the crown and length at the sides. The wispy texture prevents heaviness. Best for round faces with fine hair. Style with a round brush, directing the sides outward.
4. Arched Bangs
Arched bangs follow the curve of your brow – slightly longer in the middle, shorter at the temples. Medium length hairstyles with bangs for face shapes with arched bangs lift the center of your face, creating the illusion of length. The arch also highlights your eyes. Best on round faces with straight or wavy hair. Style by blowing forward with a small round brush.
For Square Faces (Softening, Curved Bangs)
5. Curved Bangs
Curved bangs are similar to arched but softer. They curve gently across your forehead, longer at the corners of your eyes. Medium length hairstyles with bangs for face shapes with curved bangs soften a strong jawline. The curve draws the eye horizontally, balancing the width of a square face. Style with a round brush, following the natural curve.
6. Side-Swept Bangs with Texture
Side-swept bangs that are point-cut for soft, textured ends. Medium length hairstyles with bangs for face shapes with textured side bangs break up the straight lines of a square face. The texture adds softness. Avoid blunt, heavy side bangs – they emphasize squareness. Style by blowing to one side and messing up the ends with your fingers.
7. Wispy Curtain Bangs
Curtain bangs that are extra wispy and thin, landing at your cheekbones or jawline. Medium length hairstyles with bangs for face shapes with wispy curtain bangs frame a square face softly. The wispy ends feather against your jaw instead of sitting in a hard line. Best on square faces with fine or medium hair. Style by blowing to each side.
For Heart Faces (Widening, Balancing Bangs)
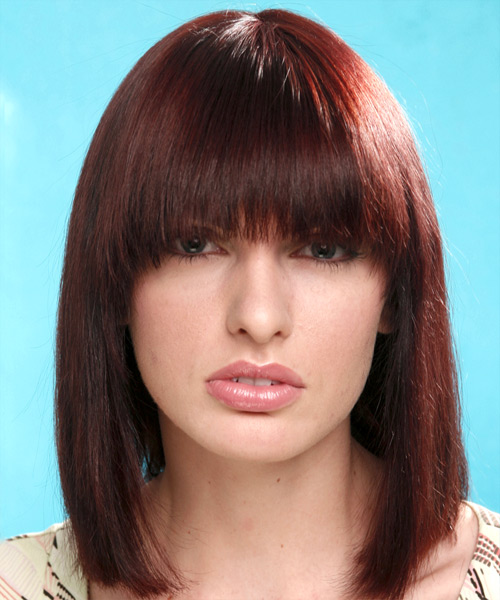
8. Blunt Bangs (Straight Across)
Blunt bangs cut straight across, hitting just above your eyebrows. Medium length hairstyles with bangs for face shapes with blunt bangs balance a heart-shaped face by drawing attention to your eyes instead of your pointed chin. The horizontal line widens a narrow forehead. Best on heart faces with straight or lightly wavy hair. Style with a flat iron for smoothness.
9. Curtain Bangs with Longer Sides
Curtain bangs where the sides are longer – hitting at your jaw instead of your cheekbones. Medium length hairstyles with bangs for face shapes with long-sided curtain bangs add width to the lower part of a heart-shaped face. This balances a pointed chin. Style by blowing the sides outward, away from your face.
10. Feathered Bangs
Feathered bangs are cut with a razor for soft, wispy edges. They land at your eyebrows. Medium length hairstyles with bangs for face shapes with feathered bangs soften a heart face without adding too much weight at the forehead. The feathering prevents the “heavy curtain” look. Best with a medium shag or layered cut.
For Oval Faces (Almost Anything, But Here Are the Best)
11. Blunt Baby Bangs
Baby bangs (micro bangs) sit 1-2 inches above your eyebrows. Blunt and straight across. Medium length hairstyles with bangs for face shapes on oval faces can handle bold choices like baby bangs. The short length shows off your forehead without making your face look long. Style with a flat iron for sharp edges. Edgy and modern.
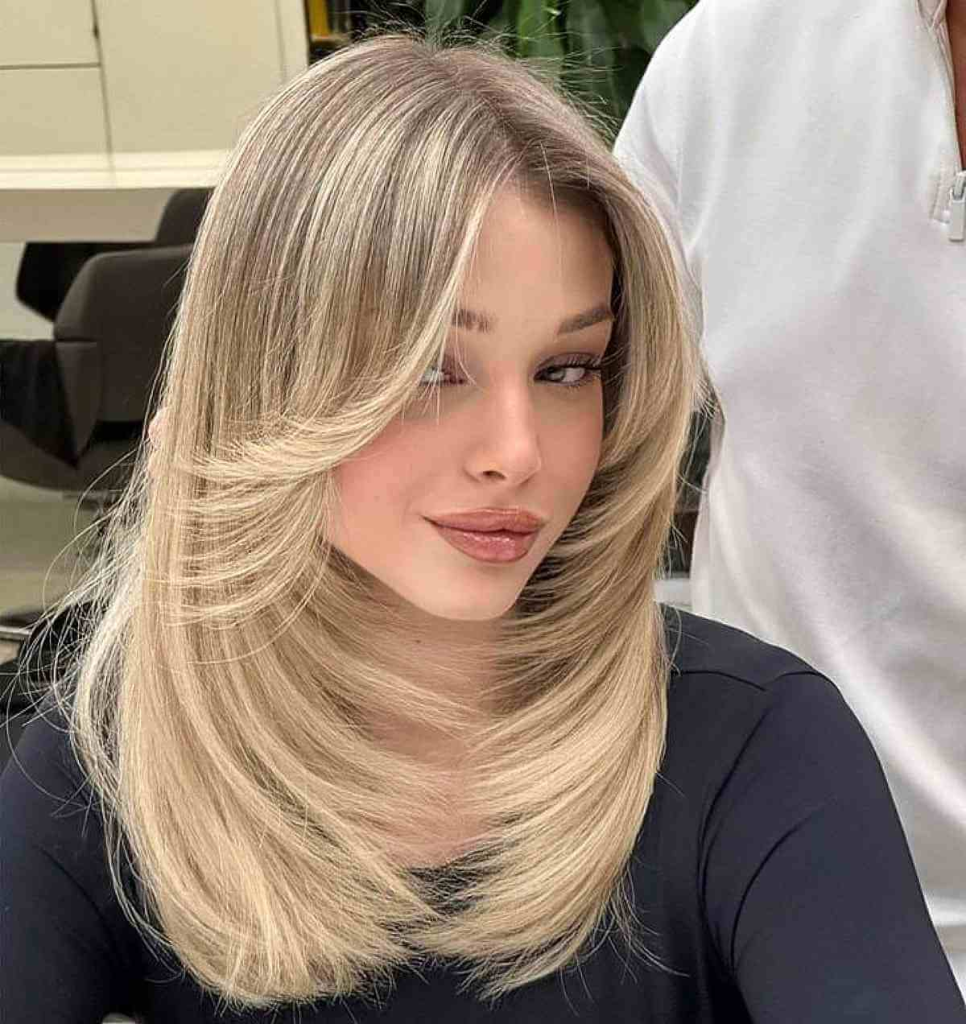
12. Curtain Bangs with Volume
Curtain bangs blown out with extra volume at the roots. Medium length hairstyles with bangs for face shapes on oval faces can handle dramatic curtain bangs that start shorter and sweep wider. The volume adds interest without throwing off your natural balance. Style by blowing the bangs up and then to each side.
For Long Faces (Shortening, Widening Bangs)
13. Full Blunt Bangs
Blunt bangs cut straight across, hitting at your eyebrows or just below. Full means no gaps – solid from temple to temple. Medium length hairstyles with bangs for face shapes with full blunt bangs shorten the appearance of a long face. The horizontal line adds width where you need it. Style with a round brush, blowing forward. Best with a lob or medium layered cut.
More Info: Customizing Bangs for Your Face Shape
Measuring your face shape at home: Pull your hair back. Look in a mirror. Trace your face outline with a dry erase marker. Round faces are as wide as they are long. Square faces have a strong, angular jaw. Heart faces have a wide forehead and pointed chin. Oval faces are longer than wide with balanced proportions. Long faces are significantly longer than wide. Medium length hairstyles with bangs for face shapes start with an honest assessment.
Forehead height matters too: Even within face shapes, forehead height changes everything. High foreheads can handle thicker, longer bangs. Low foreheads need wispy, shorter bangs. Average foreheads have the most options. Tell your stylist if you have a high or low forehead – it’s as important as your face shape.
Cowlicks and bangs: A cowlick at your hairline can make bangs behave badly. Ask your stylist to cut around the cowlick – leaving it slightly longer or cutting it at a different angle. Medium length hairstyles with bangs for face shapes can absolutely work with cowlicks. You just need a stylist who knows how to work with them.
Styling bangs daily: A small round brush (1 inch) and a blow-dryer are your best friends. Even if you air-dry the rest of your hair, blow-dry your bangs. Takes 60 seconds. Dry shampoo on bangs between washes keeps them from getting greasy. Medium length hairstyles with bangs for face shapes require very little daily work once the cut is right.
Frequently Asked Questions
Can I have bangs if I wear glasses? Yes. Curtain bangs and side-swept bangs work best with glasses. Avoid blunt bangs that hit right at your glasses frame – they’ll clash. Medium length hairstyles with bangs for face shapes can be adapted for glasses wearers. Tell your stylist you wear glasses.
What if I change my mind about bangs? Growing out bangs takes 3-4 months. During the awkward phase, pin them back, braid them, or sweep them to the side. Medium length hairstyles with bangs for face shapes can transition into no-bangs styles if you’re patient.
How often do bangs need trimming? Every 3-4 weeks. Bangs grow fast. Learn to trim them yourself at home (watch YouTube tutorials) or find a salon that offers free bang trims between cuts.
Can I have bangs with curly hair? Yes, but cut them dry, curl by curl, and leave them longer than you think (shrinkage is real). Medium length hairstyles with bangs for face shapes for curly hair need a stylist who specializes in curls.
Final Thoughts
Medium length hairstyles with bangs for face shapes are not a mystery. They just require attention to detail. Know your face shape. Know your forehead height. Know your hair texture. Then choose bangs that balance your features instead of fighting them. Take photos to your stylist. Be specific about what you want. And then enjoy your new face-framing fringe. The right bangs will make you wonder why you waited so long.
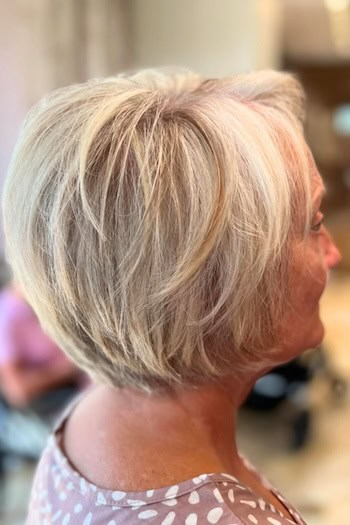
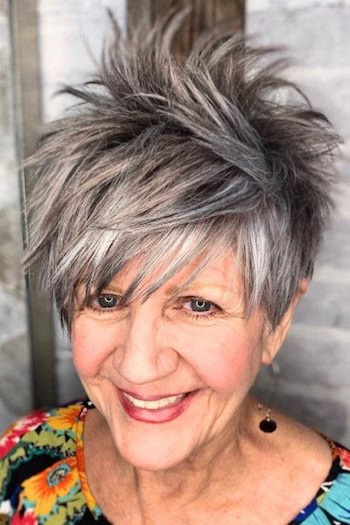
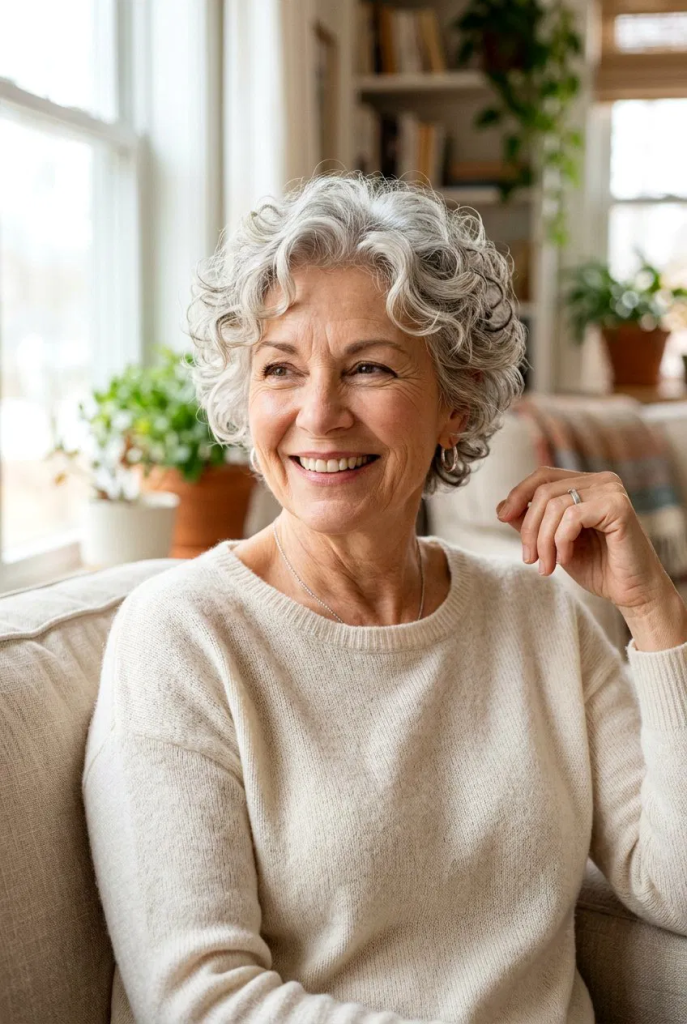
Hey friend. Let me guess – you’re over 60, you want short hair, but you don’t want to fight with it every morning. Easy short hairstyles for women over 60 low maintenance are exactly what you need. You’ve earned the right to roll out of bed, run your fingers through your hair, and look put together. Not spend 30 minutes with a blow-dryer and a round brush. Not sit under a hooded dryer like it’s 1985. Easy short hairstyles for women over 60 low maintenance exist, and they’re better than ever. Textured crops, soft pixies, and rounded bobs that air-dry beautifully. No heat required. No frustration allowed.
Here’s what I tell my clients in their 60s, 70s, and beyond. Your time is valuable. Your hands might not work like they used to. Your hair has changed – it’s likely finer and more fragile. Easy short hairstyles for women over 60 low maintenance work with these changes instead of against them. Shorter lengths mean less weight pulling on fragile roots. Textured cuts mean you don’t need perfect styling. And gray hair? It actually holds a style better because it has more grip. Easy short hairstyles for women over 60 low maintenance are not about settling. They’re about choosing ease without sacrificing beauty.
The 13 styles I’m sharing today are the ones I recommend most often to clients who say “I’m done with complicated hair.” Easy short hairstyles for women over 60 low maintenance include wash-and-go pixies, air-dry bobs, and textured crops that look better when you don’t try too hard. Some require no heat. Some require just your fingers. All take 5 minutes or less from shower to out the door. Let’s find your new easy style.
13 Easy Short Hairstyles for Women Over 60 Low Maintenance
1. Wash-and-Go Pixie
A classic pixie cut with soft, blended layers. Wash your hair, towel dry, and go. Easy short hairstyles for women over 60 low maintenance don’t get simpler than this. The pixie is short enough that it dries in 10 minutes without heat. If you have a cowlick, use a dab of paste to tame it. Otherwise, nothing needed. Perfect for women with straight or lightly wavy hair.
2. Textured Crop With Fingers-Only Styling
A crop is 1-2 inches everywhere with point-cut texture. After washing, rub a tiny bit of paste between your palms. Rake through dry hair with your fingers. Easy short hairstyles for women over 60 low maintenance like this one take 60 seconds. The texture hides any unevenness. No brush, no blow-dryer, no mirror needed. Best for fine to medium hair.
3. Air-Dry Rounded Bob
A rounded bob follows the curve of your head – shorter in back, longer in front. Wash, towel dry, and shake it out with your fingers. Easy short hairstyles for women over 60 low maintenance with a rounded shape air-dry into a soft, curved silhouette. The shape does the work for you. No round brush required. Perfect for wavy or lightly curly hair.
4. Pixie With Long Top (Finger Comb Only)
A pixie where the top is left longer (2-3 inches) and the sides are tapered. After washing, finger comb the top forward or to the side. Easy short hairstyles for women over 60 low maintenance with a longer top give you styling options without tools. Use your fingers only – no comb, no brush. The tapered sides stay neat automatically.
5. Curly Short Cut With Air-Dry Definition
For natural curls. A short cut with tapered sides and a rounded top. Apply curl cream to soaking wet hair. Scrunch with a microfiber towel. Easy short hairstyles for women over 60 low maintenance for curls take 3 minutes of active work. Then air-dry while you make coffee. No diffuser needed unless you’re in a rush.
6. Chin-Length Bob With Towel-Scrunch Waves
A chin-length bob with soft layers. After washing, towel dry until damp. Scrunch sections with your fist. Easy short hairstyles for women over 60 low maintenance using towel scrunching create soft waves without heat. Let air-dry the rest of the way. The waves last all day and get softer as the week goes on.
7. One-Length Crop With No Product
A crop cut to one uniform length (1.5 inches) with blunt ends. Wash, towel dry, and walk away. Easy short hairstyles for women over 60 low maintenance with no product are the ultimate lazy-girl style. The blunt ends create a clean line without any effort. Best for straight hair that doesn’t frizz. Perfect for swimming, golf, or travel.
8. Stacked Bob With Air-Dry Lift
A stacked bob has graduated layers in the back that create lift. Wash and towel dry. Flip your head upside down and shake. Easy short hairstyles for women over 60 low maintenance with stacking give you crown volume without a blow-dryer. The stacked layers are cut to stand up on their own. Flip back up and go.
9. Short Shag With Messy Air-Dry
A shag has layers throughout – short at the crown, longer through the ends. Wash, towel dry, and mess it up with your fingers. Easy short hairstyles for women over 60 low maintenance in a shag look better when they’re messy. The intentional dishevel is the whole point. No brushing, ever.
10. Tapered Nape Cut With Fingers-Only Finish
Tapered means very short at the nape, gradually longer toward the crown. After washing, rub a drop of serum between your palms. Smooth over the top section only. Easy short hairstyles for women over 60 low maintenance with a tapered nape keep the back neat automatically. Your fingers are the only tool you need.
11. Curly Pixie With Leave-In Only
For tight curls or coils. A curly pixie with tapered sides. Apply leave-in conditioner to wet hair. That’s it. Easy short hairstyles for women over 60 low maintenance for type 4 hair need just one product. The leave-in provides moisture and definition. Air-dry or sit in the sun for 10 minutes. Perfect for hot climates.
12. Soft Crop With Side-Swept Bangs (Combo Only)
A crop with side-swept bangs that are cut to fall perfectly without styling. Wash and towel dry. Sweep the bangs to the side with your hand once. Easy short hairstyles for women over 60 low maintenance with side bangs hide forehead lines without any work. The bangs are cut so they naturally fall to the side. No round brush needed.
13. The Five-Minute Blow-Dry (Lowest Effort Heat Style)
For women who still want a blow-dry but minimal effort. A short layered cut. Use a 2-in-1 blow-dryer brush. Easy short hairstyles for women over 60 low maintenance can include a tiny bit of heat if you want. The 2-in-1 tool does the brushing and drying together. Five minutes from wet to styled. Less effort than a traditional blowout.
More Info: Making Low Maintenance Actually Work
The right cut is everything:Easy short hairstyles for women over 60 low maintenance start with a great cut. If the cut is wrong, no amount of “easy” styling will fix it. Find a stylist who listens when you say “I want to wash and go.” Bring photos of styles that look good air-dried. Be very clear: “I will not be using a round brush or a blow-dryer at home.”
Products that simplify: A good leave-in conditioner. A lightweight paste or pomade for texture. Dry shampoo for second-day hair. That’s it. Easy short hairstyles for women over 60 low maintenance don’t need a 10-product routine. Avoid heavy oils, gels that crunch, and anything that requires a special technique.
Adapting for arthritis or limited mobility: If your hands hurt or you have limited range of motion, choose cuts that don’t require lifting your arms. A crop or pixie that dries in place. Use a microfiber towel (lighter than a regular towel). Skip products that need to be rubbed between your palms. Easy short hairstyles for women over 60 low maintenance can be adapted for any physical limitation.
Nighttime routine for even less morning work: Sleep on a silk pillowcase. In the morning, shake your hair out with your fingers. That’s it. If you have curls, pineapple loosely with a silk scrunchie. Easy short hairstyles for women over 60 low maintenance should look good when you wake up, not require a full restyle.
Frequently Asked Questions
What if I have a cowlick? A cowlick can be cut to work with you instead of against you. Ask your stylist to leave a little extra length at the cowlick so it lays flat. Easy short hairstyles for women over 60 low maintenance can absolutely accommodate cowlicks – you just need the right cut.
How do I get volume without a blow-dryer? Flip your head upside down and shake your roots with your fingers when your hair is 80% dry. Or use root clips while your hair air-dries. Easy short hairstyles for women over 60 low maintenance can have plenty of volume with zero heat.
What if my hair is very thin? Go shorter. A pixie or crop will look fuller than a bob. Easy short hairstyles for women over 60 low maintenance for thin hair should be textured – point-cut ends create the illusion of density. Avoid one-length cuts that show every sparse spot.
How often do I need to wash? Every 2-3 days for fine hair. Every 3-5 days for medium or coarse hair. Easy short hairstyles for women over 60 low maintenance are even easier when you stretch washes. Dry shampoo is your friend.
Final Thoughts
Easy short hairstyles for women over 60 low maintenance are not a compromise. They are a choice. A choice to spend your time on things that matter more than your hair. A choice to love how you look without fighting your reflection. Find a cut from this list that speaks to you. Take it to your stylist. Be clear about what “easy” means to you. And then enjoy the freedom of hair that works for you, not against you.
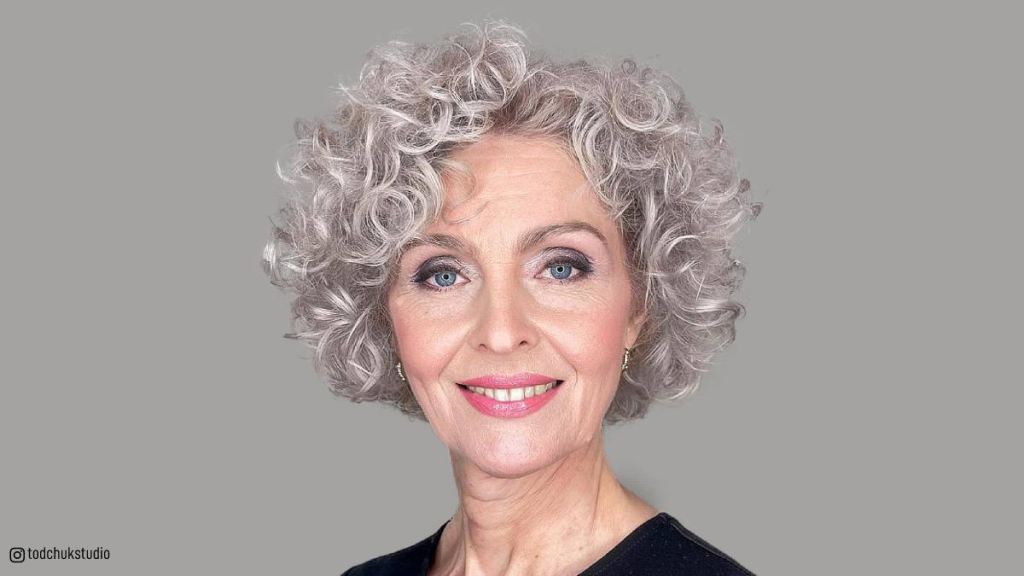
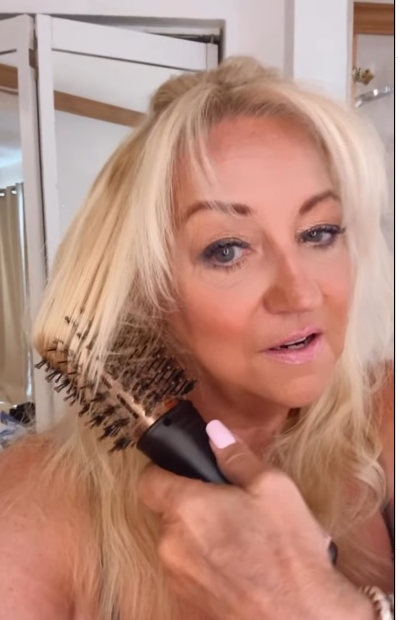
For more than forty years, my identity was tethered to a chemical scent that lived somewhere between ammonia and burnt sugar. It was the smell of “The Perm.” Like many women who came of age in the late 20th century, I viewed the perm not as an elective beauty treatment, but as a mandatory maintenance task—much like changing the oil in a car or paying the electric bill. From the tight, coiled spirals of the 1980s to the “body waves” of the early 2000s, I believed that my hair, in its natural state, was an unfinished product.
When I turned 65, however, a strange thing happened. I looked in the mirror after a fresh salon appointment and didn’t see a woman with “body and bounce.” I saw a woman with hair that looked like tired straw. My scalp was perpetually itchy, my ends were splitting faster than I could trim them, and the “volume” I so desperately sought looked more like a halo of frizz.
That was the day I decided to stop. Little did I know that by giving up the chemicals, I was about to discover the healthiest, most beautiful version of myself.
The 40-Year Chemical Cycle
To understand why stopping was so radical, you have to understand the grip the perm had on my generation. In my thirties, fine hair was seen as a flaw to be corrected. A perm was the “fix.” It gave me the height and structure that made me feel professional and put-together.
But a perm is not a gentle process. To create those curls, a stylist applies a reducing agent (usually ammonium thioglycolate) to break the disulfide bonds in the hair’s protein structure. Once the internal “skeleton” of the hair is collapsed, it is molded into the shape of a rod and then “neutralized” with hydrogen peroxide to reform the bonds in their new, curled shape.
Doing this once or twice a year is stressful for hair; doing it for forty years is an endurance test. By the time I reached my sixties, my hair had been through hundreds of these chemical reconstructions.
The Changing Biology of Hair at 65
What I failed to realize—and what my stylist never quite articulated—was that the hair on my head at 65 was fundamentally different from the hair I had at 25.
As we age, our hair follicles undergo significant changes:
Reduced Sebum Production: The scalp produces fewer natural oils, making hair naturally drier.
Melanin Loss: As hair turns grey or white, the cuticle (the outer protective layer) becomes thinner and more fragile.
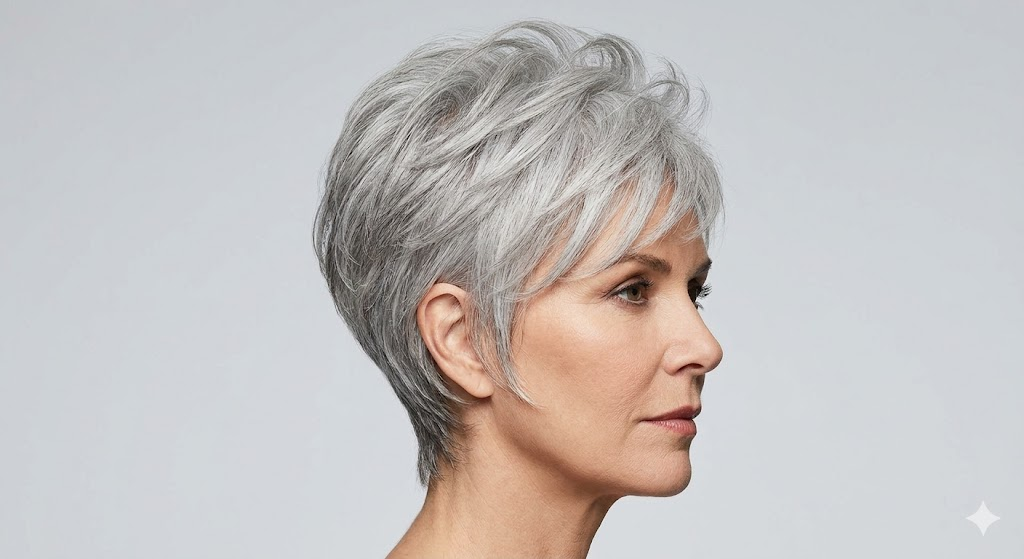
Texture Shifts: “Silver” hair is often coarser or more wiry, making it less resilient to harsh chemical processing.
By applying the same perm formula I used in my thirties to my sixty-five-year-old strands, I was essentially attacking an already fragile structure. The chemicals were stripping away what little moisture remained, leaving me with hair that was “formed” but functionally dead.
The “Ugly” Transition: A Test of Will
The decision to quit was easy; the execution was not. When you stop perming, you aren’t granted instant beauty. Instead, you are granted the Line of Demarcation.
For months, I lived with two inches of soft, silver-grey growth at the roots and six inches of frizzy, yellowish, permed “old” hair at the ends. It was the ultimate test of vanity. There were mornings when I reached for the phone to call my stylist, convinced that I looked “unkempt” or “old.”
But I stayed the course. I started using silk pillowcases to prevent breakage at the junction where the new growth met the old damage. I traded my stiff hairsprays for deep-conditioning masks. And slowly, the “new” hair began to take over.
The Big Chop: A Moment of Liberation
The turning point came eight months in. I walked into the salon and told my stylist, “Cut it all off. Every bit of the perm.”
She hesitated. “It’ll be quite short,” she warned.
“Good,” I replied.
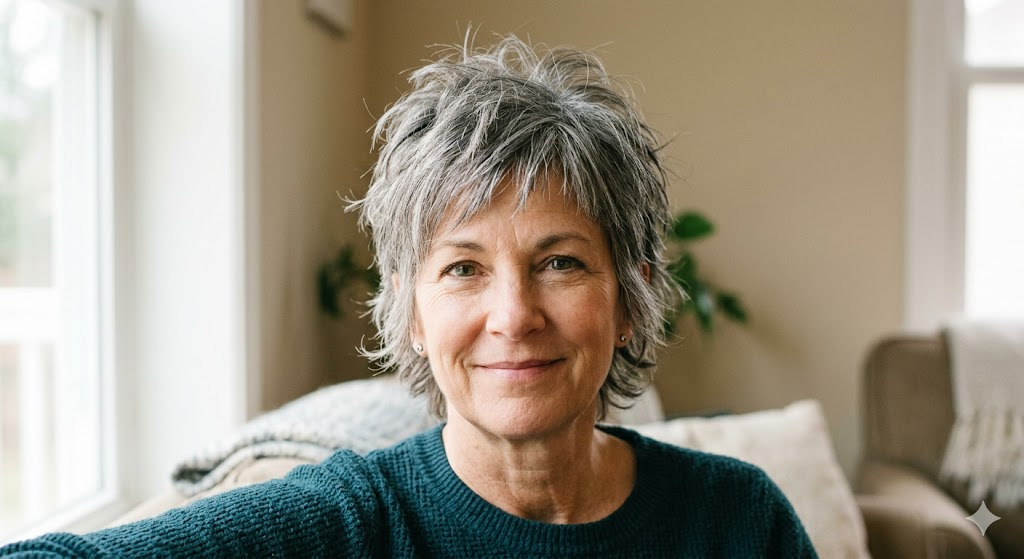
When the last of the chemically treated hair hit the floor, I felt a physical weight lift. For the first time in decades, I could run my fingers from my scalp to my ends without snagging on a knot. The hair that remained was soft. It was shiny. And most surprisingly, it had a natural, sophisticated wave that I never knew existed because I had been forcing it into artificial curls for half a century.
The Benefits of Going Natural
Once the chemicals were gone, the transformation in my hair’s health was nothing short of miraculous. If you are sitting on the fence about ditching the chemicals, here is what you can expect:
1. The Return of Shine
Perms raise the hair cuticle, which makes the hair look dull because it can’t reflect light. Healthy, un-permed hair has a flat, smooth cuticle. For the first time in years, my hair actually shimmered in the sun.
2. Scalp Relief
I hadn’t realized how much my scalp had been suffering. The chronic redness and occasional “chemical burns” disappeared. My hair follicles were finally allowed to breathe, which actually led to a slight increase in thickness—my hair wasn’t falling out as much because it wasn’t being traumatized.
3. True Color Clarity
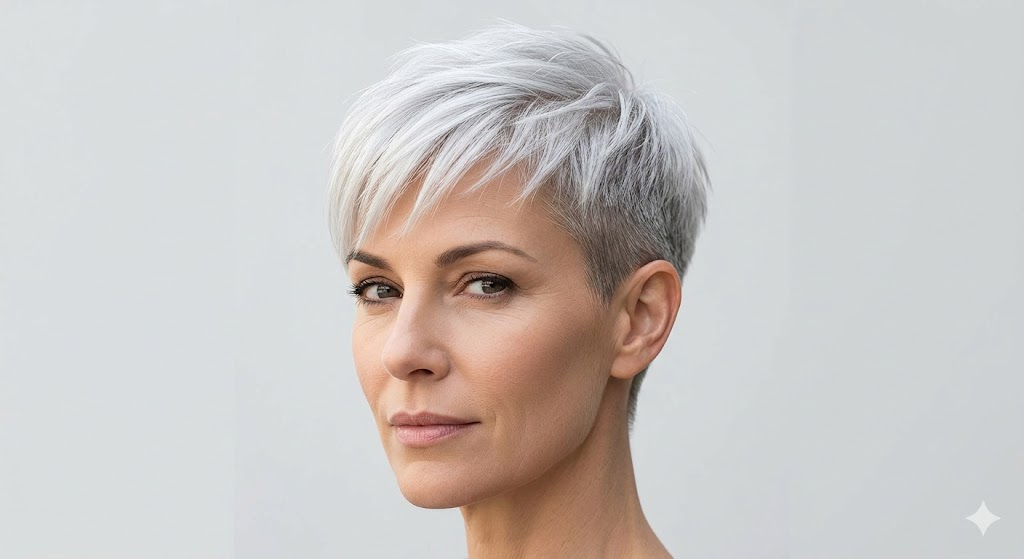
Chemicals, especially perms and the high-heat styling they require, can turn grey hair a dingy, brassy yellow. Once I went natural, my silver hair became a bright, crisp “arctic white” that looked intentional and modern rather than neglected.
4. Reclaimed Time (and Money)
The average perm appointment lasted three hours and cost a significant amount of money, not to mention the expensive “post-perm” shampoos I had to buy. Now, my routine is a ten-minute wash and air-dry.
My New “Less is More” Regimen
At 65, I learned that healthy hair doesn’t need to be manipulated; it needs to be nourished. Here is the simple routine that changed everything:
Sulfate-Free Everything: I switched to gentle cleansers that don’t strip the scalp’s dwindling oil supply.
The Power of Oil: I started using a tiny drop of Argan oil on my damp ends. It provides the “weight” and control I used to seek from perms without the damage.
Cold Water Rinses: It sounds like an old wives’ tale, but rinsing with cool water helps seal the cuticle, locking in moisture and shine.
Embracing the Cut: Instead of relying on a perm for “style,” I invested in a high-quality precision haircut. A great cut does the work that the chemicals used to do.
The Psychological Shift: Redefining “Old”
The most unexpected part of this journey wasn’t the hair—it was the confidence.
There is a pervasive myth that as women age, we must “do more” to stay attractive. We think we need more makeup, more hair treatments, and more structural “fixes.” But stopping the perms taught me that the opposite is often true. The more I stripped away the artificial, the more vibrant I looked.
Friends started asking me what I was doing differently. “Did you get a facelift?” one asked. No—I just stopped frying my hair. The soft, natural texture of my grey hair softened the lines on my face in a way that the stiff, permed “helmet” never could.
I no longer look like I’m trying to cling to the aesthetic of a 1985 Sears catalog. I look like a woman who is comfortable in her skin—and her hair.
Advice for the Transitioning Woman
If you are 60, 70, or 80 and you’ve been perming your hair since the Nixon administration, the idea of stopping is terrifying. You might feel like your hair is “too thin” or “too flat” to go without it.
But I challenge you to look closely at your hair. Is the perm actually giving you volume, or is it just giving you bulk through damage?
Steps to take:
Talk to a “Silver Stylist”: Find someone who loves working with natural grey hair.
Go Short Gradually: If a “big chop” is too scary, gradually cut off two inches every few months until the chemicals are gone.
Invest in Moisture: Your “new” hair will be thirsty. Treat it to the best conditioners you can find.
Conclusion: Meeting Myself at Last
I spent forty years fighting my hair. I fought its straightness, I fought its fineness, and I fought its color. At 65, I finally signed a peace treaty.
Stopping the perms wasn’t an act of “giving up” on my appearance. It was an act of self-respect. Today, my hair is the healthiest it has ever been. It moves when I walk, it’s soft to the touch, and it glows with a health that no chemical bottle could ever provide.
If you’re waiting for a sign to put down the perm rods and see what’s underneath, this is it. You might just find that your best hair days aren’t behind you—they’re just waiting to grow out.
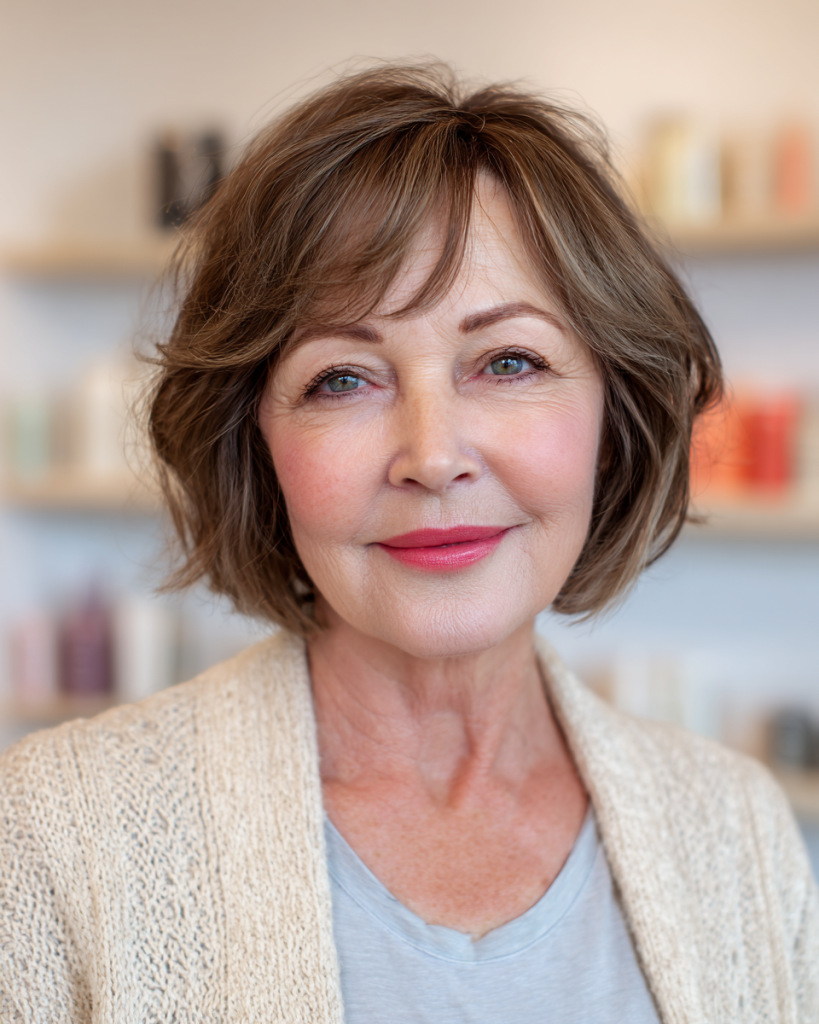
For women over 50 with thin hair, bob haircuts are one of the most flattering and effective choices you can make. The right bob removes weight, adds strategic layering, and creates the illusion of density—all while keeping your hair looking chic and modern. Unlike longer styles that can pull thin hair down and make it look sparser, a well-cut bob lifts at the roots, adds movement, and frames your face beautifully. In this guide, you’ll discover 15 bob haircuts for women over 50 with thin hair, each designed to maximize volume, minimize maintenance, and give you a confident, youthful look. If you love short, flattering styles, these low maintenance haircuts for women over 50 with fine hair offer additional inspiration.
Why a Bob Is Perfect for Thin Hair Over 50
Thin hair requires a completely different approach than thick hair. Here’s why bob haircuts for women over 50 with thin hair are so effective:
Removes weight that pulls hair down – Shorter lengths prevent thin hair from being weighed down at the ends
Creates the illusion of density – Strategic layering adds endpoints that reflect light, making hair look thicker
Hides scalp visibility – Proper cutting at the crown conceals thinning areas
Adds movement and swing – Bobs create bounce that one-length cuts lack
Air-dries quickly – Thin hair dries in 10–15 minutes, and bobs make air-drying look intentional
Lifts at the roots – Shorter lengths allow thin hair to stand up, not lie flat
For women with fine hair, these short hairstyles for thin fine hair offer additional density-building ideas.
The 15 Best Bob Haircuts for Women Over 50 with Thin Hair
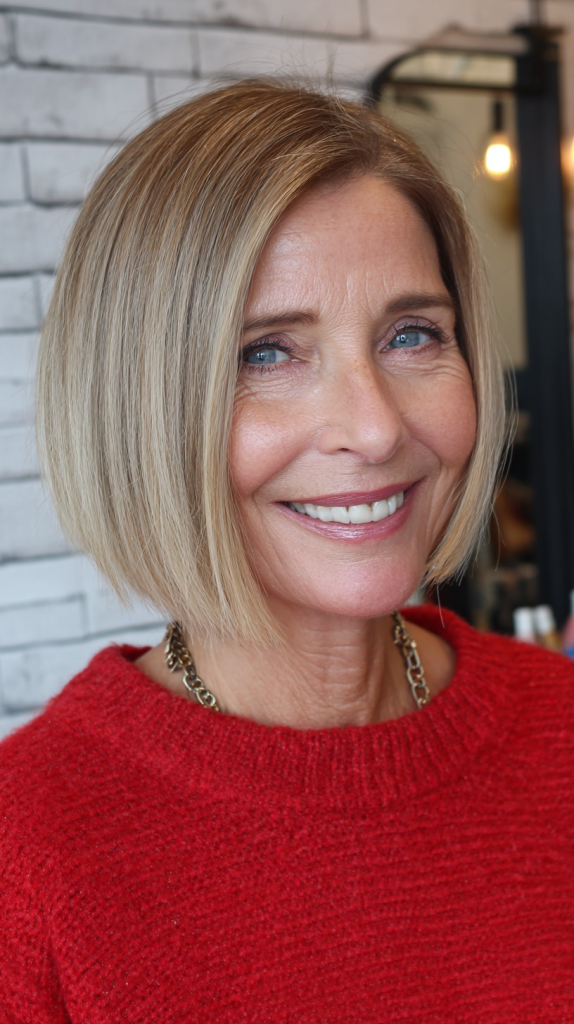
1. The Stacked Bob
Why it works: A stacked bob has graduated layers in the back that create a built-in bump of volume at the crown. The stacking is cut into the interior of the hair, so the volume comes from the cut itself—not from styling. For women with thin hair, this is one of the most effective volume-building cuts available. The front is left slightly longer (chin-length) for softness.
How to style it: Apply root-lifting spray to the crown area. Blow-dry the stacked back using a small round brush for 2–3 minutes, lifting aggressively. The front can be left to air-dry or quickly smoothed. The stacked section will naturally lift and hold volume without product. Finish with dry texture spray at the crown.
Best face shapes: Oval, round, heart (crown volume adds balance)
Maintenance needs: Trim every 5–6 weeks. The stacked interior loses its lift quickly if the graduation grows out.
For women with round faces, these best haircuts for round faces over 50 offer additional slimming strategies.
2. The Inverted Bob
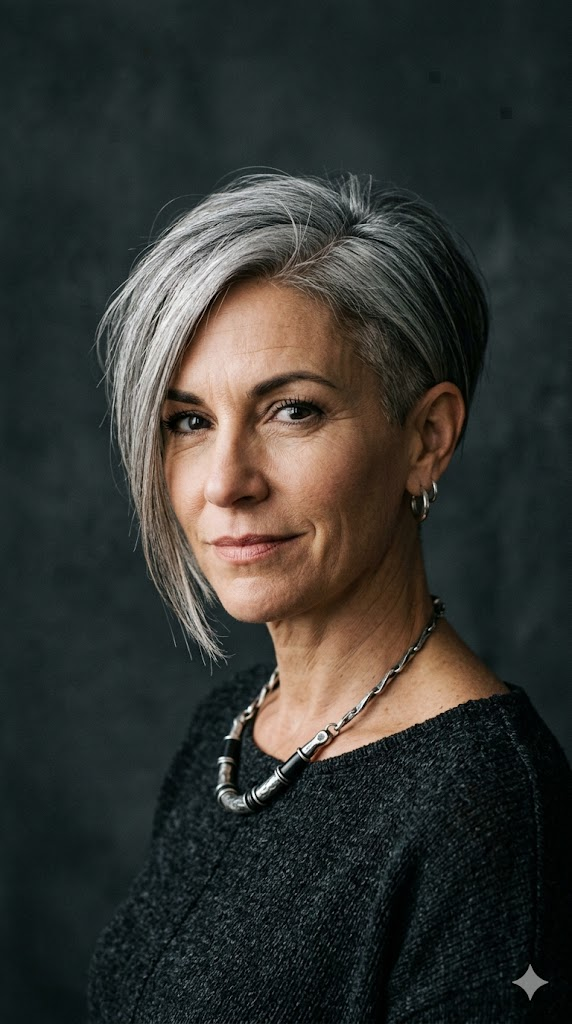
Why it works: An inverted bob is shorter in the back and longer in the front, creating an angled line that draws the eye forward. For thin hair, the inversion removes weight from the nape (where thin hair can look sparse) while keeping length in the front for slimming face-framing. The angle also creates the illusion of more volume at the crown.
How to style it: Apply volumizing foam to damp hair. Blow-dry the back section first using a round brush, directing hair downward. For the longer front pieces, use a flat iron to create a slight bend away from the face. The angle should be visible—the front should be noticeably longer than the back. Finish with shine spray.
Best face shapes: Oval, heart, oblong (the angle elongates rounder faces)
Maintenance needs: Trim every 5–6 weeks. The angle must be maintained.
3. The Blunt Bob with Soft Ends
Why it works: A blunt bob at chin-length creates the appearance of maximum density because every hair ends at the same point. Softening the very ends (micro-point cutting) prevents the “helmet head” look while keeping the weight line intact. For women with thin hair, this cut creates the illusion of thickness without layers that can make fine hair look wispy.
How to style it: Apply lightweight mousse to damp hair. Comb through with a wide-tooth comb. Air-dry completely, using your fingers to gently separate any clumps. For a more polished look, blow-dry with a flat paddle brush on low heat for 5 minutes, directing all hair straight down. Never add heavy products that will weigh down the blunt line.
Best face shapes: Oval, oblong, square (adds width to very narrow faces)
Maintenance needs: Trim every 5–6 weeks. The blunt line shows every uneven hair.
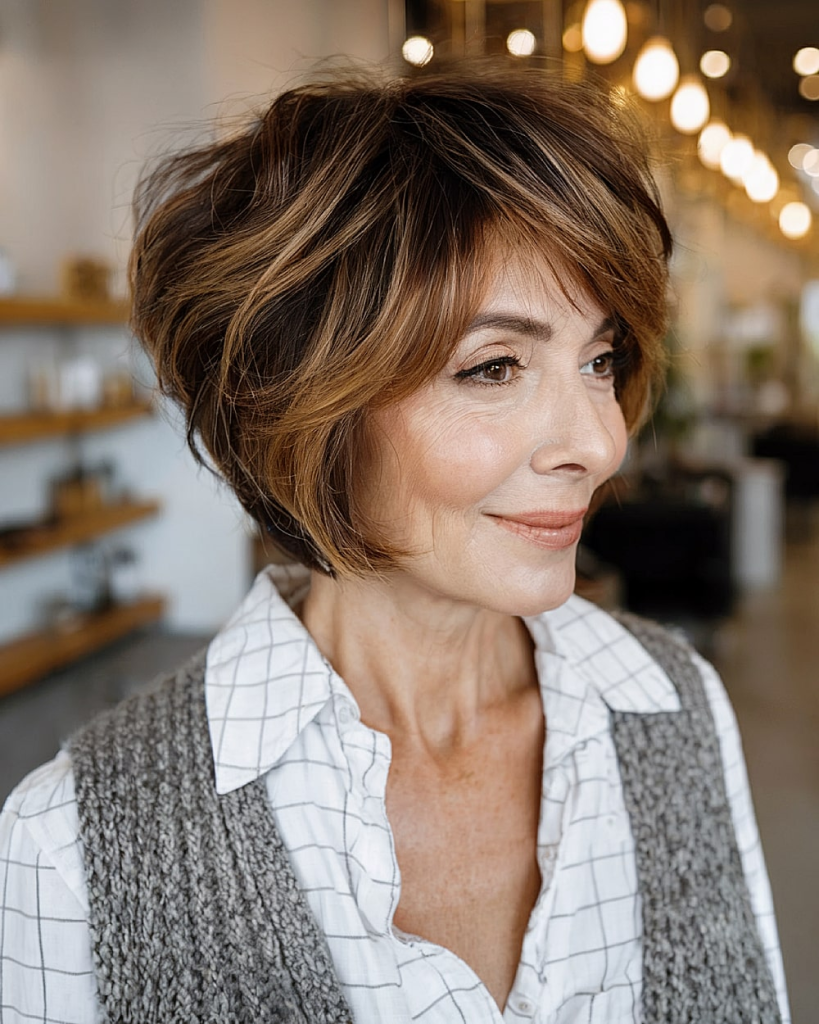
4. The Layered Bob (Chin-Length)
Why it works: A layered bob at chin-length removes interior weight so hair falls naturally into place without precision styling. The layers should be soft and subtle—not choppy or disconnected—so they blend seamlessly. For thin hair, this length is ideal because it’s short enough to avoid being weighed down but long enough to tuck behind ears. The layers create movement and the illusion of density.
How to style it: Apply lightweight mousse to damp roots. Blow-dry using a small round brush (1 inch), lifting each section at the root. The layers will create natural movement without curling. For an air-dry option, apply wave spray and scrunch—the layers will create texture that looks intentional, not frizzy.
Best face shapes: All face shapes (most universally flattering option)
Maintenance needs: Trim every 6–8 weeks. Soft layers hide grow-out beautifully.
For plus size women seeking flattering options, these short haircuts for plus size women over 50 offer additional slimming ideas.
5. The French Bob
Why it works: The French bob is cropped between the earlobe and chin, often with a subtle undercurl at the ends. It’s effortlessly chic and requires almost no daily effort. For women with thin hair, the French bob’s blunt edge creates the illusion of density, while the short length prevents the hair from looking wispy. The shorter length also means less weight pulling hair down.
How to style it: Apply smoothing cream to damp hair. Tuck hair behind your ears while it air-dries to encourage that signature curved-under shape. If you have natural wave, use a diffuser on low heat and let the ends curl freely. Never use a straightener—the French bob celebrates imperfect, lived-in texture.
Best face shapes: Oval, heart, square (avoid if you have a very long face)
Maintenance needs: Trim every 6 weeks. The blunt edge is key to the style.
6. The Textured Lob (Long Bob)
Why it works: A textured lob hits between the chin and collarbone. For thin hair, this length works best when heavily textured—think piecey ends and invisible layers. The extra length gives you versatility (ponytails, half-up styles) while the texture prevents the dreaded flat, stringy look. The lob is one of the most forgiving cuts for thin hair because the texture hides thinning.
How to style it: Apply sea salt spray to damp hair throughout. Scrunch vigorously, then air-dry completely—do not touch while drying. Once dry, shake out with fingers and add dry texture spray at the roots. For a polished version, use a 1.5-inch curling iron to create loose bends, then brush through with a wide-tooth comb.
Best face shapes: All face shapes (most versatile length for thin hair)
Maintenance needs: Trim every 8–10 weeks. The longest interval on this list.
7. The Asymmetric Bob
Why it works: An asymmetric bob is shorter on one side than the other—sometimes by just an inch, sometimes by several inches. For thin hair, asymmetry creates visual interest and the illusion of more volume on the shorter side. The diagonal line also draws the eye across the face, distracting from any sparse areas.
How to style it: Apply texturizing cream to damp hair. Blow-dry using your fingers, directing the longer side forward and the shorter side back behind your ear. The key is to embrace the unevenness—don’t try to make both sides match. Finish with dry wax on the ends of the longer side for definition.
Best face shapes: Oval, heart, diamond (asymmetry balances longer faces)
Maintenance needs: Trim every 5–6 weeks. The angle needs occasional refreshing.
8. The Graduated Bob
Why it works: A graduated bob features layers that increase in length from back to front, creating a soft, sloping line. Unlike a stacked bob (which has distinct tiers), a graduated bob is smoother and more subtle. For thin hair, this cut offers lift in the back and length in the front without harsh lines. The graduation creates natural volume without teasing.
How to style it: Apply root booster to damp hair, focusing on the back crown. Blow-dry using a round brush, lifting each section at a 90-degree angle. The front pieces can be blown smooth or left with a slight bend. The graduation creates natural volume without teasing, and thin hair holds the shape well.
Best face shapes: Oval, round, square (the graduation adds length)
Maintenance needs: Trim every 6–8 weeks. The graduation line is forgiving but benefits from regular upkeep.
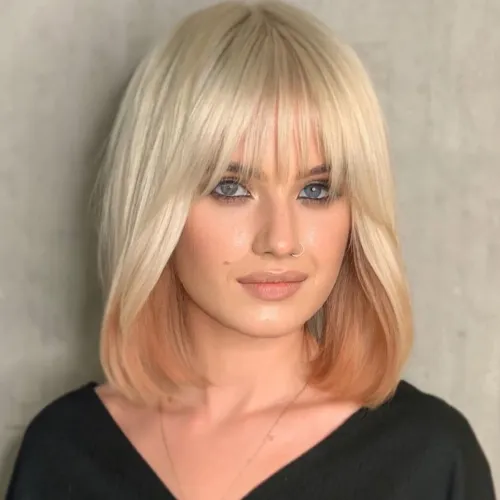
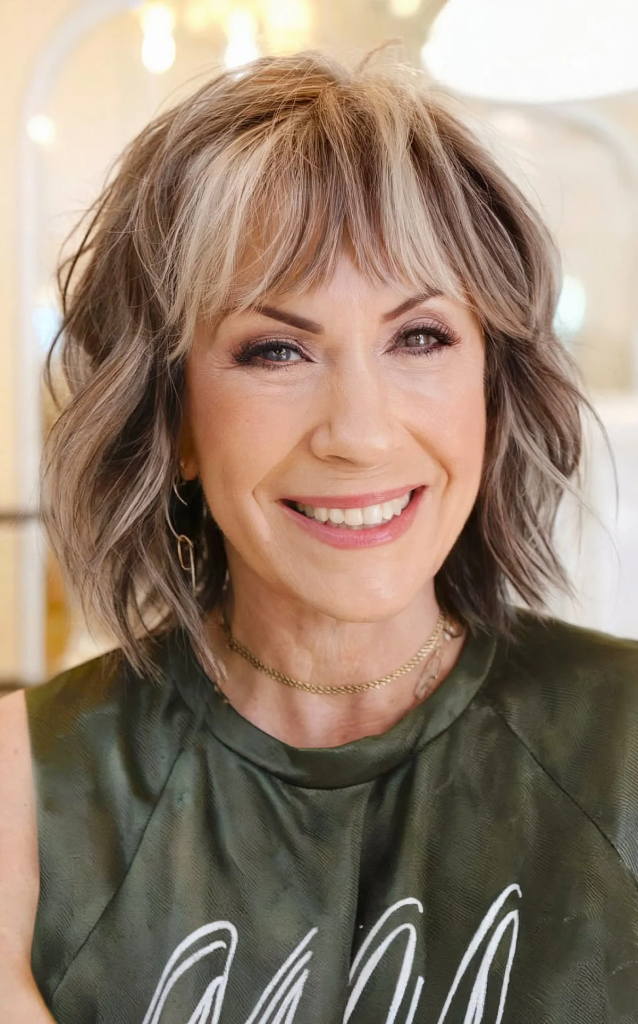
9. The Textured Bob with Curtain Bangs
Why it works: Adding curtain bangs to a textured bob softens the overall look and creates beautiful face-framing. The bangs part in the middle and sweep to each side, blending seamlessly into the choppy layers. For thin hair, curtain bangs add the illusion of density at the hairline without requiring a full fringe that can look sparse.
How to style it: Apply lightweight mousse to damp hair. Blow-dry the curtain bangs using a small round brush, rolling them away from your face. The rest of the bob can be air-dried or quickly tousled with fingers. To refresh bangs on day two, mist with water and re-roll around a round brush with heat for 10 seconds.
Best face shapes: Oval, heart, round (curtain bangs slim wider foreheads)
Maintenance needs: Bangs trim every 3–4 weeks; bob trim every 6–8 weeks
For more face-framing inspiration, these curtain bangs for women over 50 offer age-defying styling tips.
10. The Wispy Bob
Why it works: A wispy bob takes the classic bob to its most delicate extreme. The ends are texturized until they are almost feathery, with very fine, barely-there points at every edge. For women with extremely thin hair, this is the most flattering option because the wispy ends eliminate any blunt line that could emphasize how little hair you have.
How to style it: Apply lightweight mousse to damp hair. Towel-dry aggressively, then use your fingers to push the top forward. Air-dry completely—about 10 minutes. Avoid heavy products like wax or pomade, which will clump the fine ends together. Finish with a micro-mist of shine spray from 12 inches away.
Best face shapes: Oval, heart, oblong (wispiness softens longer faces)
Maintenance needs: Trim every 5–6 weeks. The wispy ends are forgiving between trims.
11. The A-Line Bob
Why it works: An A-line bob is a specific type of inverted bob where the front is significantly longer than the back—often by 2–3 inches. The line is sharp and intentional. For thin hair, the A-line removes weight from the nape (where thin hair looks sparsest) while creating a dramatic, modern shape that adds visual interest.
How to style it: Apply smoothing cream to damp hair. Blow-dry using a round brush, directing the back section downward and the front sections forward. The A-line shape should be visible—the front should be noticeably longer. For a sleek finish, use a flat iron on the front pieces. Finish with shine spray to emphasize the sharp line.
Best face shapes: Oval, heart, square (the sharp line adds structure)
Maintenance needs: Trim every 5–6 weeks. The A-line requires precise upkeep.
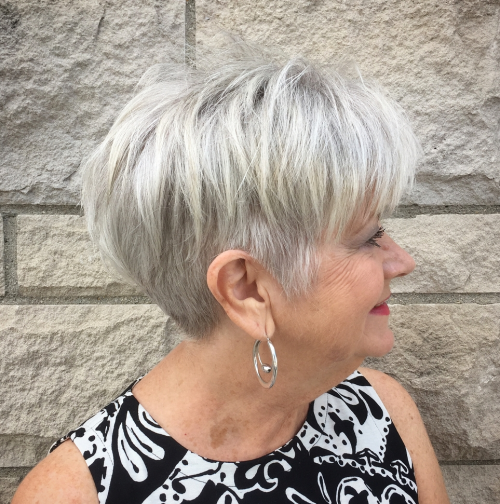
12. The Micro Bob
Why it works: The micro bob is cropped right at or slightly below the earlobe, making it shorter than a traditional bob but longer than a pixie. This length requires almost no styling because the hair isn’t long enough to tangle or misbehave. For women with thin hair, the micro bob’s blunt perimeter creates the illusion of density while the short length prevents wispy ends.
How to style it: Apply smoothing balm to damp hair. Comb straight back away from your face, then let hair fall naturally. The shortness means it will dry in whatever direction it wants—and that’s the charm. If you have cowlicks, a small round brush on just that section for 30 seconds solves everything.
Best face shapes: Oval, heart, square (very short lengths require strong bone structure)
Maintenance needs: Trim every 4–5 weeks. Any growth beyond the earlobe changes the proportion.
13. The Invisible Layers Bob
Why it works:Invisible layers (also called internal layers) are cut into the interior of the hair without changing the perimeter. This technique removes weight and adds movement while maintaining the appearance of a one-length cut. For thin hair, invisible layers are a game-changer—your hair will feel lighter and move better without looking layered or wispy.
How to style it: Apply lightweight mousse to damp hair. Blow-dry using a round brush for 5–7 minutes, focusing on smoothing the perimeter. The invisible layers will create natural movement without any visible layer lines. For an air-dry option, apply wave spray and scrunch—the internal layers will create texture that looks intentional, not frizzy.
Best face shapes: All face shapes (most subtle layering option)
Maintenance needs: Trim every 8–10 weeks. Invisible layers grow out very gracefully.
14. The Side-Parted Bob
Why it works: This isn’t a different cut—it’s a styling technique that transforms any bob. A deep side part (the part aligned with the arch of your eyebrow) immediately creates asymmetrical volume because all the hair is swept to one side, lifting off the scalp on the deeper side. For women with thin hair, this one styling change can add 50% more visible volume instantly.
How to style it: On damp hair, create a deep side part (the part should align with the arch of your eyebrow). Blow-dry using a round brush, lifting the hair on the deeper side straight up and directing it across your head. The shorter side can be tucked behind your ear. Lock the part in place with light hold spray on the roots.
Best face shapes: Round, oval, heart (the diagonal line slims the face)
Maintenance needs: No additional maintenance beyond your underlying bob trim schedule
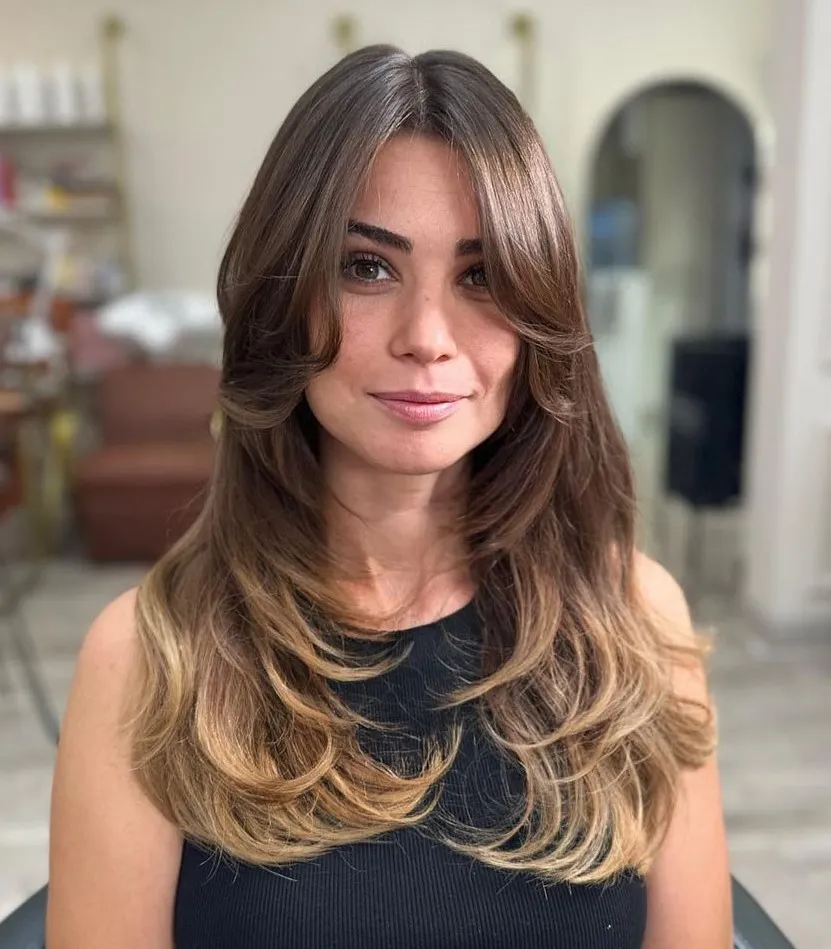
15. The Shoulder-Length Layered Bob
Why it works: For women who prefer to keep a bit more length, a shoulder-length layered bob is the perfect balance. Long enough to pull back but short enough to avoid feeling heavy, this cut uses soft, subtle layers to add movement and volume. The weight of the longer length helps control fine hair, while the layers prevent it from looking flat.
How to style it: Apply leave-in conditioner and wave spray to damp hair. Scrunch vigorously. Air-dry completely or use a diffuser on low heat. The layers will create soft bends throughout the length. For a polished look, use a 1.5-inch curling iron on just the face-framing pieces.
Best face shapes: All face shapes (most universally flattering longer option)
Maintenance needs: Trim every 8–10 weeks. Layers hide grow-out well.
For women over 60 seeking effortless styles, these wash and wear haircuts for women over 60 offer additional low-maintenance ideas.
How to Style a Bob for Thin Hair (Daily Routine)
Styling thin hair requires the right techniques and products to maximize volume. Here’s your daily roadmap:
Start with volumizing products at the roots only – Apply mousse or root-lifting spray exclusively to your roots and crown. Applying to the ends will weigh them down.
Blow-dry upside down – Flip your head over and blast roots with warm heat for 30 seconds before you even pick up a brush. This pre-lifts the roots and cuts drying time in half.
Use a small round brush – A ¾-inch or 1-inch round brush is ideal for thin hair because it allows you to wrap small sections tightly for maximum lift.
Cool shot is your best friend – After heating each section with a round brush, hit it with 10 seconds of cool air before releasing. This locks the bend and extends volume for hours.
Dry shampoo is a volume product, not just a refresher – Apply dry shampoo to clean, dry hair—not just second-day hair. It adds grip and texture that makes thin hair look twice as thick.
Texturizing powder over hairspray – Hairspray can weigh thin hair down. Instead, use texturizing powder at the roots for instant, gravity-defying lift.
Avoid heavy oils and butters – Coconut oil, argan oil, and shea butter are too heavy for thin hair. If you need shine, use a micro-mist of shine spray from 12 inches away.
Second-day refresh – Mist roots with sea salt spray, flip head upside down, and blow-dry on low heat for 60 seconds while scrunching with your fingers. This revives volume without re-washing.
For gray or silver thin hair – Use purple-tinged dry shampoo to add volume while preventing yellowing.
Quick Maintenance Cheat Sheet
Cut Style
Trim Frequency
Special Notes
Stacked Bob
5–6 weeks
Built-in volume needs upkeep
Inverted Bob
5–6 weeks
Angle must be maintained
Blunt Bob with Soft Ends
5–6 weeks
Blunt line requires upkeep
Layered Bob (Chin-Length)
6–8 weeks
Most versatile option
French Bob
6 weeks
Blunt edge is key
Textured Lob
8–10 weeks
Longest interval on this list
Asymmetric Bob
5–6 weeks
Angle needs occasional refreshing
Graduated Bob
6–8 weeks
Most forgiving graduation
Textured Bob with Curtain Bangs
Bangs: 3–4 weeks; Bob: 6–8 weeks
Bangs require frequent trims
Wispy Bob
5–6 weeks
Most forgiving ends
A-Line Bob
5–6 weeks
Sharp angle requires upkeep
Micro Bob
4–5 weeks
Shortest bob interval
Invisible Layers Bob
8–10 weeks
Most subtle layering
Side-Parted Bob
Same as underlying cut
Styling change, not cut change
Shoulder-Length Layered Bob
8–10 weeks
Best for length retention
Final Thoughts
Bob haircuts for women over 50 with thin hair prove that thinning doesn’t mean sacrificing style. Whether you prefer a stacked bob, an inverted bob, or a textured lob, the key is choosing a cut that removes weight, adds volume, and works with your natural texture. These 15 bobs are designed to make your mornings easier, your hair look fuller, and your confidence soar. Take this guide to your stylist, discuss which option aligns with your face shape, thinning pattern, and lifestyle, and get ready to discover how beautiful a bob can be on thin hair.
The 17 medium hairstyles for busy women in this guide prove that you do not need hours in front of a mirror to look put-together. Between work, family, errands, and everything else life throws at you, your hair should be the least stressful part of your day. Medium length hair—falling between the chin and collarbone—offers the perfect balance of style and convenience. It is long enough to pull back in seconds but short enough to dry quickly and hold its shape. Whether you have fine hair, thick hair, curly hair, or straight hair, there is a medium cut here that will respect your time and still look polished. In this guide, we will explore seventeen medium hairstyles for busy women, complete with why each works, how to style it, best face shapes, and maintenance needs.
Why Medium Length Is Perfect for Busy Women
Medium length hair offers unique advantages when your schedule is packed:
Dries in under 10 minutes with a blow-dryer
Long enough to pull back into a ponytail, bun, or claw clip
Short enough to prevent tangles and morning knots
Holds volume better than long hair
Versatile for all occasions from work to workouts to evenings out
Grows out gracefully so you can stretch between salon visits
The 17 Medium Hairstyles for Busy Women
1. Textured Lob (Long Bob)
The lob hits between the chin and collarbone with soft texture throughout. It is the ultimate low-maintenance medium cut.
Why it works: The texture hides any unevenness from air-drying. The length is versatile—wear it down, half-up, or in a low ponytail.
How to style it: Apply texturizing spray to damp hair. Scrunch and air-dry. For a polished look, blow-dry using a round brush for 5 minutes.
Best face shapes: Oval, round, square. The length elongates round faces.
Maintenance needs: Trim every 8–10 weeks.
2. Shoulder-Length Layered Cut
Soft, blended layers throughout shoulder-length hair add movement and volume without requiring constant styling.
Why it works: The layers prevent the dreaded triangle shape. Air-drying looks intentional. The cut works on straight, wavy, or curly hair.
How to style it: Apply volumizing mousse to damp hair. Blow-dry using your fingers or a round brush for 5 minutes. Or simply air-dry and go.
Best face shapes: Oval, round, heart. The layers soften all face shapes.
Maintenance needs: Trim every 8–10 weeks.
3. Medium Length Shag
The shag features choppy, disconnected layers with the shortest layers at the crown. It is designed to look good messy.
Why it works: The choppiness hides grow-out between salon visits. Air-drying enhances the texture rather than fighting it.
How to style it: Apply texturizing spray to damp hair. Scrunch as you blow-dry with a diffuser, or air-dry completely. Do not brush.
Best face shapes: Oval, square, heart. The crown volume flatters all.
Maintenance needs: Trim every 8–10 weeks. Looks better grown out.
4. Chin-Length Bob with Soft Layers
This classic bob hits at the chin with soft, blended layers. It is polished but not fussy.
Why it works: The chin length draws attention to your jawline. The soft layers prevent the bob from looking helmet-like.
How to style it: Blow-dry using a round brush, tucking the ends under slightly. Takes 5 minutes. For faster styling, air-dry and use your fingers to tuck the ends.
Best face shapes: Oval, round, square. The length balances wider faces.
Maintenance needs: Trim every 6–8 weeks.
5. Low-Maintenance Medium Cut
This cut is specifically shaped so that air-drying looks intentional. No blow-dryer required.
Why it works: The layers are subtle. The ends are textured. This cut delivers style with zero effort.
How to style it: Wash and condition. Towel-dry gently. Apply a lightweight leave-in conditioner. Use your fingers to push the hair in the direction you want it to dry. Air-dry completely. That is it.
Best face shapes: Oval, round, heart. The softness flatters all.
Maintenance needs: Trim every 8–10 weeks.
6. Medium Length Cut with Face-Framing Layers
Face-framing layers start at the cheekbones or chin, drawing attention to your eyes and softening your features.
Why it works: The face-framing pieces do the work of bangs without the maintenance. They add interest to simple styles.
How to style it: Blow-dry using a round brush, directing the face-framing pieces away from your face. Takes 3–5 minutes.
Best face shapes: Oval, round, square. The layers soften jawlines.
Maintenance needs: Trim every 8–10 weeks.
7. Messy Medium Length Shaggy Bob
The shaggy bob (shob) is a hybrid between a shag and a bob. Choppy layers throughout with a bob perimeter.
Why it works: The shagginess hides any bad hair days. The bob shape keeps it from looking too wild.
How to style it: Apply texturizing spray to damp hair. Scrunch and air-dry. The messier, the better.
Best face shapes: Oval, heart, round. Crown volume balances round faces.
Maintenance needs: Trim every 8–10 weeks.
8. Collarbone-Length Cut with Soft Waves
This cut hits exactly at the collarbone with soft, undone waves. It looks like you tried, but you did not.
Why it works: The collarbone length is universally flattering. Soft waves add movement and hide any uneven texture.
How to style it: Apply sea salt spray to damp hair. Twist sections loosely and let air-dry. Or use a large curling iron for 3 minutes to create loose waves.
Best face shapes: Oval, round, square. The length elongates round faces.
Maintenance needs: Trim every 8–10 weeks.
9. Medium Length Cut with Curtain Bangs
Curtain bangs are parted down the middle and curve to each side. They blend into face-framing layers.
Why it works: Curtain bangs hide forehead lines and grow out beautifully—no awkward in-between phase.
How to style it: Blow-dry the bangs using a small round brush, directing left to left and right to right. Takes 2 minutes. The rest can air-dry.
Best face shapes: Oval, round, heart. Curtain bangs elongate round faces.
Maintenance needs: Bangs every 5–6 weeks. Length every 8–10 weeks.
10. Sleek Medium Bob
For women who prefer a polished look, a sleek medium bob delivers. The hair is cut blunt or with very subtle layers.
Why it works: A sleek bob takes 5 minutes to flat-iron but looks like you spent 30. It is professional and put-together.
How to style it: Apply heat protectant. Blow-dry using a paddle brush, then flat-iron quickly. Takes 7–10 minutes total.
Best face shapes: Oval, heart, diamond. The sleekness highlights bone structure.
Maintenance needs: Trim every 5–6 weeks. Sleek styles show growth faster.
11. Medium Length Cut with Side-Swept Bangs
Side-swept bangs sweep diagonally across the forehead. They are low-maintenance and universally flattering.
Why it works: The diagonal line creates a slimming effect. The bangs hide forehead lines without constant trimming.
How to style it: Blow-dry the bangs using a round brush, sweeping them across your forehead. Takes 1 minute. The rest can air-dry.
Best face shapes: Round, square, heart. The diagonal line flatters round faces.
Maintenance needs: Bangs every 4–5 weeks. Length every 8–10 weeks.
12. Asymmetrical Medium Cut
One side is slightly longer than the other. The asymmetry adds visual interest without adding styling time.
Why it works: Asymmetry draws the eye diagonally, creating a slimming effect. The cut looks intentional even when air-dried.
How to style it: Style as a standard medium cut. The asymmetry does the work. Air-dry or blow-dry in 5 minutes.
Best face shapes: Oval, heart, diamond. Avoid if you have a very round face.
Maintenance needs: Trim every 6–8 weeks. Asymmetry loses contrast as hair grows.
13. Curly Medium Length Cut
For women with natural curls, a medium length cut with layers removes weight and allows curls to spring up.
Why it works: Curly hair is naturally wash and wear. A medium cut with layers prevents triangle head and adds bounce.
How to style it: On soaking wet hair, apply leave-in conditioner and curl cream. Scrunch upward. Air-dry or diffuse for 5 minutes. Do not brush.
Best face shapes: All face shapes. Curls flatter everyone.
Maintenance needs: Trim every 8–10 weeks. Deep condition weekly.
14. Medium Length Cut with Deep Side Part
A deep side part creates instant volume and asymmetry without changing the cut itself.
Why it works: The deep part lifts the roots on the heavier side, creating the illusion of more volume. It takes 10 seconds.
How to style it: Create a deep side part while hair is damp. Blow-dry the heavier side up and away from your face. Takes 5 minutes.
Best face shapes: Round, oval, square. The deep part adds height to round faces.
Maintenance needs: Trim every 8–10 weeks. The part does not affect trim schedule.
15. Blunt Medium Cut with Hidden Layers
This cut looks blunt from the outside but has hidden internal layers that add movement.
Why it works: The blunt perimeter gives the illusion of thick, healthy ends. The internal layers prevent the cut from feeling heavy.
How to style it: Blow-dry smooth using a paddle brush to emphasize the blunt line. Takes 5 minutes. The internal layers do the work.
Best face shapes: Oval, square, oblong. The blunt line adds width to longer faces.
Maintenance needs: Trim every 6–8 weeks. Blunt lines show uneven growth.
16. Medium Length Cut with Textured Ends
The ends are heavily point-cut to create a wispy, piece-y finish. The rest of the cut is simple and smooth.
Why it works: The textured ends add interest without requiring styling. Air-drying enhances the piece-y texture.
How to style it: Apply texturizing spray to damp ends. Air-dry or blow-dry for 3 minutes. The ends will naturally separate.
Best face shapes: Oval, round, heart. The texture softens all.
Maintenance needs: Trim every 8–10 weeks.
17. Wash-and-Wear Medium Cut
This is the ultimate busy woman cut. Shaped to air-dry beautifully with zero products and zero tools.
Why it works: The layers are placed to work with your natural texture. No blow-dryer. No flat iron. No stress.
How to style it: Wash and condition. Towel-dry gently. Shake out your hair with your fingers. Air-dry. That is it.
Best face shapes: Oval, round, heart. The simplicity works on all.
Maintenance needs: Trim every 8–10 weeks. Looks better slightly grown out.
5-Minute Styling Routines for Busy Women
For air-dried texture:
Apply texturizing spray to damp hair
Scrunch with your fingers
Air-dry while you get dressed
Fluff with fingers before walking out
For polished blow-dry:
Apply heat protectant and mousse
Blow-dry using a round brush for 5 minutes
Focus on lifting the roots and turning the ends under
Done
For second-day hair:
Spray dry shampoo at the roots
Massage in with fingers
Pull into a low ponytail or messy bun
Leave out face-framing pieces
For curly hair:
Refresh curls with a spray bottle of water and leave-in conditioner
Scrunch upward
Air-dry for 5 minutes
Go
Quick Maintenance Cheat Sheet for Busy Women
Cut Type
Trim Frequency
Time to Style
Textured lob
8–10 weeks
0–5 minutes
Shoulder-length layered
8–10 weeks
0–5 minutes
Medium length shag
8–10 weeks
0–3 minutes
Chin-length bob
6–8 weeks
3–5 minutes
Low-maintenance cut
8–10 weeks
0 minutes
Face-framing layers
8–10 weeks
2–3 minutes
Messy shaggy bob
8–10 weeks
0–2 minutes
Collarbone waves
8–10 weeks
0–5 minutes
With curtain bangs
Bangs: 5–6 weeks / Length: 8–10 weeks
2 minutes
Sleek medium bob
5–6 weeks
7–10 minutes
With side-swept bangs
Bangs: 4–5 weeks / Length: 8–10 weeks
1 minute
Asymmetrical cut
6–8 weeks
0–5 minutes
Curly medium cut
8–10 weeks
0–5 minutes
Deep side part
8–10 weeks
10 seconds
Blunt with hidden layers
6–8 weeks
5 minutes
Textured ends
8–10 weeks
0–3 minutes
Wash-and-wear cut
8–10 weeks
0 minutes
Final Thoughts
Your time is valuable. The right medium haircut should work with your schedule, not against it. Whether you choose a textured lob that air-dries beautifully, a sleek bob that takes 7 minutes to flat-iron, or a wash-and-wear cut that needs zero styling, the goal is the same: look polished without the stress. Bring photos from this guide to your stylist. Be honest about how much time you have. And enjoy a haircut that finally fits your busy life.
The 12 short pixie haircuts for fine flat hair in this guide prove that thin, limp hair does not have to stay that way. The right pixie cut removes weight, adds texture, and creates the illusion of density and volume that fine hair desperately needs. Unlike longer styles that drag fine hair down, a well-cut pixie lifts at the roots, hides sparse areas, and makes mornings easier. Whether you have genetic fine hair, age-related thinning, or just hair that refuses to hold volume, there is a pixie here that will transform your look. In this guide, we will explore twelve short pixie haircuts for fine flat hair, complete with why each works, how to style it, best face shapes, and maintenance needs.
Why Fine Flat Hair Needs a Pixie Cut
Fine flat hair has unique challenges that longer lengths make worse. Here is why a pixie is your best solution:
Removes weight that pulls fine hair flat against the scalp
Creates lift at the crown where fine hair needs volume most
Hides sparse areas with texture and strategic layering
Requires less product to maintain body than longer hair
Dries in minutes and holds style longer
Prevents the stringy look that longer fine hair often gets
The 12 Short Pixie Haircuts for Fine Flat Hair
1. Textured Pixie with Piece-Y Top
This pixie is short on the sides and back with a longer, heavily textured top cut into visible piece-y sections.
Why it works: The piece-y top creates separation that tricks the eye into seeing more hair. The short sides remove weight so the top can lift. The texture hides any thin areas.
How to style it: Apply volumizing mousse to damp hair. Blow-dry upside down for two minutes. Flip back and use your fingers to piece out the top sections. Finish with dry shampoo at the roots for extra lift.
Best face shapes: Oval, heart, oblong. The height on top balances longer face shapes.
Maintenance needs: Trim every 4–6 weeks. Fine hair shows split ends quickly.
2. Layered Pixie with Crown Volume
This pixie concentrates layers at the crown, creating maximum lift exactly where fine flat hair needs it most.
Why it works: Crown volume lifts the entire face. The short sides and back remove weight, allowing the crown layers to stand up rather than lie flat.
How to style it: Use root-lifting spray on damp crown area. Blow-dry the crown straight up using a small round brush. Do not flatten with your hands as it dries.
Best face shapes: Round, oval, heart. The height elongates round faces.
Maintenance needs: Trim every 5–6 weeks. Crown volume fades as layers grow.
3. Choppy Pixie with Wispy Bangs
Soft, wispy bangs graze the eyebrows while the rest of the pixie is cut with choppy, textured layers.
Why it works: Wispy bangs soften the forehead and draw attention to your eyes. The choppy texture throughout hides thin areas and adds the appearance of density.
How to style it: Blow-dry the wispy bangs using a small round brush, keeping them soft and separated. The rest of the pixie stays textured and piece-y.
Best face shapes: Oval, heart, round. The softness flatters all face shapes.
Maintenance needs: Bangs every 3–4 weeks. Rest of cut every 5–6 weeks.
4. Tapered Pixie with Longer Top
The sides and back are tapered very short (almost shaved), while the top is left longer—usually 1–2 inches.
Why it works: The extreme contrast between the tapered sides and the longer top makes the top look fuller by comparison. The taper also removes maximum weight.
How to style it: Apply lightweight mousse to damp top hair. Blow-dry using your fingers, lifting at the roots. The tapered sides need no styling.
Best face shapes: Oval, heart, diamond. The height flatters angular faces.
Maintenance needs: Sides every 3–4 weeks. Top every 5–6 weeks.
5. Short Shaggy Pixie
This pixie borrows from the shag cut—choppy, disconnected layers throughout, with the shortest layers at the crown.
Why it works: The shaggy texture is a volume powerhouse for fine hair. The choppy layers create movement and hide any sparse areas.
How to style it: Apply texturizing spray to damp hair. Scrunch as you blow-dry with a diffuser. Do not over-brush. The messier, the better.
Best face shapes: Oval, heart, round. Crown volume balances round faces.
Maintenance needs: Trim every 6–8 weeks. The shaggy pixie looks better slightly grown out.
6. Side-Swept Pixie
This pixie features longer layers on top that are swept to one side, creating a diagonal line across the forehead.
Why it works: The diagonal line creates a slimming effect and draws attention away from any thin areas. The sweeping motion also adds the appearance of movement and fullness.
How to style it: Apply volumizing mousse to damp hair. Blow-dry the top sweeping to one side using a round brush. A light hairspray keeps the sweep in place.
Best face shapes: Round, square, heart. The diagonal line elongates round faces.
Maintenance needs: Trim every 5–6 weeks.
7. Asymmetrical Pixie
One side is slightly longer than the other—usually by 1–2 inches. The asymmetry adds visual interest and draws the eye diagonally.
Why it works: Asymmetry creates the illusion of more hair because the eye travels across the shape rather than settling on thin areas. It also adds modern edge.
How to style it: Style as a standard pixie. The asymmetry does the work. A deep side part on the shorter side enhances the effect.
Best face shapes: Oval, heart, diamond. Avoid if you have a very round face.
Maintenance needs: Trim every 5–6 weeks. Asymmetrical cuts lose contrast as they grow.
8. Pixie with Micro Bangs
Micro bangs sit 1–2 inches above the eyebrows. The rest of the pixie is short and textured.
Why it works: Micro bangs draw immediate attention to your eyes and away from any thin areas on the crown. The boldness of the bangs makes the whole cut look intentional.
How to style it: Keep micro bangs pin-straight or slightly piece-y with a dab of texturizing paste. The rest of the pixie stays textured.
Best face shapes: Oval, heart, diamond. Avoid if you have a round face.
Maintenance needs: Micro bangs every 2–3 weeks. Rest of cut every 4–5 weeks.
9. Sleek Pixie with Hidden Volume
This pixie looks smooth and polished on the surface but has hidden internal layers that create lift at the crown.
Why it works: Fine hair can look even thinner with too much visible choppiness. The sleek exterior gives the illusion of density while internal layers provide movement.
How to style it: Apply smoothing serum and heat protectant. Blow-dry using a round brush, lifting at the crown. Flat-iron for sleekness if desired. Finish with a light shine spray.
Best face shapes: Oval, heart, diamond. The sleekness highlights bone structure.
Maintenance needs: Trim every 4–5 weeks. Sleek styles show uneven growth faster.
10. Curly Pixie for Fine Curls
For women with fine curly or wavy hair, a short pixie removes weight and allows curls to spring up with more definition.
Why it works: Fine curls get weighed down easily. A short pixie removes that weight, allowing each curl to bounce up and create the appearance of more density.
How to style it: On soaking wet hair, apply lightweight leave-in conditioner and curl cream. Scrunch upward. Diffuse or air-dry. Do not brush.
Best face shapes: All face shapes. Fine curls can be customized with or without bangs.
Maintenance needs: Trim every 6–8 weeks. Deep condition weekly.
11. Textured Crop with Piece-Y Ends
This cut is very short—usually 1–2 inches all over—but the ends are heavily point-cut to create piece-y, separated texture.
Why it works: Fine hair looks thicker when it is not all lying in the same direction. The piece-y ends create separation that tricks the eye into seeing more hair.
How to style it: Apply a small amount of texturizing paste to dry hair. Use your fingers to pull small sections into piece-y peaks. No blow-dryer needed.
Best face shapes: Oval, heart, square. The texture softens all face shapes.
Maintenance needs: Trim every 4–5 weeks. The piece-y ends need refreshing.
12. Low-Maintenance Wash-and-Wear Pixie
This pixie is shaped so that air-drying looks intentional and polished. No blow-dryer required. No complex products.
Why it works: Fine hair can be over-manipulated. This cut respects that. The layers are cut to fall naturally when air-dried, so you can wash and go.
How to style it: Wash and condition. Towel-dry gently. Apply a lightweight leave-in conditioner. Use your fingers to push the hair in the direction you want it to dry. Air-dry completely. That is it.
Best face shapes: Oval, round, heart. The softness flatters all.
Maintenance needs: Trim every 8–10 weeks. This cut looks better slightly grown out.
How to Style a Pixie for Fine Flat Hair for Maximum Volume
The daily routine (5 minutes):
Apply volumizing mousse or root-lifting spray to damp roots
Blow-dry upside down for 2–3 minutes
Flip back and use your fingers to style—do not use a brush
Apply dry shampoo to dry roots for instant lift and texture
Finish with a light texture spray at the ends
Products that help fine flat hair:
Volumizing mousse
Root-lifting spray
Dry shampoo (apply to dry hair)
Texturizing spray
Lightweight hairspray
Products to avoid:
Heavy creams and butters
Oils and serums (use only a tiny drop on ends if needed)
Thick gels and pomades
Leave-in conditioners not labeled “lightweight”
Styling techniques for fine flat hair:
Always blow-dry upside down
Use a small round brush (1–1.5 inches) for crown lift
Do not touch your hair while it is drying—touching creates flatness
Dry shampoo is not just for day two—use it on clean, dry hair for instant volume
Quick Maintenance Cheat Sheet for Fine Flat Hair
Cut Type
Trim Frequency
Special Notes
Textured pixie with piece-y top
4–6 weeks
Piece-y ends need refreshing
Layered pixie with crown volume
5–6 weeks
Crown volume fades
Choppy pixie with wispy bangs
Bangs: 3–4 weeks / Rest: 5–6 weeks
Bangs need attention
Tapered pixie with longer top
Sides: 3–4 weeks / Top: 5–6 weeks
Taper needs frequent upkeep
Short shaggy pixie
6–8 weeks
Looks better grown out
Side-swept pixie
5–6 weeks
Sweep needs refreshing
Asymmetrical pixie
5–6 weeks
Loses contrast
Pixie with micro bangs
Bangs: 2–3 weeks / Rest: 4–5 weeks
Most high-maintenance
Sleek pixie with hidden volume
4–5 weeks
Shows growth fast
Curly pixie for fine curls
6–8 weeks
Deep condition weekly
Textured crop with piece-y ends
4–5 weeks
Ends need refreshing
Low-maintenance wash-and-wear
8–10 weeks
Looks better grown out
Final Thoughts
Fine flat hair does not have to limit your style. The right short pixie haircut can transform thin, limp strands into a voluminous, textured style that looks intentionally full and healthy. The key is removing weight, adding texture, choosing the right product, and mastering a few simple styling techniques. Work with a stylist who understands fine hair. Bring photos from this guide. And get ready to love hair that finally has the lift and body you have always wanted.